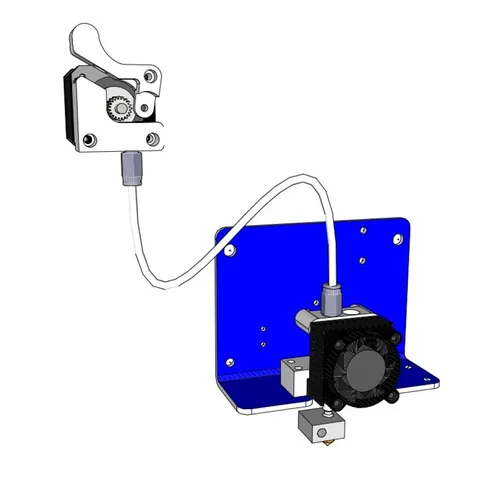
QU-BD MBE Bowden Experiment-1 - ord bot mount
prusaprinters
This (untested) design has 3 printable parts. These can be used to convert a stock qu-bd extruder to use a bowden tube. Note that this is an experiment. I currently do not have any mount for the drive portion, once I get it working I'll work that out. My goal is to get 2 print heads as close as possible mounted on the ord-bot. I believe I can get them closer by removing the drive motors (thus bowden) At the moment i do not believe I can use the body block from the MBE. Those 6mm tapped holes are probably too close together. This first draft is intended to help me debug the whole bowden concept non-printed parts: qu-bd MBE extruder kit Straight Quick Connectors Pneumatic Fittings 4mm x 1/8" PT Male Thread (10 for 7.26 on ebay @ http://www.ebay.com/itm/321061698459 1M PTFE/Teflon Tubing/Pipe OD 4mm ID 2mm Tubing - (1m/$5 on ebay, search "ptfe 2mm 4mm") 1x 624 bearing (ebay 10/$5) 3x M3 screws to mount the drive parts to the stepper motor M4 screw for bearing. (I printed the lever/bearing hole a little small so I could use a #4 screw) Spring (I had one in a box, it was the diameter of a pencil, and around 1 inch long. I think I got it in a kit from Home Depot) update 10/9/14 I have been printing with this setup for over a month. I am using the water cooled hot end from thing:280314 instead of this air cooled one, but I would expect similar results. I consider the bowden setup a success (had to increase the retract compared to a virgin MBE to eliminate stringing.) At this point I'm more interested in perfecting the water cooled extruder so I'll post further updates there. Print instructionsCategory: Other Summary This (untested) design has 3 printable parts. These can be used to convert a stock qu-bd extruder to use a bowden tube. Note that this is an experiment. I currently do not have any mount for the drive portion, once I get it working I'll work that out. My goal is to get 2 print heads as close as possible mounted on the ord-bot. I believe I can get them closer by removing the drive motors (thus bowden) At the moment i do not believe I can use the body block from the MBE. Those 6mm tapped holes are probably too close together. This first draft is intended to help me debug the whole bowden concept non-printed parts: qu-bd MBE extruder kit Straight Quick Connectors Pneumatic Fittings 4mm x 1/8" PT Male Thread (10 for 7.26 on ebay @ http://www.ebay.com/itm/321061698459 1M PTFE/Teflon Tubing/Pipe OD 4mm ID 2mm Tubing - (1m/$5 on ebay, search "ptfe 2mm 4mm") 1x 624 bearing (ebay 10/$5) 3x M3 screws to mount the drive parts to the stepper motor M4 screw for bearing. (I printed the lever/bearing hole a little small so I could use a #4 screw) Spring (I had one in a box, it was the diameter of a pencil, and around 1 inch long. I think I got it in a kit from Home Depot) update 10/9/14 I have been printing with this setup for over a month. I am using the water cooled hot end from thing:280314 instead of this air cooled one, but I would expect similar results. I consider the bowden setup a success (had to increase the retract compared to a virgin MBE to eliminate stringing.) At this point I'm more interested in perfecting the water cooled extruder so I'll post further updates there.
With this file you will be able to print QU-BD MBE Bowden Experiment-1 - ord bot mount with your 3D printer. Click on the button and save the file on your computer to work, edit or customize your design. You can also find more 3D designs for printers on QU-BD MBE Bowden Experiment-1 - ord bot mount.
