Qidi X-Max (X-Plus) Quick Change Extruder Carriage MKII
prusaprinters
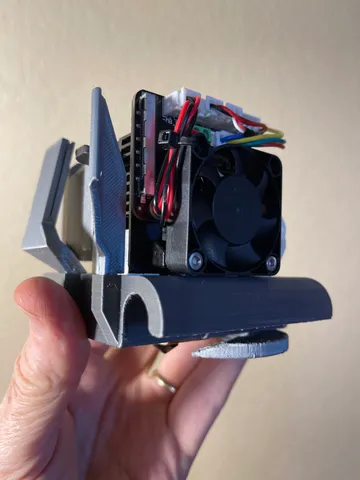
Updated June 2022This carriage fits the Qidi X-Max (X-Plus) where the bearings are 29mm L, 19mm O.D., 10mm I.D.The stock Qidi X-Max carriage it is a pain in the you know what to switch between the low temp to the high temp extruders.This design moves the belt clip to the side so that the carriage can be slipped between the belts and thus the extruder can remain attached to the carriage.Only one screw needs to be removed: The Belt Clip which can be accessed from the top or via the door.The layer fan duct snaps into place so no need for screws.There is no cover which provides great visibility and easy maintenance access.If your printer is making unsettling noises it is because the gantry (X-Axis) bars are spaced 69.5mm from center to center, but the Qidi carriage has a spacing of 70mm. This results in noise from binding and resistance, especially when the carriage is moved closer to the sides. I assume that the bar design spacing was supposed to be 70mm. Qidi knows about this issue, but apparently are not going to fix it.In addition the bearing spacing not matching the bar spacing there are plenty of other reasons the print your own carriage:The Qidi carriage screw bosses that support the extruder are not the same height.The Qidi carriage is often warped, i.e., not flat. you can test this by setting your empty carriage on a flat surface to see if it rocks.The Low Temp extruder hot end fins run into the carriage cavity wall causing the extruder to lean forward.These three issues cause the nozzle to be at an angle with relation to the bed which is definitely not desirable.Additionally the stock Qidi carriage has the following issues:Sharp edges caused by the molding process are sharp enough to cut your hands.The fan duct is only on one side so the layer cooling is uneven. You can confirm this with Hume Beam's Overhang Test. Or you can just look at the example on his Draken fan duct page.PrintingSupport and other information is included in the file download notes. Make sure not to use supports everywhere when printing the duct.Enhanced PLA can be used for the low temp extruder carriage. For the high temp extruder use a high temp filament such as polycarbonate or PETG.All the parts are orientated for printing. Where supports are called for, they should be set for touching the build plate only.Post-PrintingRequires one M3 nut and screw for the belt clip. The rest of the parts are friction fit, but can glued if desired.I placed heat insulating fiber washers between the extruder and the extruder support bosses. I was able to get #8 washers at a big box hardware store. They are ~0.3mm thick and protect the bosses from deformation.InstallationWatch how to switch carriages here: https://youtu.be/J-BsMNNPrB4When installing/uninstalling the carriage, be sure to provide opposing support for the bars.Work on the front end first. Once the carriage has been lifted off the bearings, move the bearing to the side. This allows the carriage to rest directly on the bars.After the front end, work on the back end and again move the bearings to the side.The belt will slip between the extruder motor and the carriage without the need to remove the extruder.Two PFTE slip fittings are included: 4mm & 6mmThe fan duct is not compatible with the High Temp extruder.
With this file you will be able to print Qidi X-Max (X-Plus) Quick Change Extruder Carriage MKII with your 3D printer. Click on the button and save the file on your computer to work, edit or customize your design. You can also find more 3D designs for printers on Qidi X-Max (X-Plus) Quick Change Extruder Carriage MKII.