Pulley and M8 Threaded Clips for Filament Rollers
prusaprinters
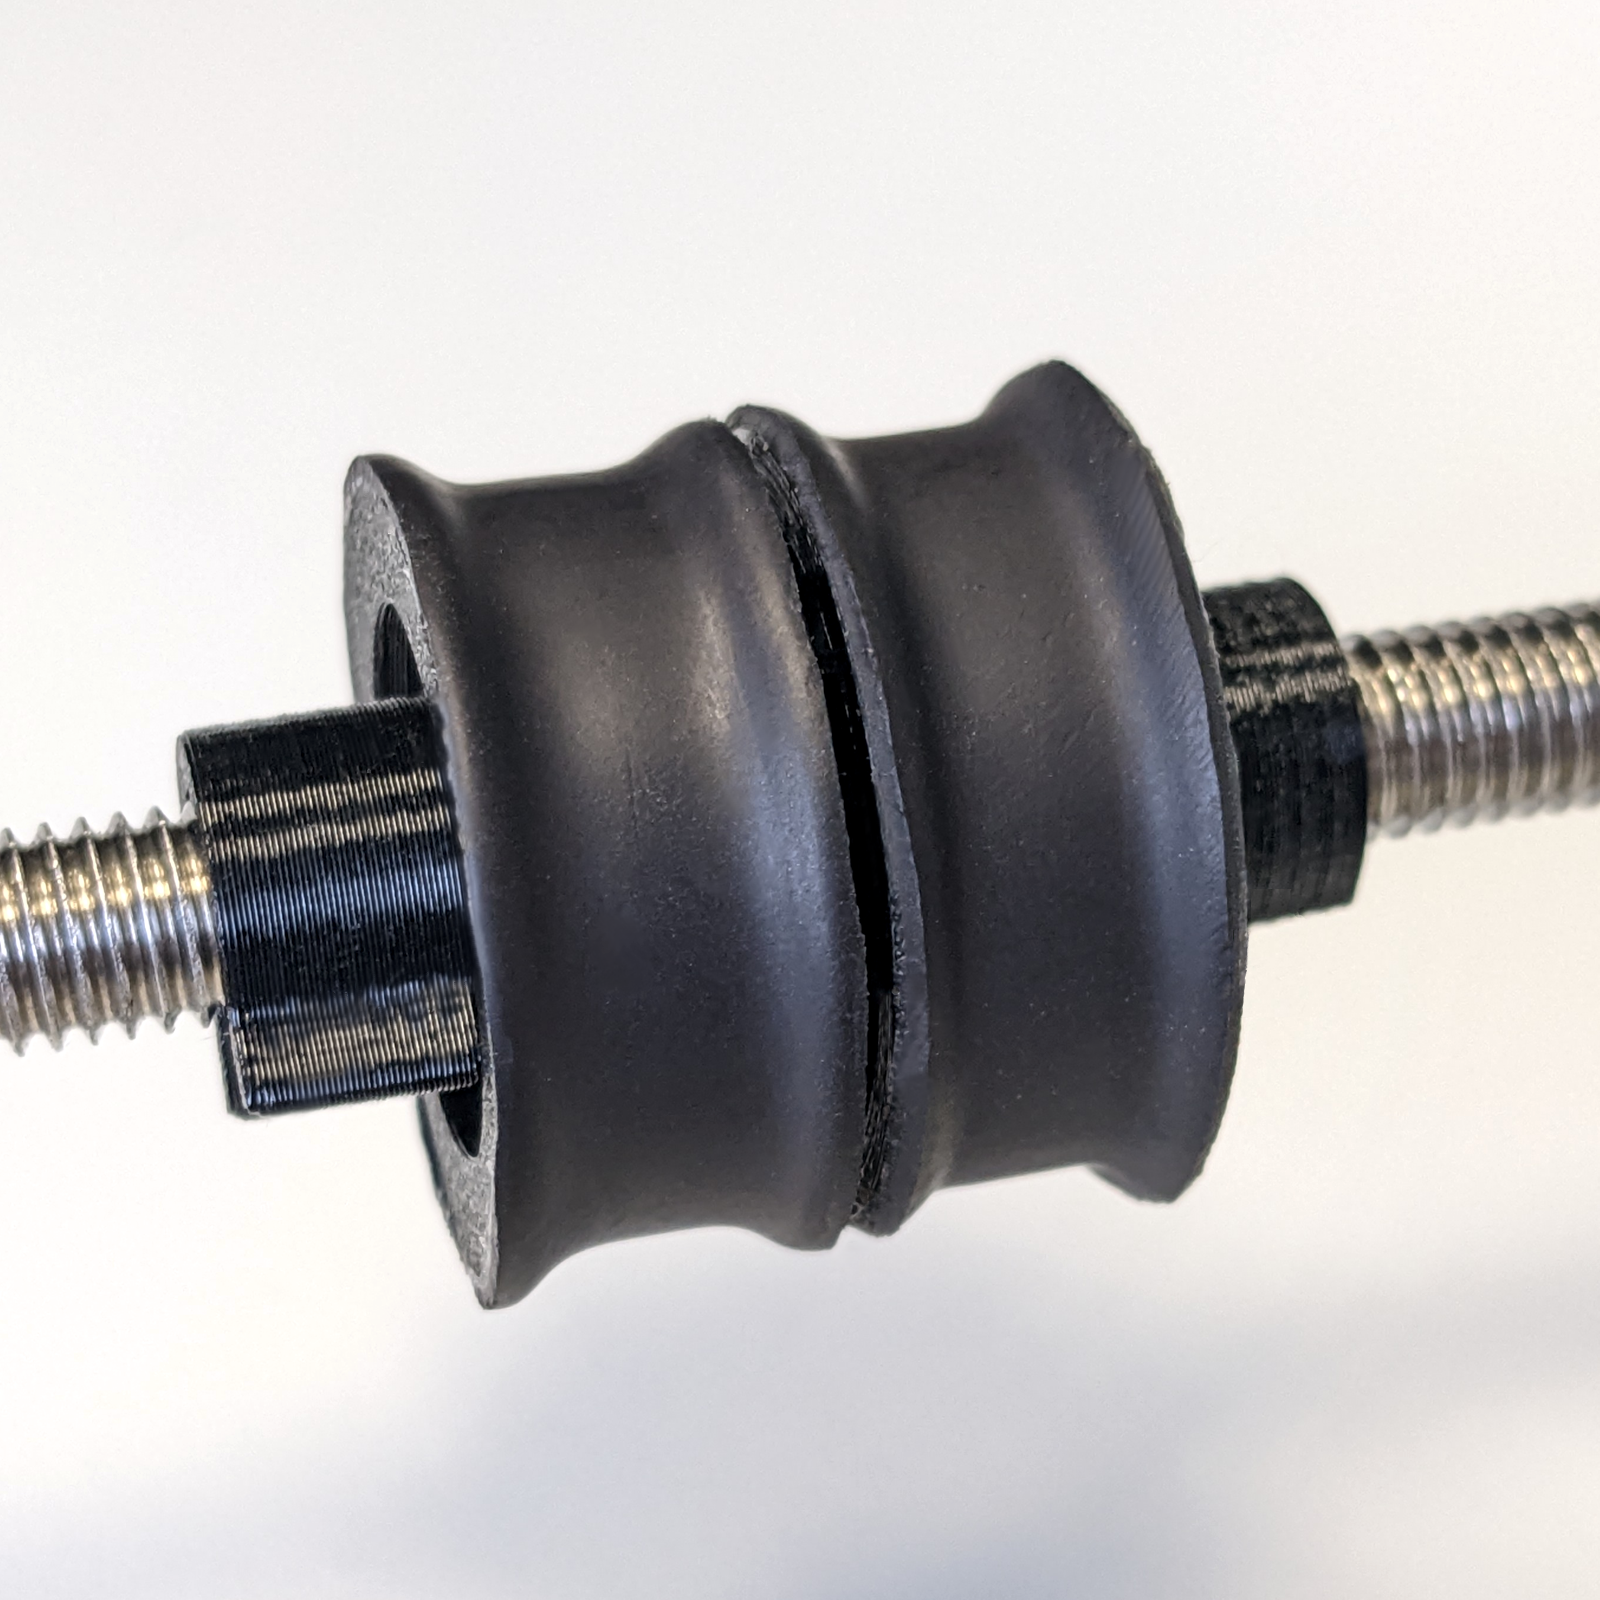
<p>For building a filament dry box I needed some pulleys to be mounted on M8 threaded rods for the filament spools to roll on. I decided to use 608 bearings and designed some threaded clips to align the pulleys, keep them in place and to allow for fast rearrangement of the pulleys when putting in a spool with different width. In addition I was unhappy with how most spools ran on (PETG) printed pulleys so I optimized the pulley to be working with heat shrink glued tube. This solution has worked perfectly for me for years now, is relatively inexpensive and long lasting. And for many builders I consider this simpler than going the path of printing Flex material. </p><h4>Model Details</h4><p><strong>Pulley and Bearing Press Tool</strong></p><figure class="table"><table><tbody><tr><td><figure class="image"><img src="https://media.printables.com/media/prints/322021/rich_content/fb7e083d-d62f-4870-811b-910585ea2b99/pulley.png#%7B%22uuid%22%3A%220af0280d-9514-4cdc-a836-9c1c145400b4%22%2C%22w%22%3A1305%2C%22h%22%3A969%7D"></figure></td><td><figure class="image"><img src="https://media.printables.com/media/prints/322021/rich_content/9f103a3d-455f-4fa1-9a99-5bca2542c7c1/pulley_cut.png#%7B%22uuid%22%3A%224fa75178-07d7-4e1a-aeee-218503ed69ab%22%2C%22w%22%3A1305%2C%22h%22%3A969%7D"></figure></td><td><figure class="image"><img src="https://media.printables.com/media/prints/322021/rich_content/32aa323a-db4b-41fa-a720-ce71d8a28c63/press-tool.png#%7B%22uuid%22%3A%22c228a46e-eaca-46b3-8b2d-656337f7c0d6%22%2C%22w%22%3A1305%2C%22h%22%3A969%7D"></figure></td></tr></tbody></table></figure><p>There is not much to say. It shows the pulley with a bearing and heat-shrink tube on the outside. The third picture shows the bearing press tool. Please note that you should press in the bearing <i><strong>before </strong></i>heat-shrinking the tube around the latter as this will most probably mess up the small tolerances of the pulley and makes pressing-in the bearing unnecessarily difficult.</p><p><strong>Threaded Clips</strong></p><figure class="table"><table><tbody><tr><td><figure class="image image_resized" style="width:64.97%;"><img src="https://media.printables.com/media/prints/322021/rich_content/2362490f-fb71-4b02-b284-1cfbe83a7ba1/clips.png#%7B%22uuid%22%3A%22905e4cbe-9b67-45c5-8ba5-1d5a90ab5fa2%22%2C%22w%22%3A1306%2C%22h%22%3A793%7D"></figure></td></tr></tbody></table></figure><p>Using standard M8 nuts (and washers if you like) of course works for holding the assembled pulleys in place, but it often is a pain to work with: It takes a long time to rearrange, you need multiple nuts for counter-locking them in place, you cannot take the nuts out or add additional ones if required without disassembling the complete gantry. So here are some threaded clips instead.</p><p>Most clips have a cut-out / phase on one / both ends so the clip does not interfere with the rotating bearing. The clip itself is small enough to not interfere with the pulley. The other two clips without cut-out / phase are intended to be used as spacers or to hold other parts than bearings in place.</p><p>With these clips it is possible to freely adjust the position of the pulleys, remove unneeded clips e.g. when you want two pulleys to be very close to each other (with just the small center clip in between the two), and add additional clips when you need it. In my case, where I use one and the same Dry Box for sometimes 3 or 4 or 5 spools, such clips are a great help. Also printed in PETG they have worked reliably for years.</p><p><strong>Usage of Clips</strong></p><p>In general, you should be able to just clip-on the clips to the M8 threaded rod. Check that it sits straight at the end. For me it works out just fine at least 9 out of 10 times and with a bit of experience you will notice while clipping it on, if the clip is “twisted” (and you can just redo it).</p><p>The reason for the clip sometimes being clipped-on “twisted” actually lies in the very nature of the thread and what happens while clipping it on: While the thread-pitch is unidirectional, while clipping it on the thread one side will be “pushed” into the direction of the pich, but the other in the opposite direction. This is somehow compensated for in the thread guides in the clip, but I don't think there is a perfect solution.</p><p><strong>Example Setup</strong></p><figure class="table"><table><tbody><tr><td><figure class="image"><img src="https://media.printables.com/media/prints/322021/rich_content/022df2fa-9f5b-4dc1-a590-570f86c62be1/single_pulley_side.png#%7B%22uuid%22%3A%22c4ea2e73-636c-434a-b0c9-2d83ee4ae1a6%22%2C%22w%22%3A1148%2C%22h%22%3A1119%7D"></figure></td><td><figure class="image"><img src="https://media.printables.com/media/prints/322021/rich_content/a56b74da-a72b-4ac6-8a28-89f7f3be3ae4/singel_pulley.png#%7B%22uuid%22%3A%22af827996-5cf4-4c04-b2b6-e063e367d72b%22%2C%22w%22%3A1119%2C%22h%22%3A1148%7D"></figure></td><td><figure class="image"><img src="https://media.printables.com/media/prints/322021/rich_content/ae826c03-3a89-4fe0-9cf8-793df987318d/single_pulley_cut.png#%7B%22uuid%22%3A%22a4477bf5-cd53-4706-af52-e6c95d2fd85f%22%2C%22w%22%3A1119%2C%22h%22%3A1148%7D"></figure></td></tr></tbody></table></figure><p> </p><figure class="table"><table><tbody><tr><td><figure class="image"><img src="https://media.printables.com/media/prints/322021/rich_content/ad537a0a-3322-4bc7-babc-d375625aa484/example_1.png#%7B%22uuid%22%3A%22acce99bc-6b51-47c0-8ec9-f4ebfd422433%22%2C%22w%22%3A1600%2C%22h%22%3A1600%7D"></figure></td><td><figure class="image"><img src="https://media.printables.com/media/prints/322021/rich_content/c9e285d8-d319-451a-980b-a213a2e5f1ef/example_2.png#%7B%22uuid%22%3A%222d6cd091-198b-4c32-b004-1272ba40df1f%22%2C%22w%22%3A1600%2C%22h%22%3A1600%7D"></figure></td><td><figure class="image"><img src="https://media.printables.com/media/prints/322021/rich_content/a043cd6b-abc4-4141-884c-c0f17b1f6161/example_3-kopie.png#%7B%22uuid%22%3A%22513ad229-a0f9-4dab-b4fe-7cc6c09d7b4d%22%2C%22w%22%3A1600%2C%22h%22%3A1600%7D"></figure></td></tr></tbody></table></figure><p> </p><h4>Printing and Assembly</h4><p><strong>Printing the Parts</strong></p><ul><li>Filament Type: PETG or similar</li><li>Orientation: Place the correct flat side on the bed so you do not need support</li><li>Support: No</li><li>Layer height: 0.2mm</li><li>Perimeters: 5 (and the pulley and clips will be printed solid)</li><li>Seam position: Random</li><li>Infill: 15% (just relevant for the bearing press tool)</li></ul><p><strong>Required Parts</strong></p><p>For each pulley you need about 2cm of <strong>Heat Shrink Tube with Glue (30mm inner diameter) </strong>which you can source e.g. from <a href="https://www.amazon.de/gp/product/B012TNQWSO/ref=ppx_yo_dt_b_asin_title_o06_s00?ie=UTF8&psc=1">Amazon</a>.</p><p><strong>Assembly</strong></p><figure class="table"><table><tbody><tr><td><figure class="image"><img src="https://media.printables.com/media/prints/322021/rich_content/0ed1a01b-85ec-437a-be13-11ec1aa6c1f1/assembly_01.png#%7B%22uuid%22%3A%22e10af5cb-810b-413c-aa15-aa1c6e19091d%22%2C%22w%22%3A1600%2C%22h%22%3A1600%7D"></figure></td><td><figure class="image"><img src="https://media.printables.com/media/prints/322021/rich_content/e392d36f-ed4f-4101-bfb3-81fd120cf3f5/assembly_02.png#%7B%22uuid%22%3A%223933f0cd-44e6-411a-ba98-d70f5aa97c59%22%2C%22w%22%3A1600%2C%22h%22%3A1600%7D"></figure></td><td><figure class="image"><img src="https://media.printables.com/media/prints/322021/rich_content/162237c8-267f-4712-9899-2d19453b7d2d/assembly_03.png#%7B%22uuid%22%3A%226daa23a6-e946-406a-96ed-9820f5ac9178%22%2C%22w%22%3A1600%2C%22h%22%3A1600%7D"></figure></td><td><figure class="image"><img src="https://media.printables.com/media/prints/322021/rich_content/9d3b36b2-f90c-4185-b1ad-7979be4359b2/assembly_04.png#%7B%22uuid%22%3A%22777ae073-e1da-4349-93ee-59b778a4f776%22%2C%22w%22%3A1600%2C%22h%22%3A1600%7D"></figure></td><td><figure class="image"><img src="https://media.printables.com/media/prints/322021/rich_content/0ccbee5b-0ff6-47dd-b4cb-906f0a6ea76e/assembly_05.png#%7B%22uuid%22%3A%2230a4d84f-1759-4cc4-9570-ef6f976a3e85%22%2C%22w%22%3A1600%2C%22h%22%3A1600%7D"></figure></td><td><figure class="image"><img src="https://media.printables.com/media/prints/322021/rich_content/199f61c8-ffee-4f05-add3-04f856410f07/assembly_06.png#%7B%22uuid%22%3A%229b07c9c8-49f6-4e6b-8085-8cb2adec19de%22%2C%22w%22%3A1600%2C%22h%22%3A1600%7D"></figure></td></tr></tbody></table></figure><ul><li>Put the bearing in the cap of the bearing perss tool, the printed pulley in to the cup</li><li>Align the bearing with cap on the pulley</li><li>Firmly press the bearing into the pulley, ideally by using a vice</li></ul><figure class="table"><table><tbody><tr><td><figure class="image"><img src="https://media.printables.com/media/prints/322021/rich_content/d3a96a14-e1cb-40b5-afe6-b7967407b4f5/assembly_07.png#%7B%22uuid%22%3A%225e776529-a583-4300-b7bc-193216a520a1%22%2C%22w%22%3A1600%2C%22h%22%3A1600%7D"></figure></td><td><figure class="image"><img src="https://media.printables.com/media/prints/322021/rich_content/a306b598-d367-459c-b5be-069581d0f1f6/assembly_08.png#%7B%22uuid%22%3A%222f550af5-ef58-4681-b2d2-5bc17cfc33ab%22%2C%22w%22%3A1600%2C%22h%22%3A1600%7D"></figure></td><td><figure class="image"><img src="https://media.printables.com/media/prints/322021/rich_content/0b9047a6-3461-4f9a-ba96-b1773ce80129/assembly_09.png#%7B%22uuid%22%3A%22cb527446-fc23-4774-afad-c5876273bc61%22%2C%22w%22%3A1600%2C%22h%22%3A1600%7D"></figure></td><td><figure class="image"><img src="https://media.printables.com/media/prints/322021/rich_content/427b8023-7fab-4500-9f10-41e71435d1c9/assembly_10.png#%7B%22uuid%22%3A%22ab19aa3f-96fd-4fbe-a023-b17b0c5ba0b9%22%2C%22w%22%3A1600%2C%22h%22%3A1600%7D"></figure></td><td><figure class="image"><img src="https://media.printables.com/media/prints/322021/rich_content/cf1d5eac-84fb-47ee-b658-0521298ad8c1/assembly_11.png#%7B%22uuid%22%3A%224327e8e0-4383-43b4-b5eb-9951dac9f261%22%2C%22w%22%3A1600%2C%22h%22%3A1600%7D"></figure></td><td><figure class="image"><img src="https://media.printables.com/media/prints/322021/rich_content/6e7ec708-f75d-4c0e-ace9-887f00f1ddda/assembly_13.png#%7B%22uuid%22%3A%220faf3688-b26a-439c-a83e-a32c34504dfe%22%2C%22w%22%3A1600%2C%22h%22%3A1600%7D"></figure></td></tr></tbody></table></figure><ul><li>Put the pulley on an M8 threaded rod and hold it in place with one nut on each side</li><li>Cut ~2cm of the heat shrink tube and put it around the pulley</li><li>Slowly apply heat with a heat gun to the center of the pulley. Turn the pulley to shrink the tube evenly all around the pulley; you can also help a bit by pushing the tube with your finger (use gloves ;-) )into the corners</li><li><strong>IMPORTANT: Try to avoid shrinking the tube too much on the left and right side of the pulley as this will make it much harder to cut off the left over shrink tube in the next step! In case it is not glued on perfectly (which you will note when cutting the tube in the next step) it is no problem to finish it up with the heat gun at the very end.</strong></li><li>Cut-off the overhanging tube with a sharp knife (using the sides of the pulley as guides) so that the tube is flush to the sides of the pulley</li></ul>
With this file you will be able to print Pulley and M8 Threaded Clips for Filament Rollers with your 3D printer. Click on the button and save the file on your computer to work, edit or customize your design. You can also find more 3D designs for printers on Pulley and M8 Threaded Clips for Filament Rollers.