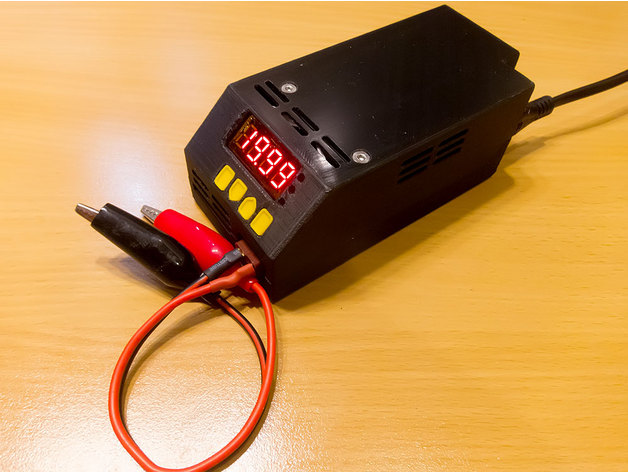
PSU to Serve (Laboratory Power Supply)
thingiverse
That is the renowned "Laboratory" Power Supply Unit. Essential for powering and measuring devices used in DIY projects. For a long time, I relied on a laptop power supply with a voltage switch (after equipping it with one of those $1 3-digit voltmeters) + StepDown. Very efficient and inexpensive setup, indeed. However, not ideal when you own a 3D Printer. Finally, I was ready to invest two days in a new project, and now I'm happy to share the results with you. The PSU features a regulated output voltage of 0...23.5V, current limit set up to 3A, and a small form-factor design. To create one yourself, you'll need the following components (most of which will require modification, but nothing too complicated): 1) A 24V 6A PSU available from various sources. I found an affordable option here: EDT-100W AC-DC Converter 110V 220V to 24V DC 6A Power Supply Switching Transformer. We'll be loading no more than 24Vx3A (90% efficient) - a maximum of 75W in a well-ventilated device, which should be sufficient. The price is less than $5! I didn't encounter any issues with the components used to build this PSU. 2) A StepDown module with all necessary settings and limits, B3603. Mine was purchased years ago from Banggood for $12.10 (the current price is also around $12.10). You can likely find it cheaper. This module is based on LM2596, which has a 3A current limit (well-ventilated, again). 3) A mini360 step-down similar to the one available from Banggood (I bought five for $0.70 each). I used this module to power a 12V air fan (instead of dropping the 24V to 12V using a resistor, which would generate too much heat and lack speed regulation). 4) A C7 Power Socket. 5) A 13x8mm Rocker Power Switch (I couldn't find my Aliexpress switch source now, but you should be able to locate them). 6) A 12V 40x40x20mm Fan - I used a Sanyo Denki KDE1204PKV1 Maglev fan because I had some on hand. Use any fan you have with a grill. 7) Deans T-Plug Male Connector ("Dean") (you'll also need the female connector part). 8) M2-M3 Screws, wirezzz... Alligator clips! Before assembly (refer to the uploaded photos for details): 1) 24V 6A PSU - desolder the 24V 2-pin connector and right capacitor, then resolder the capacitor to the ex-connector place (and the wires going to StepDown to be soldered to the ex-capacitor place). 2) B3603 StepDown - desolder inter-board connectors, replace them with wires (to move the controller board to the device's front side apart from the power board located at the top). Desolder both power 2-pin connectors. 3) mini360 - fine as is, but don't forget to adjust it for a 12V output. One tip: mini360 is based on MP2307 chip, which has a high input voltage limit of 23V (not 24V), so you should lower the voltage from the 24A 6A PSU before - any diode or two will be sufficient. Alternatively, you can try setting up without diodes since the maximum limit is around 26V. As for me, I decided not to take the risk (PSU to serve, not to fry). 4) The C7 Socket required melted-in nuts due to my oversight in designing M2 nut holders behind it. Check the photos. 5) Fine as is. 6) Cut wires, solder them to the mini360 output, then solder the mini360 input to the 24V 6A output - that's it. 7) How to fix the T-Plug Male firmly inside the case? Easy! Make two half-holes on both plug sides so that later you can secure it with 2 M3 screws. Check the photos. 8) Yes! Cut, flux, solder. Cut. Screw. Fun. Dimensions: 135x63x51mm, weight 300g. On 3D printed parts - you'll need to print Case Top+Bottom and Buttons. My setup was printed using all PLA, black, and yellow. I tried to design it with minimal supports but needed air holes and some screw holes to have support, so I used the auto-support generation feature. Questions? Welcome!
With this file you will be able to print PSU to Serve (Laboratory Power Supply) with your 3D printer. Click on the button and save the file on your computer to work, edit or customize your design. You can also find more 3D designs for printers on PSU to Serve (Laboratory Power Supply).
