Prusament Ptolemaic Clock
prusaprinters
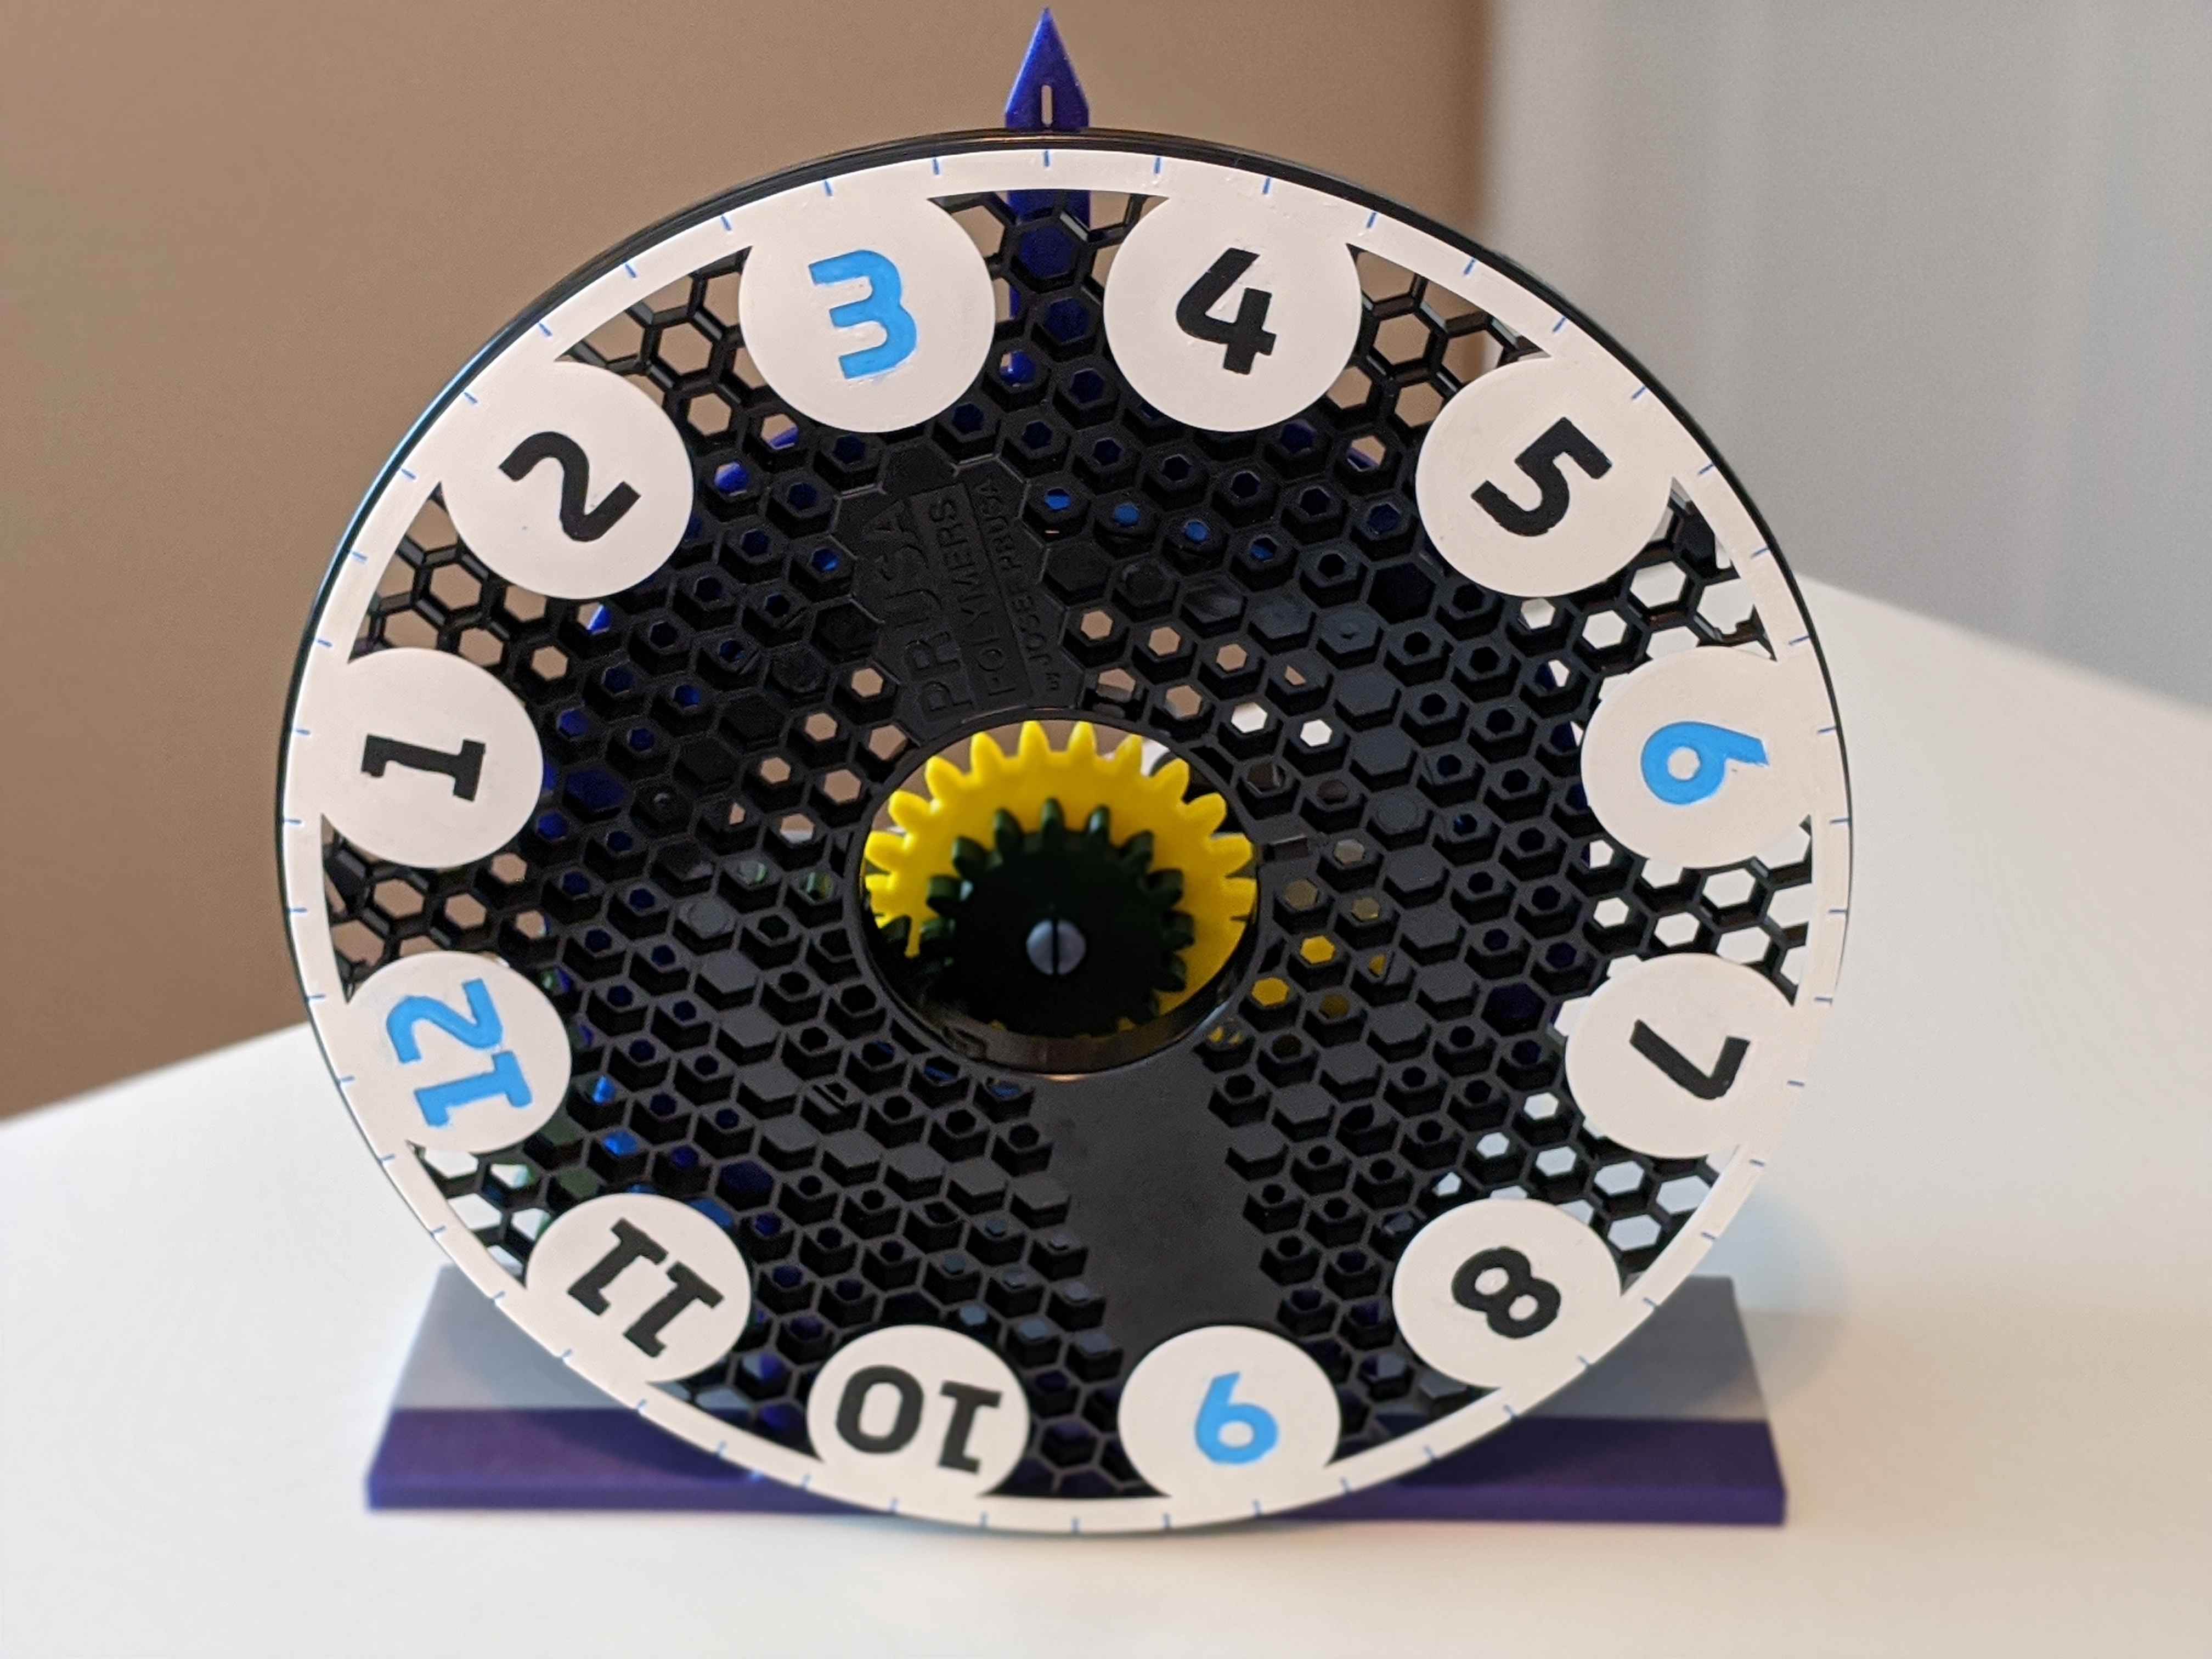
<p><i>"What time is it? It's time for more filament!"</i></p> <p>A Ptolemaic clock is one where the face rotates and the hands remain fixed. Using an empty Prusament filament spool, you can print this stylish clock to decorate your print space.</p> <p>To effectively use this model, you'll need a high torque clock motor (a regular clock motor won't be strong enough to move the gears) and 4 skate bearings.</p> <h3>Print instructions</h3><h3>Prusament Ptolemaic Clock</h3><p>See it in action: <figure class="media"> <oembed url="https://www.youtube.com/embed/is8tIGitBqI"></oembed> </figure> (<a href="https://www.youtube.com/watch?v=is8tIGitBqI" target="_blank">On YouTube</a>) </p><p>If you'd like to make any changes to the model, it is open source and ready for your contributions on <a href="https://github.com/PizzaBrandon/prusament-ptolemaic-clock">GitHub</a></p><h3>Before you get started...</h3><p><h4>Extra Parts Needed</h4></p> <p>A few extra non-printed parts are needed to make this clock work: <ul><li><a href="https://www.amazon.com/gp/product/B074DTY1H7">High-Torque Clock Motor</a></li><li><a href="https://www.amazon.com/gp/product/B0045F7FJ0">(4) 608-2RS Skate Bearings</a></li><li>Optional: Lubricant left over from the printer assembly</li></ul></p> <p><b><i>Note:</i></b> I do not receive any commission on these product links. They're only provided as example as these are the parts I purchased. If you purchase a different clock motor, please make sure it has the same dimensions or it may not work. If it does not, the OpenSCAD file used to generate the model is open-sourced so you can make whatever changes you need to fit your motor.</p><h3>Printing Guidance</h3> <p><img alt="Rendering of the printed parts for the Prusament Ptolemaic Clock" src="https://i.imgur.com/9jlPiJX.png" width="100%"/>Here is a 3D render of the parts you will print to build this clock. I've color-coded the pieces to make it easier to identify them: <ul><li>Green - Motor and Gear Plate</li><li>Orange - Clock Face Stand</li><li>Red - Clock Motor Gear</li><li>Red/Blue - Second Gear</li><li>Blue/Yellow - Third Gear</li><li>Yellow - Prusament Spindle Gear</li><li>Gold/Green - Clock Face</li></ul></p> <h4>The Gears</h4> <p>The most important factor to make this a functional clock is to print the gears as light as possible to reduce the amount of strain on the clock motor. To do this, you'll want to change a few of the default settings when you print them. Using PrusaSlicer, I recommend starting with the "0.20mm QUALITY" print settings and make the following adjustments for the gears: <ul> <li>Infill: 5%</li> <li>Solid Layers:<ul><li>Bottom: 2</li><li>Top: 3</li></ul></li> </ul></p> <p>Don't worry about the structural integrity of the gears, the two perimeters is enough to make strong teeth. The small amount of infill and the reduced number of solid layers is strong enough to keep the body of the gear together and print good-looking surfaces without adding too much weight. </p> <h4>The Structural Pieces</h4> <p>For the structural pieces of the clock - the Motor and Gear Plate and the Clock Face Stand - I chose to print them heavier to make sure there was enough weight to counter-balance the Prusament spindle and the clock motor. I printed them with the PrusaSlicer defaults for the "0.20mm QUALITY" with one change: <ul> <li>Infill: 35%</li> </ul> </p> <h4>The Clock Face</h4> <p>The Clock Face is only 1mm thick with some tighter details, so I recommend printing it with the PrusaSlicer "0.10mm DETAIL" settings. In case you're not using PrusaSlicer, you can print with 0.10mm layer height and 100% infill to get the same results.</p> <p><b><i>Note:</i></b> Be careful when removing the Clock Face from the build plate. It is very light and thin and it is easy to accidentally crease or break the plastic.</p> <h3>Assembly Instructions</h3><p><img alt="All the parts needed for assembling the Prusament Ptolemaic Clock" src="https://i.imgur.com/OG8YysW.jpg" width="100%"/> Here are all the printed parts of the clock. I printed this demonstration clock with all different colors for the parts to make the instructions easier to follow. (The gears that are intended to mate with each other are in the same color.) I highly encourage using a color switch when printing the gears, because it looks pretty good!</p><p><h4>Step 1</h4></p> <p><img alt="Illustration of the clock motor correctly placed in the Motor and Gear Plate" src="https://i.imgur.com/i9njfzr.jpg" width="100%"/> Push the clock motor stem through the hole in the Motor and Gear Plate. Place the washer and nut over the stem and finger tighten the nut down to the plate.</p> <p><img alt="Illustration of using pliers to tighten the clock motor nut" src="https://i.imgur.com/0Tv1lkm.jpg" width="100%"/> Tighten the clock motor nut using a wrench or pliers. The nut should be very tight to keep the motor from rotating itself rather than the clock gears.</p><p><h4>Step 2</h4></p> <p><img alt="Illustration of correct placement of the Clock Motor Gear on the clock motor stem" src="https://i.imgur.com/D9IUzvK.jpg" width="100%"/> Press the Clock Motor Gear snugly onto the minute stem of the clock motor. Ensure it's parallel to the clock plate.</p><p><h4>Step 3 (Optional)</h4></p> <p><img alt="Illustration of placing Prusa lubricant onto the posts of the Motor and Gear Plate" src="https://i.imgur.com/yYkxudZ.jpg" width="100%"/> If you have any Prusa lubricant remaining from assembling your printer or if you have other lubricant available, smearing a small amount onto the posts of the Motor and Gear Plate can help ensure the gears turn smoothly. This isn't required as all the parts should fit together well and rotate freely - I just did it as extra insurance for long life of this clock.</p><p><h4>Step 4</h4></p> <p><img alt="Illustration of placing the Second Gear onto the Motor and Gear Plate" src="https://i.imgur.com/IDNum5b.jpg" width="100%"/> Place the Second Gear above the middle post on the Motor and Gear Plate. Align the teeth of the Clock Motor Gear and the Second Gear. Press the Second Gear firmly onto the post, ensuring the teeth of the bottom gear don't push the Clock Motor Gear out of alignment.</p><p><h4>Step 5</h4></p> <p><img alt="Illustration of placing the Third Gear onto the Motor and Gear Plate" src="https://i.imgur.com/7ZKc9xm.jpg" width="100%"/> As in Step 4, place the Third Gear above the left-most post on the Motor and Gear Plate. Align the teeth of bottom gear with the top gear of the Second Gear. Press the Third Gear firmly onto the post.</p><p><h4>Step 6</h4></p> <p><img alt="Illustration of the fully-assembled Motor and Gear Plate" src="https://i.imgur.com/QwouIvf.jpg" width="100%"/> Now that the Motor and Gear Plate is fully-assembled, test how the gears fit with each other and that there aren't any snags when rotating them. If the gears are a little loose, it won't impact the clock's performance, but if they're too tight, it won't rotate. When turning the clock motor's time adjustment wheel, all the gears should turn freely without any places that it's difficult to move past.</p><p>If the gears don't turn easily, remove the Third and Second Gears from the Motor and Gear Plate and check that their posts don't have any burrs or other defects. You can use a hobby knife to gently scrape the posts to remove any imperfections that would impact rotation.</p><p><h4>Step 7</h4></p> <p><img alt="Illustration of placing the skate bearings on the Clock Face Stand" src="https://i.imgur.com/Jig3cpP.jpg" width="100%"/> Set aside the Motor and Gear Plate and take the four skate bearings and the Clock Face Stand. Press the skate bearings onto the four posts on the Clock Face Stand. They should slide on easily with a little gentle force and should not slide back off.</p><p><h4>Step 8</h4></p> <p><img alt="Illustration of the clock face parts" src="https://i.imgur.com/pcglvdv.jpg" width="100%"/> Disassemble the empty Prusament filament spindle by gently pulling the plastic parts from the cardboard cylinder core. Attach the Clock Face to the outside of one plastic piece of the Prusament filament spindle. You can glue it on or use adhesive tape. (In this illustration, I decided to paint the clock numbers for better visibility and for aesthetics.)</p><p><h4>Step 9</h4></p> <p><img alt="Illustration of assembling the Clock Face Stand and Clock Face" src="https://i.imgur.com/WjYqbRY.jpg" width="100%"/> Place the Clock Face face down and place the Clock Face Stand and Prusament Spindle Gear over the raised part of the Prusament filament spindle. Press the Prusament Spindle Gear down firmly so it is fully attached to the spindle and there are no gaps between the gear and the spindle.</p><p><img alt="Illustration of the assembled Clock Face" src="https://i.imgur.com/yiqCYnS.jpg" width="100%"/> When the Clock Face is correctly assembled, the spindle should rotate freely within the Clock Face Stand. The Prusament Spindle Gear may not be in contact with all four skate bearings, but that isn't necessary for correct function of the clock. As long as it rests on the two bottom bearings when upright and doesn't wiggle much, it is working correctly</p><p><h4>Step 10</h4></p> <p><img alt="Illustration of aligning the Clock Face Stand and Motor and Gear Plate" src="https://i.imgur.com/S6dnbAY.jpg" width="100%"/> Align the feet and slots on the bottom of the Clock Face Stand and Motor and Gear Plate. Press them together gently, ensuring the teeth of the Prusament Spindle Gear engage with the top gear on the Third Gear.</p><p><img alt="Illustration of the back of the assembled Prusament Ptolemaic Clock" src="https://i.imgur.com/c4wlxvg.jpg" width="100%"/> The gears should all now be engaged and rotating the time adjustment wheel on the clock motor should rotate all the gears and the clock face.</p><p><h4>Step 11</h4></p> <p><img alt="Illustration of the front of the assembled Prusament Ptolemaic Clock" src="https://i.imgur.com/tDDJ2MB.jpg" width="100%"/> Set the time of your new clock using the time adjustment wheel on the clock motor. The ticks on the Clock Face represent 15-minute increments. Align the hole in the hand of the Clock Face Stand with the correct time on the Clock Face.</p><p><h4>Step 12</h4></p> <p>Place the clock where it can be seen and admired by everyone. Enjoy!</p>
With this file you will be able to print Prusament Ptolemaic Clock with your 3D printer. Click on the button and save the file on your computer to work, edit or customize your design. You can also find more 3D designs for printers on Prusament Ptolemaic Clock.