Prusa XL Enclosure Camera Mount - Simple print & attachment
prusaprinters
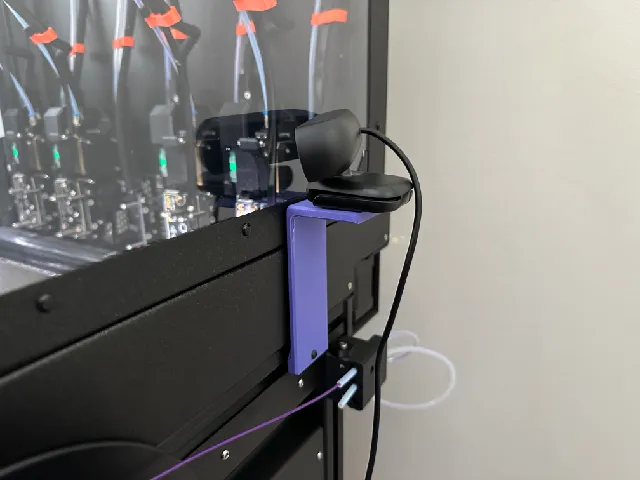
This is a webcam camera mount for the sides of a Prusa XL. I designed it to work with the new enclosure. My old way of mounting the webcam no longer worked, so I needed a new way.This method uses the top aluminium extrusion and one of the M3nEs captured nuts that slide into the extrusion. If you built the printer, you probably have one spare, more so if you made the enclosure.This mount works with or without the official Prusa Enclosure. The base of the mount rises to just above the glass.You also need an M3x12 bolt, there might be something usable in the spares that came with the printer or enclosure. For ease, I used one from my screw set.The slot in the top is 10mm wide and there's plenty of room for ¼" or 3/8" camera mounts.The standard mount has. a slot length of 30mm while the long one has a slot length of 60mm. These measurements include the circular part at the ends, the diameter of each is 10mm. This means the straight parts of the slot are 20mm for standard and 50mm for the long. They should fit most cameras.PrintingI used eSun PLA in Very Peri, but any PLA will do, there is no need to use more exotic filament. Choose the colour that matches your colour scheme, or maybe a Galaxy Black.Perimeters: 3Walls: 3Infil: 15% - CubicSupports: Organic - with Soluble clearancesI printed this on the side, and used PETG for the supports, this makes removing them easy. This can be printed, just about without supports if you print the large flat side down.AssemblyPrepare your three parts:Camera mount - you already created.M3nEs nut.M3x12 bolt.Insert the M3nEs into the slot close to where you want the camera mounted. Then, screw the mount onto the nut with the bolt. Align the top with the bottom of the glass window, to make it straight before final tightening. It should all it flush and snug against the side of the printer.Note: The camera mount might need the mounting bolt hole cleaning a little, run a bolt back and forth to clean out any rough edges.Using the slot at the top, mount your camera to the top plate. Position camera for best angle and enjoy your new camera view.OtherIf you need another size for the mount, just let me know and I will make adjustments.For those who like to tinker, there is also a STEP file for each size of mount.
With this file you will be able to print Prusa XL Enclosure Camera Mount - Simple print & attachment with your 3D printer. Click on the button and save the file on your computer to work, edit or customize your design. You can also find more 3D designs for printers on Prusa XL Enclosure Camera Mount - Simple print & attachment.
