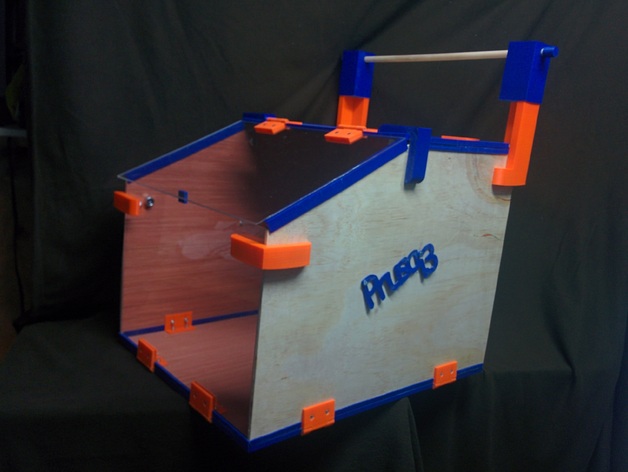
Prusa Super Case
thingiverse
This printer enclosure was inspired by John R's http://www.thingiverse.com/thing:787153. It is not a derivative or remake. I like the concept of using printed parts to assemble an enclosure, but I also wanted an enclosure that would allow me to easily adjust and maintain the printer. Thanks to John R for the idea. The Prusa Super Enclosure has fold-down sides and front. All parts (hinges, braces, edging, etc) were designed from scratch by me. You will need the following materials to build the Super Enclosure: a. Sheet of 5mm Plywood 1220mm (4') x 2440mm (8') b. 53 M4 15mm (hex head screws, lock washers, and nuts) c. 1 meter of ~3.2 mm (1/8'') steel rod to be cut to 60mm segments for hinge pins d. 1 meter of 13 mm (1/2'') wooden dowel e. Sheet of 2mm Plexiglass 500mm (20") x 500mm (20") f. 12 M10 15mm (hex head screws, lock nuts) Print: a. 4 Bottom Hinges (Plywood to Plywood) b. 2 Bottom Hinge Plexi (Plywood to Plexiglass) c. 4 Braces (Plywood to Plywood) d. 4 Locks e. 2 Lock Spools f. 2 Top Door Hinges (Plywood to Plexiglass) g. 2 Dowel Caps h. 2 Logos i. 2 Top Side Edges j. 2 Bottom Side Edges k. 1 of every other part Cut the plywood to size on a table saw. I've provided a drawing with the layout and sizes of the plywood and Plexiglass pieces. The better your cuts, the better the box will work. The edging prints vertically and needs to be separated. I found that a hack saw blade works well. When applying the hinges, install the edging ends first. This ensures that your hinges are in the right place. You can then install the hinges and the middle edging. Follow this practice for all sides and for the braces as well. When drilling the Plexiglass, drill a small pilot hole. Then use several bits increasing in size until you get the diameter required. I found that using the drill in reverse after the initial hole helps to ensure that the glass does not crack. I learned this the hard way. I also recommend buying the Plexiglass cutting tool. My utility knife made a mess of this, and then I had to buy a second sheet. I learned this the hard way too. The L-shaped locks slide over the M10 bolts. That is to say, you don't remove the nuts and bolts to flip down the sides or front. You just slide off the locks. I'm really happy with the way this turned out. Measure your Prusa before you build, some adjustments might have to be made for styles that are wider or longer. OpenScad file included. https://youtu.be/W20no7K56R0
With this file you will be able to print Prusa Super Case with your 3D printer. Click on the button and save the file on your computer to work, edit or customize your design. You can also find more 3D designs for printers on Prusa Super Case.
