Prusa Power Panic receptacle Mount
prusaprinters
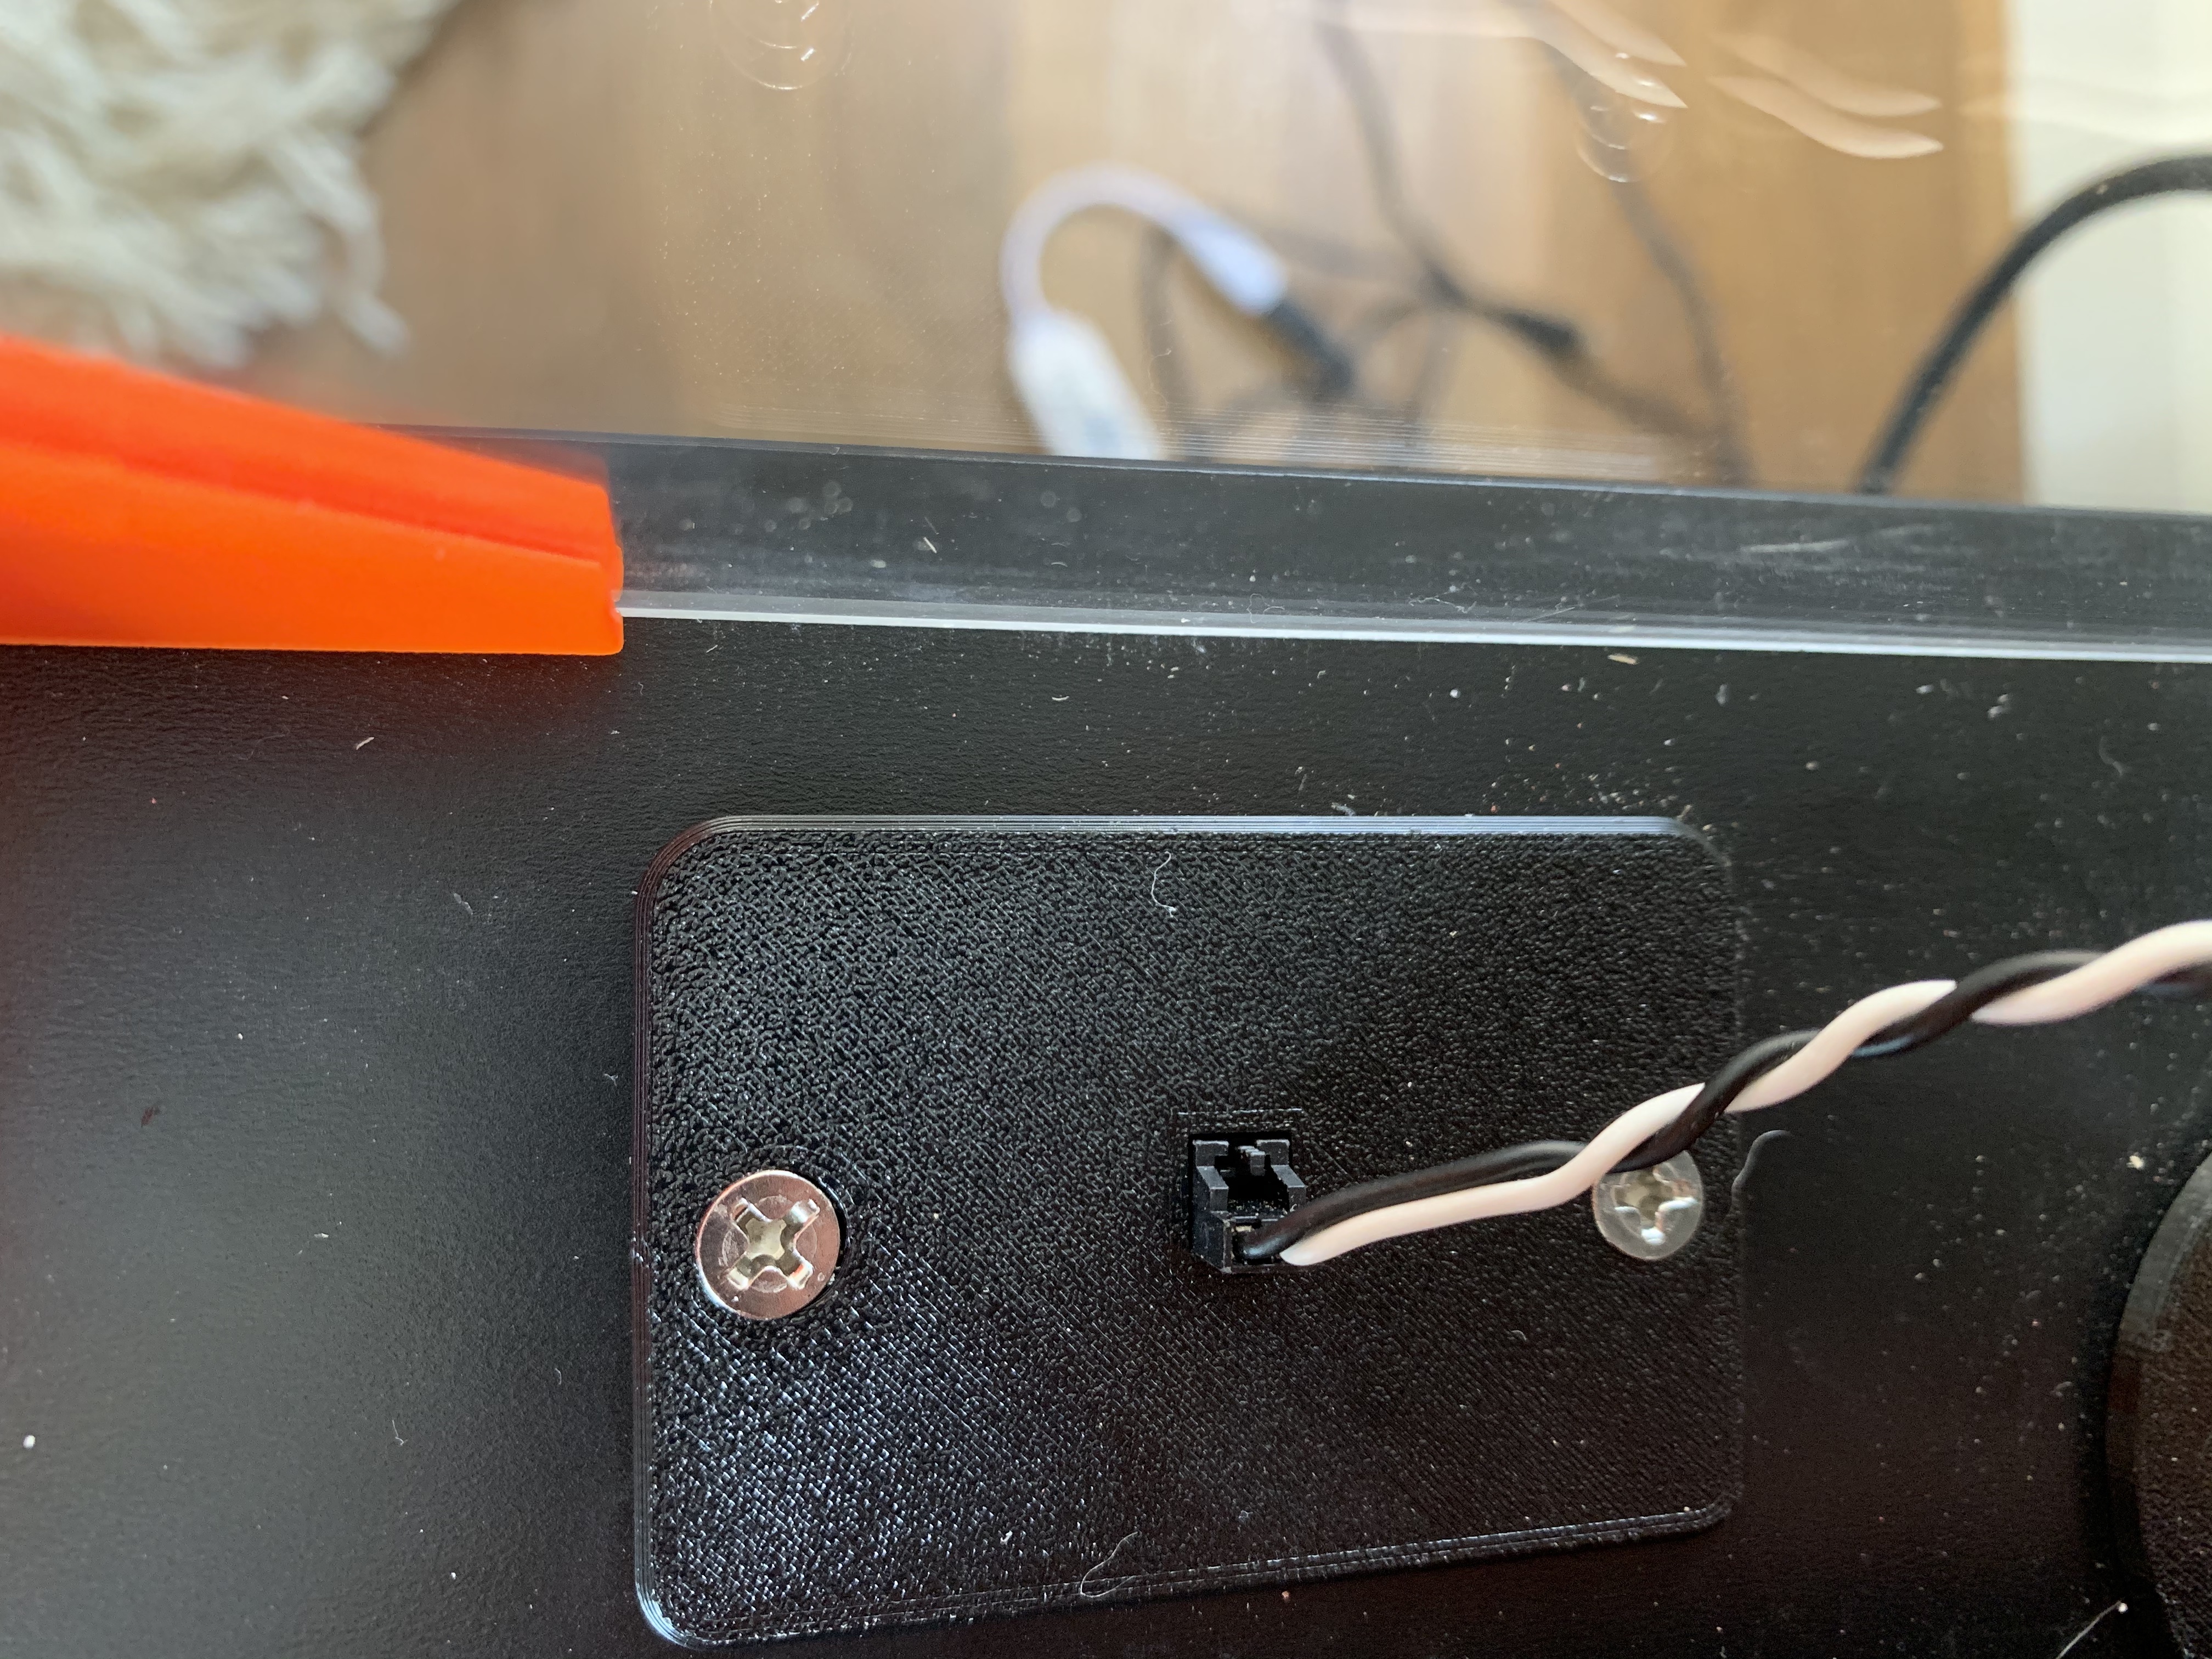
<p>I built a Lack v2 enclosure about a month ago. To me the biggest flaw with it is the inability to remove the printer from the enclosure easily. This is useful for troubleshooting, cleaning, maintenance, et cetera.</p> <p>So my first step was to purchase 2 sets of PSU-Einsy power cables here:<br/> <a href="https://shop.prusa3d.com/en/mk3mk3s/970-psu-einsy-power-cable.html">https://shop.prusa3d.com/en/mk3mk3s/970-psu-einsy-power-cable.html</a></p> <p>I also ordered an extra power panic cable:<br/> <a href="https://shop.prusa3d.com/en/mk3mk3s/969-psu-einsy-power-panic-cable.html">https://shop.prusa3d.com/en/mk3mk3s/969-psu-einsy-power-panic-cable.html</a></p> <p>I cut them in half, and soldered them to XT60 connectors found here:<br/> <a href="https://hobbyking.com/en_us/genuine-xt60-nylon-connectors-male-female-5-pairs.html">https://hobbyking.com/en_us/genuine-xt60-nylon-connectors-male-female-5-pairs.html</a></p> <p>I then printed 2 of these:<br/> <a href="https://www.thingiverse.com/thing:3559875">https://www.thingiverse.com/thing:3559875</a></p> <p>I put female connectors on the printer, and male connectors on the PSU (or vice versa, can't remember) so I could connect them together outside the enclosure easily too. I then created a cable for the opposites and put them in the mount on the left side of the enclosure so I could plug/unplug from the Einsy board. I used 12 AWG wires for this cable, which is overkill. You could use 16 AWG if you wanted since this is what Prusa uses for the PSU-Einsy power cables.</p> <p>So that was all well and good but the power panic was still running through the channel which wasn't TOO annoying to disconnect, but you still have to unscrew the plate on the PSU to disconnect it which is kind of annoying.</p> <p>After some hunting I found that the power panic connector was a "Molex: 50-57-9402" (found that here: <a href="https://github.com/PrusaOwners/prusaowners/wiki/MK3_Compatible_Parts">https://github.com/PrusaOwners/prusaowners/wiki/MK3_Compatible_Parts</a>).</p> <p>But it doesn't tell you what the receptacle is called. I finally found it on eBay here:<br/> <a href="https://www.ebay.com/itm/MOLEX-2-Pin-2543-2-54mm-Female-LOCK-Connector-with-Male-Header-Crimp-x-10-SETS/111374416300">https://www.ebay.com/itm/MOLEX-2-Pin-2543-2-54mm-Female-LOCK-Connector-with-Male-Header-Crimp-x-10-SETS/111374416300</a></p> <p>It ships from China, so it took a two and a half weeks to get here, but it was cheap and my only option.....Finally got it and was excited to learn that it did in fact fit the power panic connectors!</p> <p>But I could not find a mount for this connector. So I made my own.</p> <p>I used PETG since it is going in the enclosure where the temperature will get pretty high.</p> <p>Required Materials</p> <ul> <li>snap-off knife</li> <li>extra power panic cable from Prusa</li> <li>4× screw 6×30 mm</li> <li>4x M3 x 16mm socket head screws</li> <li>4x M3 nuts</li> <li>2x 10cm (ish) pairs of wire (ideally black and some other color), about 20 AWG</li> <li>2x 2cm (ish) black narrow shrink wrap tubing, to fit on the wire</li> <li>2x 2cm (ish) white (ideally, but any color but black will do) narrow shrink wrap tubing, to fit on the wire</li> <li>4x power panic receptacle, purchasable here:<br/> <a href="https://www.ebay.com/itm/MOLEX-2-Pin-2543-2-54mm-Female-LOCK-Connector-with-Male-Header-Crimp-x-10-SETS/111374416300">https://www.ebay.com/itm/MOLEX-2-Pin-2543-2-54mm-Female-LOCK-Connector-with-Male-Header-Crimp-x-10-SETS/111374416300</a></li> </ul> <h3>Print instructions</h3><h3>Prepare the cable</h3> <ol> <li><p>If needed bend the pins on the receptacle so they stick straight out from the back.<br/> <img alt="bending pins" src="https://media.prusaprinters.org/thumbs/inside/640x480/media/prints/40349/images/399350_5a04bf36-63eb-47bb-8e08-3507d6c5ebef/img_3752.jpeg"/></p> </li> <li><p>Cut a length of wire around 10cm.</p> </li> <li><p>Pull the pair of wires apart at the end and strip, twist and tin the ends.<br/> <img alt="wires apart" src="https://media.prusaprinters.org/thumbs/inside/640x480/media/prints/40349/images/399351_6b3489d0-c41d-43b6-8d79-e9474306a117/img_3754.jpeg"/></p> </li> <li><p>Connect one end of the power panic cable to the receptacle. Take note of which side is black and which side is white. Disconnect the cable from the receptacle.</p> </li> <li><p>Place a black shrink wrap tubing on the black wire.</p> </li> <li><p>Solder the wire to the black pin as noted in the prior step.<br/> <img alt="ready to solder" src="https://media.prusaprinters.org/thumbs/inside/320x240/media/prints/40349/images/399353_34a527e7-5b78-4de1-bcf1-2cc1a5881033/img_3755.jpeg"/><br/> <img alt="soldered" src="https://media.prusaprinters.org/thumbs/inside/320x240/media/prints/40349/images/399355_ed8265d6-3e61-4155-ab8c-e1134ef9001b/img_3756.jpeg"/></p> </li> <li><p>Slide down the shrink wrap tubing so none of the solder point is exposed and heat the shrink wrap tubing until its nice and sealed.<br/> <img alt="shrink wrap down" src="https://media.prusaprinters.org/thumbs/inside/320x240/media/prints/40349/images/399354_90a308ea-7632-42e6-bc9c-7ed600809288/img_3757.jpeg"/></p> </li> <li><p>Do the same thing for the second wire.<br/> <img alt="other wire soldered" src="https://media.prusaprinters.org/thumbs/inside/320x240/media/prints/40349/images/399352_0a10cc34-c2d2-4c2d-a2a0-665f67d200b3/img_3759.jpeg"/><br/> <img alt="other shrink wrap down" src="https://media.prusaprinters.org/thumbs/inside/320x240/media/prints/40349/images/399359_b030414d-61df-4f2e-b3b8-0295850a5cee/img_3760.jpeg"/></p> </li> <li><p>Repeat these steps for the other end of the wire.<br/> <img alt="finished end" src="https://media.prusaprinters.org/thumbs/inside/320x240/media/prints/40349/images/399356_4bfb2a72-1f15-4c9e-8186-34f32b2f4d07/img_3761.jpeg"/></p> </li> <li><p>I would make a second one of these cables. One for the steps ahead, and a second so you can more easily use the printer outside the enclosure if you need/want to.</p> </li> </ol> <h3>Print and assemble the first mount</h3> <ol> <li><p>Slide one end of the wire into the mount so that the flat side is facing the side of the mount with the hex nut slots.<br/> <img alt="wire end in mount" src="https://media.prusaprinters.org/thumbs/inside/640x480/media/prints/40349/images/399358_df040424-14be-4ab8-bc48-b0142cde367a/img_3763.jpeg"/></p> </li> <li><p>Place the printed mount cap on top, locking the wire in place.<br/> <img alt="mount cap on" src="https://media.prusaprinters.org/thumbs/inside/640x480/media/prints/40349/images/399357_9dfaa4c9-a52a-41e0-8382-720828ce9d70/img_3764.jpeg"/></p> </li> <li><p>Screw 2 M3 x 16mm screws in most of the way.</p> </li> <li><p>Place the M3 nuts into the bottom of the main mount and finish screwing in the M3 screws until they are snug.</p> </li> </ol> <p><strong>5. DO NOT ASSEMBLE THE SECOND MOUNT YET.</strong></p> <h3>Installing the mount in the enclosure</h3> <ol> <li><p>Locate an empty space on the left side of the enclosure and set the unused mount down (with the mount cap temporarily screwed on) with the rear on the surface. Use a pencil to trace an outline of the rear part of the mount on the surface.</p> </li> <li><p>Use the snap-off knife to cut a hole in the surface of the enclosure in the shape you drew on with the pencil.</p> </li> <li><p>Repeat this process on the bottom side of the enclosure in the same place as the top side.</p> </li> <li><p>Insert the mount with the wire installed in it into the hole you made with the other end sticking out the second hole.</p> </li> <li><p>Screw the mount into place with 2 6×30 mm screws.</p> </li> <li><p>Now assemble the second mount and the wire sticking out the other side as you did the first side.</p> </li> <li><p>Push the second mount into the other hole and screw it into place with the other two 6×30 mm screws.</p> </li> <li><p>Connect the power panic cable from the Einsy board into the mounted receptacle in the enclosure.</p> </li> <li><p>Connect the extra power panic cable to the PSU and hook it into the externally mounted receptacle.</p> </li> </ol>
With this file you will be able to print Prusa Power Panic receptacle Mount with your 3D printer. Click on the button and save the file on your computer to work, edit or customize your design. You can also find more 3D designs for printers on Prusa Power Panic receptacle Mount.