Prusa MK4/3 Enclosure & Cabinet
prusaprinters
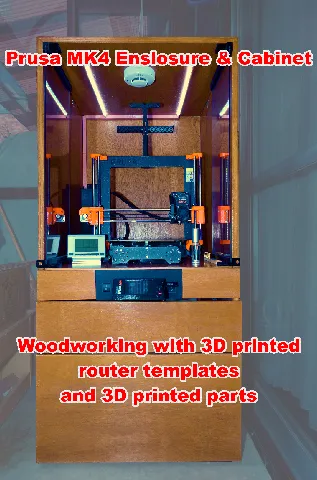
Features Enclosure & Cabinet for MK4 (also fits with MK3). The Prusa xLCD unit is on the front panel; you can easily access it without opening the door. Enough enclosure height to put the filament on the printer inside the enclosure.Slide-in front doors. If you print PLA or PETG in a warm season, you can slide in the front doors to the side.LED lights; the switch is on the front panel. Prusa PSU (the Delta power unit with a Prusa printer) is outside the enclosure, so you need not worry about the temperature. Removable enclosure with handles. The first drawer can hold tools such as a heat gun, radio pillar, scraper, wire brush, or hexagonal spanner. You can use the second drawer to store print plates and filaments. Associated models3D printed parts I will upload 3D-printed parts one by one. Locking anchorEnclosure door hinge and railPrusa PSU towerEnclosure power connectorEnclosure front switch panelEnclosure handleHole coverLED cable cover ToolsPoor man's biscuit joiner/biscuit joint cutterWoodworkingThe Prusa Enclosure & Cabinet combines woodworking and 3D-printed parts. In this section, I will explain the woodworking part. It would help if you had woodworking experience, skills, and various tools, especially a trimming router. I attached 3D data of router templates. CutlistThe following table shows a list of wood parts.The dimensions in this table assume 18 mm thick plywood.If you want to use different thick wood, you need to open the FreeCAD source file (master.FCStd), modify the wood_thickness parameter, and recompute all related FreeCAD files; then you can get the dimensions of each part.custlist 18mm.pdf is a calculated cutlist for 1800mm x 900mm x 18mm plywood by Cutlist optimizier.widthlengthQtyMaterialLabel5835481Plywood18mmcabinet-right5835481Plywood18mmcabinet-left835621Plywood18mmcabinet-Switch-panel-bar205261Plywood18mmcabinet-Toe-kick5835521Plywood18mmcabinet-Top-table805361Plywood18mmcabinet-Reinforcement-bar805361Plywood18mmcabinet-Reinforcement-bar1395621Plywood18mmdrawer1-panel1004161Plywood18mmdrawer1-right1004161Plywood18mmdrawer1-left1004741Plywood18mmdrawer1-front1004741Plywood18mmdrawer1-rear3884721Plywood6mmdrawer1-floor/thickness=6mm2985621Plywood18mmdrawer2-panel2204161Plywood18mmdrawer2-right2204161Plywood18mmdrawer2-left2204741Plywood18mmdrawer2-front2204741Plywood18mmdrawer2-rear3384721Plywood6mmdrawer2-floor/thickness=6mm5836631Plywood18mmenclosure-left5836631Plywood18mmenclosure-right5266251Plywood18mmenclosure-rear5836021Plywood18mmenclosure-top TrimmingYou need to trim some of the wooden parts. I created 3D-printed router templates. These templates are under the router template folder.Recommended configuration to print router templates:PLA is the best because it is hard and solid.Top solid layers to be zero to shorten the print time.You may not reuse the templates; a 15% infill grid (the default of PrusaSlicer) is enough.When you use templates:You may need to fix it on the wood with double-sided tape.Use a straight router bit with a bottom bearing around 10 mm long. All templates are 10mm thick, so if you set the router bit 15mm from the router base, you can dig the wood 5mm deep.Cabinet side and reinforcement bar Join the cabinet side panel and the reinforcement bar by the dado joint.Apply the cabinet-side-dig template to create a 5mm depth dado on a side panel of the cabinet for the joint with reinforcement bar. Apply the bar-edge template to make the edge of the reinforcement bar round shape so that the bar fits with the dado on the side panel. There are two versions, left and right. For the top inner edge of the side panel, you need trim xx mm width xx mm depth.Cabinet Switch panel barOpen the center hole at the switch panel bar.Set the left side of the hole of the sw-bar-center-hole template to 178mm from the left edge of the switch panel bar, and create a throughout hole.Shift the template around 40mm to the right and enlarge the hole.Repeat the process until the right side of the hole of the template is 384mm from the left side of the panel bar.Dig the center part of the switch panel bar.Set the left side of the hole of the sw-bar-dig1 template to 161mm from the left of the panel bar and dig 5.2 mm. Slide the template 20mm to the right and dig again. The digging part becomes more than 30mm wide and switches to the sw-bar-dig2 template.Repeat the process until the right side of the template's hole is 401mm from the left of the panel bar. Dig the right and left edge of the switch panel bar 18mm width, 13mm depth.Dig the top edge of the switch panel bar 13mm width, 13mm depth.Cabinet top table Use the table-hole-template and make oval-shaped holes on the top table.Create a 5mm depth square step at the left-back side of the top table. This square step is for fixing the power unit tower. Use power-holder-dig1 template first; and then power-holder-dig2 template.Drawer There are no temples for drawers.Cabinet Glue the left side panel, right side panel, front reinforcement bar, rear reinforcement bar, and top table. You need to check perpendicularity and clamp until the glue is fixed. I used Titebond 3 to glue these parts. We created a dado for the joints; a screw is not necessary.Glue switch panel bar and toe kick.After the glue is fixed, trim the top table's right, rear, and left sides 5 mm in depth and 18 mm in width.Enclosure Apply a biscuit joint to join the left and top, right and top, left and rear, right and rear. I used Makita's biscuit No. 10. Since I don't have a biscuit joint cutter, I designed a Poor man's biscuit joiner / biscuit joint cutter. You can create biscuit joints without an expensive biscuit joint cutter. FinishingI recommend finishing the enclosure, cabinet, and drawers using two liquid polyurethane. Two liquid polyurethane finishes are durable for alcohol and essential because IPA is expected to be used with 3D printing.If you have an error due to a woodworking accuracy issue, you may need to adjust the dimensions of some 3D printing parts.
With this file you will be able to print Prusa MK4/3 Enclosure & Cabinet with your 3D printer. Click on the button and save the file on your computer to work, edit or customize your design. You can also find more 3D designs for printers on Prusa MK4/3 Enclosure & Cabinet.