Prusa MK3S+ Timelapse Fixture
prusaprinters
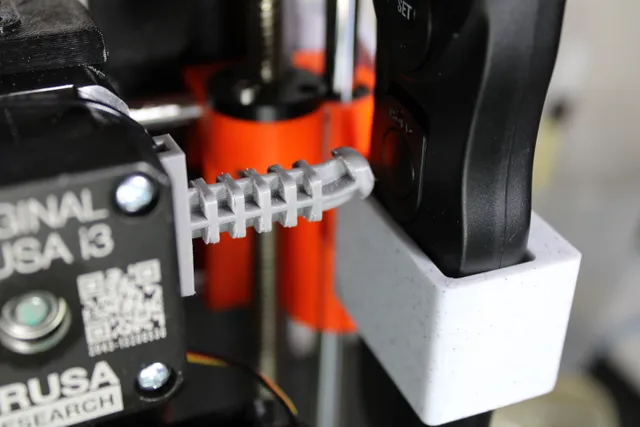
OverviewThe timelapse feature of OctoPrint is one of the main reasons I set it up on my printer. But, the image quality can be somewhat limited to what a webcam can provide. So, with some inspiration from other creators online, I designed this two part fixture for the Prusa MK3S/S+ that uses a remote trigger to take a photo with a standard digital camera. The basic idea is that the camera will be triggered to take a photo after each layer change, which will produce a smooth timelapse without the extruder getting in the way.The first part is what I call the “extruder finger”, since it is fixed to the printer's extruder motor and is used to press the button on the camera remote. The second part is the “remote fixture”, which is just used to secure the camera remote to the printer, without interfering with the majority of prints (perhaps it could be an issue if you're using the entire print volume, but that's a pretty rare case).The only other parts you'll need are a camera, of course, a tripod or some other way of positioning the camera, and a shutter release remote that will work with your camera. For example, I used a Canon EOS Rebel T7 and a Neewer remote.Here's an example of the final product: https://www.youtube.com/shorts/IN3ZI99fdsk PrintingI chose to print both parts separately since I was planning to use different materials for each. I printed the “extruder finger” with the Fillamentum Flexfill TPU (both versions, 92A or 98A, should do the job) on the Prusa i3 MK3 with a 0.4mm nozzle and 0.1mm layer height. If you're new to printing with flexible filaments, you may need to play around with the temperature and speed settings. But, this print is pretty simple and small, so it shouldn't take much messing around with settings to get a functional print.I printed the “remote fixture” using PLA with a 0.4mm nozzle and 0.2mm layer height. You can modify the attached STEP file to fit your remote dimensions. The default slot is 0.7 x 1.55 inches with a slight taper on the sides. AssemblyThe assembly is pretty simple and I've included some sample g-code for the actual operation of the camera fixture.A) The “extruder finger” is designed to fit the default zip-ties that are included with the Prusa printers. I connected two zip-ties together, fed one end through the extruder finger and below the extruder motor to secure the part to the motor. Make sure not to tighten the zip-ties on any wires.B) Secure the “remote fixture” to the right side of the Prusa MK3S/S+ and slide the remote into the slot with the push-button facing the printer.C) You're all ready to capture a smooth, clean timelapse of your 3D prints! The only other component is making changes to the g-code by navigating to the Custom G-code tab under Printer Settings in PrusaSlicer. I've included some example g-code below:After Layer Change G-code:;AFTER_LAYER_CHANGE G1 X230 Y150 Z138.1 F5000 ; move to trigger camera G1 X245 Z138.1 F1000 ; focus camera G04 S1 ; pause for 1 second G1 X246 Z138.1 F1000 ; take photo G04 P500 ; pause for 0.5 second G1 X230 Z138.1 F1000 ; move away from button ;[layer_z]End G-Code (the code I inserted starts at the first G1 line):G4 ; wait M221 S100 ; reset flow M900 K0 ; reset LA {if print_settings_id=~/.*(DETAIL @MK3|QUALITY @MK3|@0.25 nozzle MK3).*/}M907 E538 ; reset extruder motor current{endif} M104 S0 ; turn off temperature M140 S0 ; turn off heatbed M107 ; turn off fan {if layer_z < max_print_height}G1 Z{z_offset+min(layer_z+30, max_print_height)}{endif} ; Move print head up G1 X230 Y150 Z138.1 F5000 ; move to trigger camera G1 X245 Z138.1 F1000 ; focus camera G04 S1 ; pause for 1 second G1 X246 Z138.1 F1000 ; take photo G04 P500 ; pause for 0.5 second G1 X230 Z138.1 F1000 ; move away from button G1 X0 Y200 F3000 ; home X axis M84 ; disable motorsD) At the end of the print, you're camera will be full of photos from each layer of the print. Just throw those into a video editor, with the photos in sequential order, shorten the duration that each photo is shown and enjoy the magic!Please like it if you do and leave any comments!Check out my TikTok!Check out my YouTube!If you like what you see, please consider contributing to my Patreon.
With this file you will be able to print Prusa MK3S+ Timelapse Fixture with your 3D printer. Click on the button and save the file on your computer to work, edit or customize your design. You can also find more 3D designs for printers on Prusa MK3S+ Timelapse Fixture.