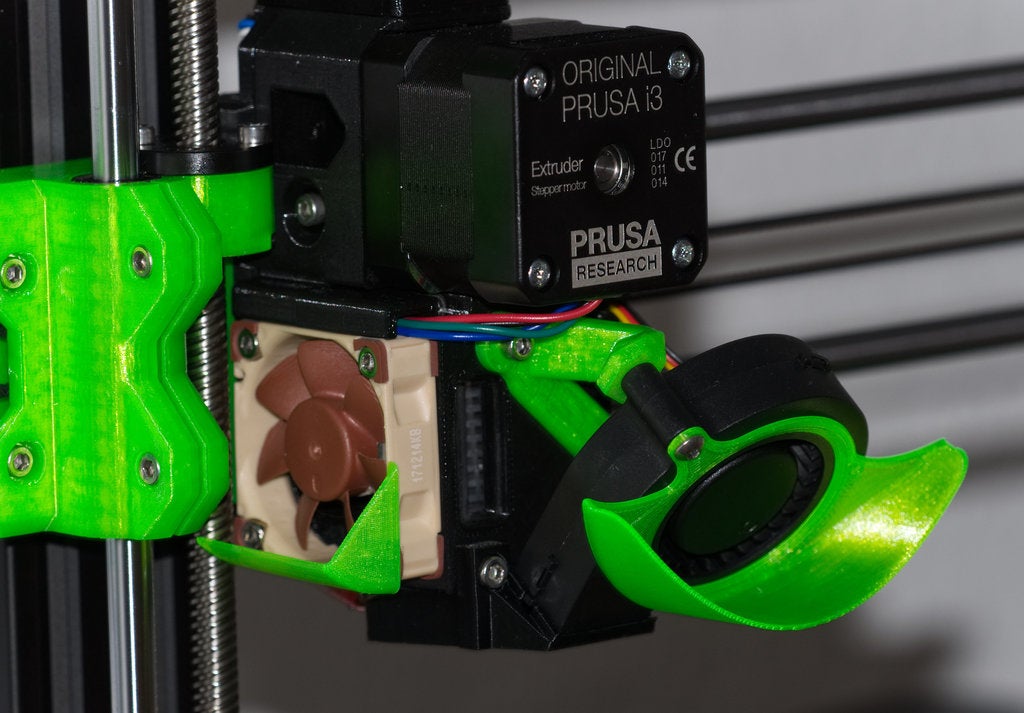
Prusa MK3 low noise fan shroud (40° angle)
prusaprinters
<p><strong>I discovered that the suction of the hotend cooling fan cools down the left side of the heated bed. I measured differences of about 5 °C between the left and right side. Also I don't like that the angled part cooling fan sucks in more warm air from the heated bed.</strong></p> <p>The existing fan shrouds didn't satisfy my needs. For example they restrict the airflow too much, which results in noise. Also weight was a factor as I want the extruder as light as possible (yes it's very minor, but every mg counts in my opinion ;D).</p> <p>I also linked <a href="https://www.thingiverse.com/vekoj/designs">vekoj's revised MK3 Extruder</a>, because in my Fusion 360 source file I used the radial fan model from his step files. Also It's the extruder I'm currently using and it works absolutely great!</p> <p><strong>With Source file</strong><br/> I have added the .f3d source file as I hope more people would add source files to their things. Often I want to modify a thing and having only the .stl file it's more cumbersome than it should be in my opinion. So I don't want anybody to get frustrated when they want to modify my design.</p> <h3>Print instructions</h3><h3>Print Settings</h3> <p><strong>Resolution:</strong> 0,2 mm height and 0,4 mm nozzle<br/> <strong>Infill:</strong> 100%<br/> <strong>Filament:</strong> 3DPSP PETG transparent green</p> <h4>Hotend fan shroud:</h4> <p>This should print easy withoud special settings.</p> <h4>Radial fan shroud:</h4> <p>This is a little bit tricky to print nice with PETG.<br/> I wanted it to be transparent, so lowering the temperature wasn't an option for me. My first print with the generic PETG profile of Slic3r-PE had sagged down overhangs. For the second attempt I upped the part cooling fan speed by ~20% and the result came out great (see the pictures.) But it's really dependend on the used filament, printer and ambient themperature, so finding the right settings is required.</p> <h3>Post-Printing</h3> <h4>Radial fan shroud alignment</h4> <p>Because of the to big screw holes of the fan, this isn't self aligning itself.</p> <p>First loosening both fan screws, then center the shroud on the fan and retighten the screws (this is how I installed mine).</p> <p>I thought about making the screw holes on the shroud a smaler diameter, but then there are still the big screw holes in the fan and so it could still get out of alignment.</p> <h3>How I Designed This</h3> <h4>How I eliminated the uggly seam line in my radial fan shroud ...</h4> <p>My first design had the thin shroud part exactly two perimeter lines wide (when sliced for a 0.4 mm nozzle). So the nozzle moves "left->right" for one layer (starts and stops on the same side). This resulted in a very ugly seam line where one edge was visibly fatter than the other (twice as thick).</p> <p>I fixed this by making the part wider, so when sliced, there is now infill between the perimeter lines. This results in the movement "left->right->left" and the nozzle stops "inside" the layer and not on the outer edge.</p>
With this file you will be able to print Prusa MK3 low noise fan shroud (40° angle) with your 3D printer. Click on the button and save the file on your computer to work, edit or customize your design. You can also find more 3D designs for printers on Prusa MK3 low noise fan shroud (40° angle).
