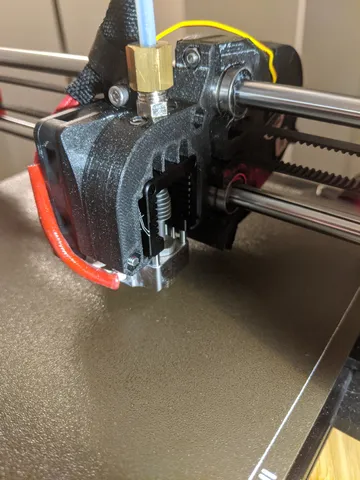
Prusa Mini Mosquito Mount
prusaprinters
07/25/2020:I have created a cooling upgrade for this mount: https://www.prusaprinters.org/prints/37368-prusa-mini-mosquito-fan-shroudI really liked Woraphot's design however I wanted something that fit the Original Prusa Mini hotend aesthetic and minimize the number of parts required to be modified.My solution is a single mount replacing the aluminum the heat sink. The original fan shroud and x-carriage can be used however for good measure, you should add heat reflective tape to the bottom of the fan shroud such as this: https://www.amazon.com/gp/product/B000E283S0There are two versions, M6 for the popular PC4-M6 Fittings and M8 which will support the original brass fitting.You will need 4 M3 nuts, 1 M3x25mm (or 30mm), 2 M2.5 16mm Screws, and a M6 Compression Fitting if using the M6 Mount such as this: https://www.ebay.com/itm/Compression-5-32-or-4mm-Tubing-OD-x-M6-M6X1-Male-Metric-Brass-Fitting-E3-L2/201952247649.The M3x25mm is for the bottom screws closest to you, the original prusa M3x20mm is just a little short.You will also need a PTFE tube chamfered externally on one side and internally for both sides, 9mm for the M6 mount and 15.5mm for the M8 mount. I have supplied jigs for both.The weight delta is 7grams, the original hotend being 44 and new one at 51 grams. The X is offset by 0.5mm, Y by -6.625mm, Z should be ~1 mm. Use "M206 X0.5 Y-6.625" after mesh bed leveling command in Custom Start G-Code to ensure prime line stays in bed OR move the bed ~6 mm towards you. Because of this offset, you will lose ~5mm of your build area in the y-axis. Also relevant instructions from WoraphotThe Prusa PTFE brass fitting will be very close to the head of two fixing screws of the Mosquito. You will need to first put in the two fixing screws but not fully then screw in the brass fitting. Gradually tighten the two fixing screws follow by gradually tightening the brass fitting.NOTE: If using the M206 command to set the offset in the start gcode, make sure you zero the offsets before you autohome and add it to the end gcode for good measures. I saw some issues where having the M206 offset set would mess with autohome. This is a known bug and you can see the issue on github: https://github.com/prusa3d/Prusa-Firmware-Buddy/issues/693PID: You can also update the PID for the hotend to prevent overshoots, you can see this post for more information https://forum.prusaprinters.org/forum/general-discussion-announcements-and-releases/pid-tuning-2/#post-215137 I have a silicone sock on my mosquito and got the following "M301 P22.79 I1.79 D72.47" and placed it in my start GCode and only see 1-2 degrees Celsius overshoot now instead of 10C.Print instructionsPrinted at 0.15mm 20% infill PETG Prusament, 0.2mm should work fine as well. Print with the airflow channels down or the side mounted to the fan shroud.
With this file you will be able to print Prusa Mini Mosquito Mount with your 3D printer. Click on the button and save the file on your computer to work, edit or customize your design. You can also find more 3D designs for printers on Prusa Mini Mosquito Mount.
