Prusa MINI MGN12 Linear Rails - Y Axis
prusaprinters
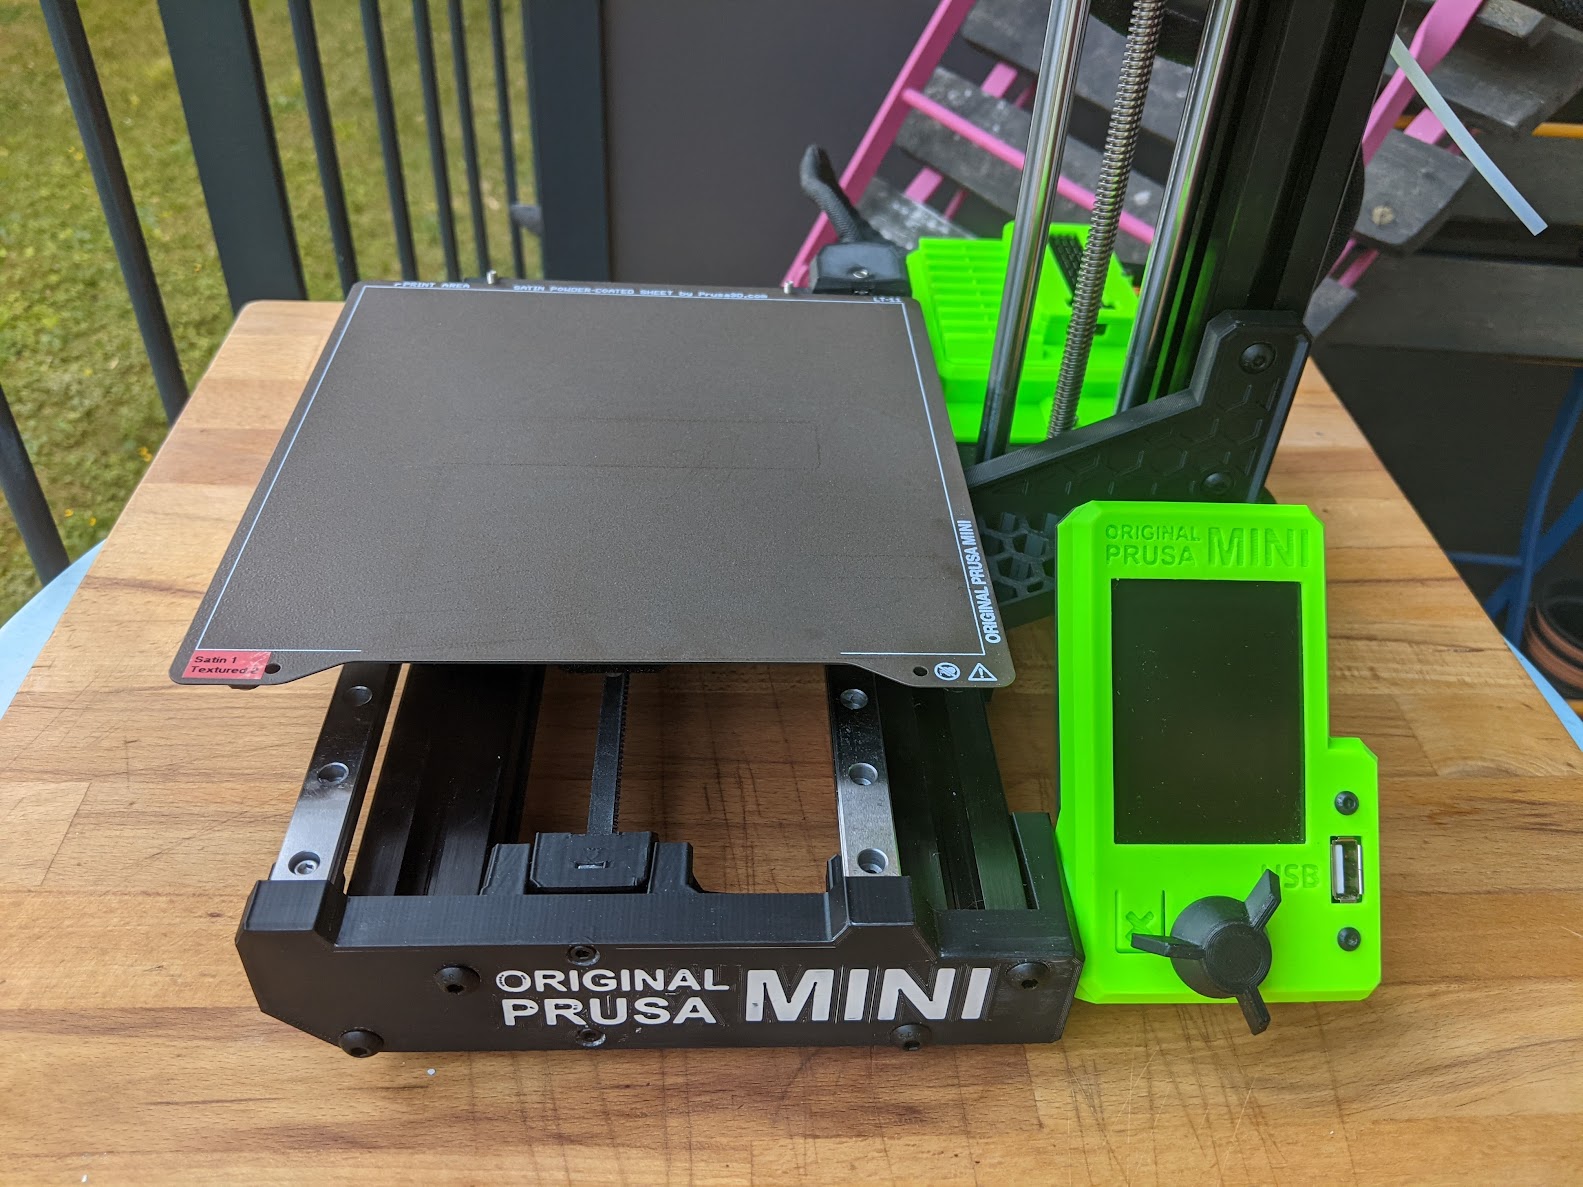
<p><strong>This is a remix of the </strong><a href="https://www.printables.com/prints/62906-prusa-mini-upgrade-hiwin-linear-rails-y-mod-mgn12"><strong>Prusa MINI Y Axis Linear Rails Mod by Ryper3D</strong></a><strong> that I re-created from scratch from the </strong><a href="https://github.com/prusa3d/Original-Prusa-MINI/tree/master/STEP/PRINTED%20PARTS"><strong>original Prusa MINI Printable Parts</strong></a> with the following differences:</p><ul><li>No Ryper3D logo. This was the main motivation for remixing the parts.</li><li>Higher tolerances for the MGN12 rail mounting hole positions</li><li>Multiple front plate designs available</li><li>Two versions of the rear plate with mounting options for other stuff at the back of the printer</li><li>STEP files available for easy remixing, including full assembly</li></ul><h3>FAQ</h3><ul><li><strong>Does this work with the MINI+?</strong><br>Yes. But you may have to print an <a href="https://github.com/prusa3d/Original-Prusa-MINI/blob/bb5f424b22ae67f017c262c3fca35222a2bbf4a3/STL/MINI-display-box.stl">older version of the Display Box</a> (or <a href="https://www.printables.com/model/40966-lcd-frame-usb-for-prusa-mini">this one with USB</a>) because the injection molded front plate of the MINI+ uses a different display mount.</li><li><strong>Is it better than stock?</strong> <br>I have noticed that the Y movements are a bit quieter and it overall feels much sturdier.</li><li><strong>Does it pass the XYZ self test?</strong><br>Yes. It passes the full self test.</li><li><strong>Is this compatible with the </strong><a href="https://www.printables.com/model/63483-prusa-mini-base"><strong>Prusa Mini Base</strong></a><strong> by David Warboss?</strong><br>Most likely yes. Scroll all the way down to the “Compatibility with Other Mods” section for more info.</li><li><strong>Is this compatible with my Z-axis stabilizer brace?</strong><br>Maybe not as it might interfere with the MGN12C blocks. However, you can use <a href="https://www.printables.com/model/218007-prusa-mini-z-axis-brace-for-mgn12-rails">this Z-axis brace</a> that is compatible. Scroll all the way down to the “Compatibility with Other Mods” section for more info.</li><li><strong>Can I use MGN12H blocks instead?</strong><br>You can use an MGN12H block for the right rail. The two blocks on the left rail must be MGN12C in order to ensure the right amount of Y travel.</li></ul><h3>BOM</h3><figure class="table"><table><thead><tr><th>Qty</th><th>Description</th><th>Sourcing</th></tr></thead><tbody><tr><td>2</td><td>MGN12 linear rail 280mm with MGN12C block **</td><td><a href="https://www.aliexpress.com/item/32829826159.html">Aliexpress</a></td></tr><tr><td>1</td><td>Additional MGN12C block</td><td><a href="https://www.aliexpress.com/item/32829826159.html">Aliexpress</a></td></tr><tr><td>6</td><td>M3x8mm Socket Heat Cap Screw ***</td><td><a href="https://www.aliexpress.com/item/4000948238295.html">Aliexpress</a></td></tr><tr><td>4</td><td>M3x10mm Socket Head Cap Screw ****</td><td><a href="https://www.aliexpress.com/item/4000948238295.html">Aliexpress</a></td></tr><tr><td>5</td><td>M3 Nyloc Nuts ****</td><td><a href="https://www.aliexpress.com/item/4000957589431.html">Aliexpress</a></td></tr><tr><td>8</td><td>(Optional) Heat Set Inserts M3 x D5.0 x L4.0-8.0 for “Backpack”</td><td><a href="https://www.aliexpress.com/item/1005002526998853.html">Aliexpress</a></td></tr></tbody></table></figure><p>** Alternatively, you can use 300mm MGN12 rails and cut 10mm off at both ends so that the mounting holes are still centered.<br>*** You need at least 3 M3x8mm screws. You may not necessarily need the remaining 3.<br>**** M3x10mm screws and nuts may be optional if the rails fit without any wiggle room. You'll need 1 nut to mount the display.</p><h3>Printed Parts</h3><figure class="table"><table><thead><tr><th>Qty</th><th>Part</th><th>Notes</th></tr></thead><tbody><tr><td>1</td><td>Fit Test.stl (optional)</td><td><strong>Print this first to test the fit of the MGN12 rails</strong></td></tr><tr><td>1</td><td>Y Plate Front *.stl</td><td>4 designs available</td></tr><tr><td>1</td><td>Y Plate Rear *.stl</td><td>2 versions available</td></tr><tr><td>1</td><td>Y Belt Holder.stl</td><td> </td></tr><tr><td>1</td><td>Y Idler.stl</td><td>Unmodified original R6 part</td></tr><tr><td>1</td><td>Optional <a href="https://www.printables.com/model/218007-prusa-mini-z-axis-brace-for-mgn12-rails">Z-Axis Brace</a></td><td>Remixed to add clearance for MGN12C block</td></tr></tbody></table></figure><h4>Front Plate Versions</h4><p>Choose a front plate based on your preferences.</p><figure class="image"><img src="https://media.printables.com/media/prints/217963/rich_content/b36e642d-faf1-48f3-ac63-77c6385457b0/front-plates-nl.png#%7B%22uuid%22%3A%22deeeb915-886e-48ec-9fc2-5eb141dcda40%22%2C%22w%22%3A3504%2C%22h%22%3A2477%7D"></figure><h4>Rear Plate Versions</h4><p>Choose between a normal rear plate or one with a 20x20mm grid with M3 threads (use heat set inserts) to mount things to the printer, such as buck converters, relays, etc.</p><figure class="image"><img src="https://media.printables.com/media/prints/217963/rich_content/313260f5-4036-4361-b825-365c4ef79623/rear-plates-nl.png#%7B%22uuid%22%3A%22e0d0a5a8-c4ca-4b34-b9ce-c84bcd3ce63e%22%2C%22w%22%3A3504%2C%22h%22%3A2477%7D"></figure><h3>Printing</h3><p><strong>These parts require a well calibrated printer. </strong>Over extrusion might make it difficult to install the MGN12 rails. Print the “Fit Test.stl” file first to find out if you need to calibrate your printer or filament. Do not use warped parts.</p><h4>Settings</h4><ul><li>0.4mm nozzle</li><li>4 perimeters</li><li>0.4mm extrusion width (0.45 probably works too)</li><li>30 to 40% infill</li><li>5 top and 5 bottom solid layers</li><li>PETG or better</li></ul><h4>Part Orientation</h4><p>The STL files already have the correct orientation for printing.</p><figure class="image"><img src="https://media.printables.com/media/prints/217963/rich_content/13eb615c-d6a8-448d-860f-f9e72c2a4625/build-plate-nl.png#%7B%22uuid%22%3A%2275cc5d19-d0dc-4f9f-b048-18c9da8d1778%22%2C%22w%22%3A3504%2C%22h%22%3A2477%7D"></figure><h3>Assembly</h3><p>Note: You should de-grease, clean, and lubricate the MGN12C linear rails prior to installation.</p><h4>Preparation</h4><ul><li>Make sure your parts look great and nothing is warped.</li><li>Test if the MGN12 rails fit all the way in to the plates.</li><li><strong>Insert an M3 Nyloc nut into the Y Front Plate</strong> where the display will be attached. This can't be done after assembly so do this first.</li></ul><h4>Disassembly</h4><ol><li>Remove the display.</li><li>Remove the heated bed.</li><li>Remove the Y idler and slide the belt off the Y motor pulley.</li><li>Remove the Y carriage.</li><li>Remove the belt holder.</li><li>Remove the front and rear Y plates.</li><li>Remove the Y motor from the rear plate.</li><li>Mark the positions on the Y belt where it exits the belt holder.</li><li>Remove the belt from the belt holder.</li></ol><h4>Re-Assembly</h4><ol><li>Install the new Y Rear Plate on the right Y extrusion only using the M5x16mm screws and do not fully tighten the screws yet.</li><li>Install the the Y motor on the Y Rear Plate.</li><li>Attach the right Y extrusion to the Y Rear Plate using the M5x16mm screws and do not fully tighten them yet.</li><li>Slide the MGN12 rails into the slots on the Y Rear Plate.</li><li>Install the Y Front Plate using the M5x16mm screws and do not fully tighten the screws yet.</li><li>Install the Y carriage on the MGN12C blocks using the screws marked with blue circles as shown below using the M3x8mm screws.</li><li>With the belt still not attached, slide the Y carriage back and forth on the rails and make sure it moves smoothly.</li><li>While applying light pressure on the Y carriage, fully tighten the M5x16mm screws.</li><li>If the MGN12 rail can wiggle inside the slots of the Y Plates, use the M3x10 screws and Nyloc nuts to fix the rails while ensuring that it can move freely (pink circles).</li><li>Install the remaining M3x8mm screws (green circles)</li><li>Slide the y carriage back and forth again and check for smooth movement. If there's any binding remove the optional M3 screws again (green circles)</li><li>Insert the belt into the Belt Holder in the same positions that you marked in the disassembly step.</li><li>Flip the printer to gain access to the bottom of the Y carriage.</li><li>Install the Belt Holder. The open part of the Belt Holder should be facing to the right (towards the Z extrusion).</li><li>Slide the belt over the Y motor pulley.</li><li>Install the Y Idler using the M3x20mm screws and tighten the belt.</li><li>Reinstall the heated bed using the tiny Torx screws.</li><li>Power up the printer and run the XYZ self test.</li></ol><figure class="image"><img src="https://media.printables.com/media/prints/217963/rich_content/0c13c6a5-48f9-4d4b-ba90-d6b896b8e42f/screws.png#%7B%22uuid%22%3A%222c992f98-9f91-4776-bd96-575666c1e035%22%2C%22w%22%3A3504%2C%22h%22%3A2477%7D"></figure><figure class="image"><img src="https://media.printables.com/media/prints/217963/rich_content/26b70582-93bc-4b50-a927-d6f9bd74a69e/full-assembly-isometric.png#%7B%22uuid%22%3A%222f1d66dc-140e-46d2-8215-a4597ad6d85b%22%2C%22w%22%3A3504%2C%22h%22%3A2477%7D"></figure><h3>Compatibility with Other Mods</h3><p>The overall dimensions of the font and back plates are unchanged. However, the MGN12C blocks and rails are wider than the smooth rods and bearings. For this very reason the belt path had to be moved 3.53mm to the left so that the block doesn't collide with the motor.</p><p>Mods should give about 1mm of clearance on the sides and bottom of the MGN12C blocks.</p><p>On the left, the MGN12C block protrudes 3.5mm beyond the Y plates.</p><h4>Potentially Incompatible Mods</h4><ul><li>Mods that are mounted to the top of the Y aluminum extrusions, such as some Z-axis stabilizers. These must potentially be changed to clear the path of the MGN12C blocks.</li><li>Alternative belt tensioners</li><li>Alternative belt holders</li></ul><figure class="image"><img src="https://media.printables.com/media/prints/217963/rich_content/80fed619-9823-4598-90ec-176b6272f312/compatibility-nl.png#%7B%22uuid%22%3A%22e67fa83c-f0d1-49a4-9b6e-3a2d59ac9312%22%2C%22w%22%3A3504%2C%22h%22%3A2477%7D"></figure>
With this file you will be able to print Prusa MINI MGN12 Linear Rails - Y Axis with your 3D printer. Click on the button and save the file on your computer to work, edit or customize your design. You can also find more 3D designs for printers on Prusa MINI MGN12 Linear Rails - Y Axis.