Prusa Mini LED Light Rig
prusaprinters
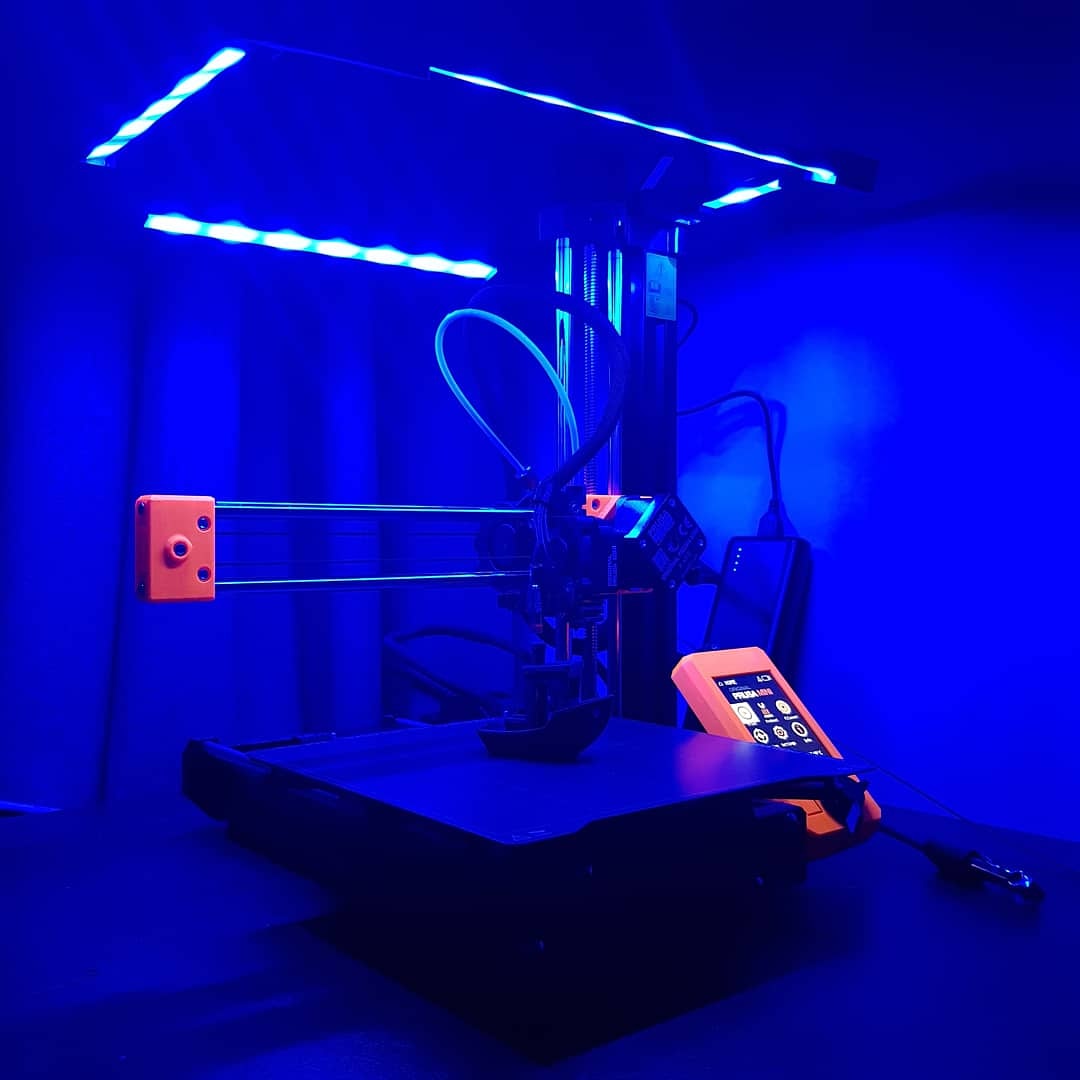
<p>I'm a UK-based maker, and I found that the existing models for an LED rig didn't fit my specification or desires, so I've remixed my own. Hopefully, you'll find this useful...</p> <p>This is a modified version of the tagged remixed model by<br/> jagr200 that attempts to create a 3+ bar LED light system for those of us without the tools or knowledge (or effort required) for soldering and electronics, all the while bringing a funky colourful light show twist to your Prusa Mini / Mini+.</p> <h3>Print instructions</h3><p><strong>+++ Tools Required +++</strong></p> <p>• Hacksaw (to cut aluminium rail)<br/> • Tweezers<br/> • Super glue (optional)</p> <p><strong>+++ Summary of Components +++</strong></p> <p>• 1.5m LED light strip @ £7.46<br/> • 1m Aluminium LED Profile Strip @ £11.98<br/> • 2x M5x30mm hex screws @ £1.50</p> <p>Total (excluding cost of PLA) = @ £20.94</p> <p><strong>+++ Components List +++</strong><br/> (correct at time of posting, 16.01.21)</p> <p><u>eBay Listing Name:</u><br/> USB Power LED Strip Lights 5050 RGB TV Backlight Lighting Remote Control New UK.</p> <p><u>Link:</u><br/> <a href="https://www.ebay.co.uk/itm/USB-Power-LED-Strip-Lights-5050-RGB-TV-Backlight-Lighting-Remote-Control-New-UK/283918505140?ssPageName=STRK%3AMEBIDX%3AIT&var=585361641537&_trksid=p2057872.m2749.l2649">https://www.ebay.co.uk/itm/USB-Power-LED-Strip-Lights-5050-RGB-TV-Backlight-Lighting-Remote-Control-New-UK/283918505140?ssPageName=STRK%3AMEBIDX%3AIT&var=585361641537&_trksid=p2057872.m2749.l2649</a></p> <p><u>Comments:</u><br/> A great LED strip that is coated in epoxy, protecting the circuitry, and can be cut to size. Each strip is 500mm, and you'll need about 1110mm worth, so purchase 3 strips.</p> <p>+++</p> <p><u>eBay Listing Name:</u><br/> 1-2m Aluminium LED LineMini Profile 5050 5630 3528 Strip Lights White Black Xmas</p> <p><u>Link:</u><br/> <a href="https://www.ebay.co.uk/itm/1-2m-Aluminium-LED-LineMini-Profile-5050-5630-3528-Strip-Lights-White-Black-Xmas/322245759017?ssPageName=STRK%3AMEBIDX%3AIT&var=511367727883&_trksid=p2057872.m2749.l2649">https://www.ebay.co.uk/itm/1-2m-Aluminium-LED-LineMini-Profile-5050-5630-3528-Strip-Lights-White-Black-Xmas/322245759017?ssPageName=STRK%3AMEBIDX%3AIT&var=511367727883&_trksid=p2057872.m2749.l2649</a></p> <p><u>Comments:</u><br/> Choose the opal diffuser covering, 1m in length. You'll be using roughly 803mm of it, so there will be some spare.</p> <p>+++</p> <p><u>eBay Listing Name:</u><br/> M2 M2.5 M3 M4 M5 M6 SOCKET COUNTERSUNK SCREWS 10.9 HT CSK HEX ALLEN KEY BOLTS</p> <p><u>Link:</u><br/> <a href="https://www.ebay.co.uk/itm/M2-M2-5-M3-M4-M5-M6-SOCKET-COUNTERSUNK-SCREWS-10-9-HT-CSK-HEX-ALLEN-KEY-BOLTS/284006064396?ssPageName=STRK%3AMEBIDX%3AIT&var=585472467015&_trksid=p2057872.m2749.l2649">https://www.ebay.co.uk/itm/M2-M2-5-M3-M4-M5-M6-SOCKET-COUNTERSUNK-SCREWS-10-9-HT-CSK-HEX-ALLEN-KEY-BOLTS/284006064396?ssPageName=STRK%3AMEBIDX%3AIT&var=585472467015&_trksid=p2057872.m2749.l2649</a></p> <p><u>Comments:</u><br/> 1x pack of M5 x 30mm will suffice. You'll only require 2 of the screws to replace the existing screws at the top of the Z-axis. No.3 Hex (Allen) key required.</p> <p><strong>+++ Construction +++</strong></p> <p>Take a look at the images I've posted. This should give you a good indication of how the cables in the base were hacked together. This allows for the IR module of the LED strip to be visible above the printer (I'm also in my modelling career infancy, so the base remix build is really nothing special...purely functional)</p> <p>I trimmed down the aluminium rail to these measurements, totalling 5 strips of rail:</p> <p>2x 250mm<br/> 1x 188mm<br/> 1x 75mm<br/> 1x 40mm<br/> (803mm total)</p> <p>From the base going ANTIclockwise*, the order should be:</p> <p>Base<br/> 40mm rail<br/> Corner - Right 1<br/> 250mm rail<br/> Corner - Right 2<br/> 188mm rail<br/> Corner - Left 2<br/> 250mm rail<br/> Corner - Left 1<br/> 75mm rail</p> <p>*the reason for this is so the cable management protrudes towards the back of the printer.</p> <p>Thread the LED strip through the shafts of the corner parts using tweezers to grab the strip from the other side. I did this whilst having the LEDs plugged in for better clarity.</p> <p>Shuffle the corner parts down the strip and add the aluminium rail as you go.</p> <p>I superglued my base unit together at the start, which was a risky move but ultimately didn't come with any consequences. The base model file I've submitted comes with a lip which will help the top and bottom parts hold together. My original model didn't include this, meaning glueing the base unit together was required.</p> <p>Aaaaand there you have it. Hopefully, a fully-functioning LED system to make your Prusa Mini look super cool whilst printing...and whilst it's not!</p> <p>NB: The USB cable of the LED strip is a bit short, just about reaching the base of the Z-axis. You may want to invest in a hub, USB extension cable, whatever your preference, as a source of constant power.</p>
With this file you will be able to print Prusa Mini LED Light Rig with your 3D printer. Click on the button and save the file on your computer to work, edit or customize your design. You can also find more 3D designs for printers on Prusa Mini LED Light Rig.