Prusa Mini Dual Fan Cooling Mod
prusaprinters
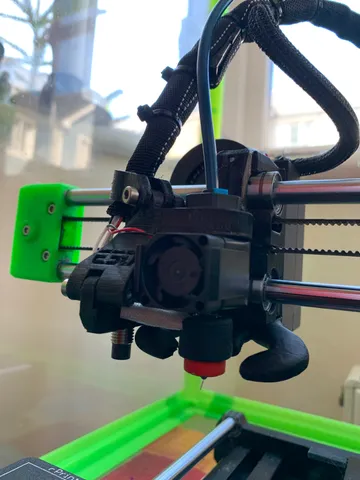
I RECOMMEND THIS ONE INSTEAD:https://www.printables.com/model/169138-prusa-mini-detachable-cooling-duct-assembly-v2 About this modI have never been happy (okay that's a lie, I was happy for the first few weeks) with my Prusa Mini's cooling. This is my attempt to improve that by adding a tri-horn duct design and a second fan (because the duct on its own reduced overall cooling whilst adding direction cooling).For reasons I don't understand, my Mini's buddy board delivers 4.6v to a single 5v fan, that then drops to 4v for dual fans (probably due to current limiting on that fan output). Low fan speed settings may not be enough to get both fans spinning. Important considerationsYou will need to run two fans off one header, with the RPM signal wire connected to one fan ONLY. I did this by wiring up an adapter, which is easy with some wire, a crimping tool and some male/female dupont connectors. Making a connector makes this whole mod reversible, so I recommend you do that!Whilst you could print this in PETG, I recommend ABS for at least the duct because of it's vicinity to the bed when printing. Do not use PLA, seriously, don't even think about this if you are planning on PLA. PETG will probably droop if you use it for the duct and print anything hotter than PLA.You will lose about 3-5mm in the X direction from the slightly wider carriage. This will show itself in a slight offset from the centre.To complete this mod you need to be comfortable changing the X-Carriage mount. Maybe you did this if you built your Mini from individual parts, but it's a little involved as a process. Prusa have good instructions on putting it together, just not for taking it apart!If you are super happy with your printer, playing with the X-Carriage can end up with a skewed X axis. Make sure you know how much to tighten the belt properly afterwards. Printing the partsPrint in ABS, using the default orientations except for the Tri-Horn-Duct and Modified X-Carriage. Everything prints without supports.Print the carriage on its back.Print the duct pointing up with enough perimeters for it to be 100% solid, but not with 100% infill. You will need a brim, this can be a challenging print to keep stuck to the build plate. Additional parts required1 x M3x16 + 1 x hex nut (to attach the MINDA mount to the X Carriage)2 x M3x10 + 2 x hex nuts (to attach the inner fan mount to the X Carriage)1 x M3x20 + 1 x hex nut (to attach the outer fan mount to the inner fan mount)1 x M3x40 + 1 x hex nut (to attach the outer fan mount and secure both fans) Putting it togetherPERFORM THIS AT ENTIRELY YOUR OWN RISK!Glue the duct to the inner fan mount, using a glue that can stand high temperatures, such as two part epoxy. There are extrusions on the mount and matching indents on the duct to help you align them properly.Remove the MINDA from the existing MINDA mount, and then remove the MINDA mount. Keep the two M3 bolts which fasten the MINDA and also the mount to the fan.Remove the hotend from the existing X CarriageRemove the existing fan from the X CarriageRemove the X Carriage but retain the two M3 boltsThis is a good time to put two hex nuts into the slots on the X Carriage and tack them in the right position with a little superglue and a bolt to ensure they are positioned correctlyPut the new modified X Carriage onAttach the hotend to the new modified X Carriage with the original two M3 boltsGlue the hex nut to the side of the new MINDA mount (use an M3 bolt to ensure it's in the right place)Mount the MINDA to the new MINDA mount and the hotend fan using the two original screwsMount the new MINDA mount to the X Carriage (you just drop a hex nut into the hole for this one, don't need to glue it!)This is a good time to glue two hex nuts to the inner fan mount hex slotsMount the inner fan mount to the X Carriage with the two M3x10 boltsMount the outer fan mount to the inner fan mount using the lower M3 boltSlot the two fans and position them correctly in the two fan mounts, then thread the long M3x40 bolt through the outer and inner mounts and fan mounting holes.Ideally out some hot glue for strain relief on the fan wiresUse the little cable tie hook on the inner fan mount to secure the fan cables or they'll pull off the fans through friction wearMake your cabling nice and tidy! I probably forgot something! Sorry if I did!
With this file you will be able to print Prusa Mini Dual Fan Cooling Mod with your 3D printer. Click on the button and save the file on your computer to work, edit or customize your design. You can also find more 3D designs for printers on Prusa Mini Dual Fan Cooling Mod.