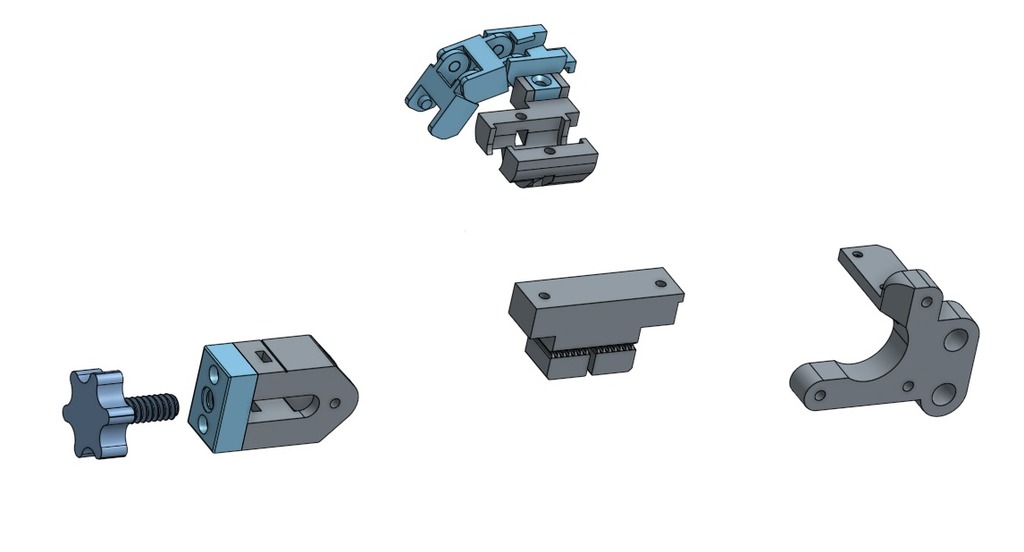
Prusa i3 MK2S y-parts
thingiverse
Here is my solution for the y-axis parts. - Motor: This part is derived from Tom3D's cheaper Prusa i3 one. The biggest difference lies in three screw fixes and a motor that is raised 1mm, although I'm unsure why this is so since the original part also has a 1 mm lower setting. Now both motor and idler are perfectly aligned. - Belt Holder: This part is derived from thing:57533 but for GT2-2 belt. - Chain Elements: These elements are smaller with an open design to easily insert or remove cables, requiring 12 elements in total. Bed and thermistore cables pass through a hole in the frame under motor screws, as seen in the picture. - Tensioner: This tensioner is designed to replace the original idler (y limits remain unchanged) and can be easily removed and installed. **This version is specifically designed for fixing M8 nuts in the lower rod** BOM: - Motor: - 3 M3x18 (DIN 912/ISO 4762) (1 screw more than the original part) - 2 M3x10 (DIN 912/ISO 4762) (endstop) - Belt Holder: - 2 M3x14 (DIN 912/ISO 4762) - 2 M3 nylock nut (DIN 985/ISO 7040) (I don't have a MK42 heat bed) - Tensioner - 1 M3x25 (DIN 912/ISO 4762) (as the original part) - 2 M3 washer (DIN 125/ISO 7089) (as the original part) - 1 M3 nylock nut (DIN 985/ISO 7040) (as the original part) - 2 M3x16 (DIN 912/ISO 4762) - 2 M3 square nuts (DIN 562) - Chain Element with Holder - 1 M3x6 (DIN 7991) - 1 2,5x100 zip to hold wires - LM8UU Holders - 6 M3x14 (DIN 7380) - 6 M3 washer (DIN 125/ISO 7089) - 6 M3 nylock nut (DIN 985/ISO 7040) 2018-03-10: - Final revised version. A significant change is on the belt tensioner. Nuts have been moved to the top rod, like Prusa, and I used thread locker glue (although Nylock nuts can be used as well) to keep them in place and allow the tensioner to slide. The previous solution can be found in 'V3 solution.zip'. 2018-01-06: - Changed body and added lockers since my nuts tend to unscrew themselves and belt becomes loose (these parts are not yet printed/tested, as my printer is currently dead). 2018-01-03: - Added modified z-bottom and z-top. You can use only the bottom left to connect the chain but if you replace all these items, you can also solve the issue reported in 'https://github.com/prusa3d/Original-Prusa-i3/issues/34'. Another solution is posted in https://www.thingiverse.com/thing:2556656 and is specific for Dondolo. 2018-01-02: - Soon I'll replace my old glass with ultrabase glass and the bed chain solution (original solution stored in 'V2 solution.zip') will be changed to connect the chain to the frame using the new bottom in https://www.thingiverse.com/thing:2556656 (bottom and top items need to be used together because they are different from the original Prusa I3). 2017-11-26: - New bed chain solution (original solution stored in 'V1_solution.zip'). To connect the chain to the frame, use the new bottom in https://www.thingiverse.com/thing:2556656 (bottom and top items need to be used together because they are different from the original Prusa I3). 2017-11-22: - I'm going to change and remove the chain under bed as it's difficult to manage cable removal and hard to print frame connector. New solution will put the chain on bed side (see https://www.thingiverse.com/thing:1874802) and "frame connector" will require a change in bottom motor support (new motor support is required). Already printed and seems to work very well. 2017-11-08: - Added missing cap - Screw and cap thread revisited (less skew, not reprinted) 2017-11-02: - Y-belt-holder reinforcement added and wires passage - Y-frame connection added (still sperimental) - Y-chain-element (Bigger upper cut for wires)
With this file you will be able to print Prusa i3 MK2S y-parts with your 3D printer. Click on the button and save the file on your computer to work, edit or customize your design. You can also find more 3D designs for printers on Prusa i3 MK2S y-parts.
