Prusa i3 mk2 "Tom's Dolly Clone" Mean Well LRS-350-12 Cover
thingiverse
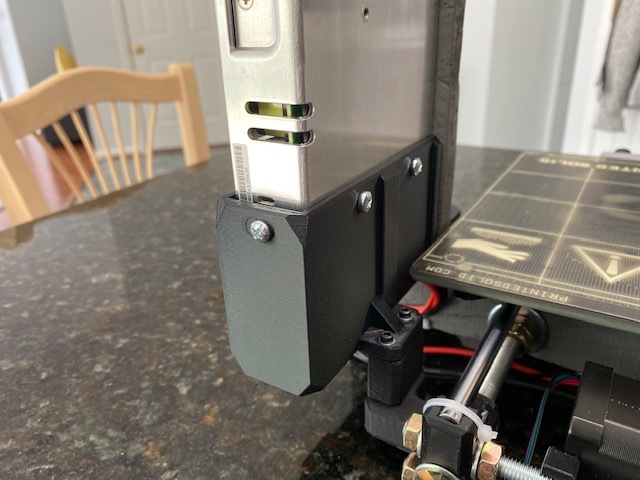
***EDITED 5/18/2020*** Final edit- because I fitted it all up, and REV5.2 holder (and the REV1.0 spacer) worked perfectly, as you can see from the pics. I really hope this helps out someone else's build too, I know it really put that professional finishing touch on my Prusa MK2S clone. Print of the main part (the power supply holder itself) took 5 hours and 45 minutes, on normal MK2S settings, 20% infill, rectilinear infill type, standard PrusaSlicer all other settings, PLA. The 2 screws to mount the power supply holder to the spacer and ultimately to the PSU Y part are m3 socket cap head, 40mm length, with a washer and standard m3 nut. I used m4 phillips screws to mount the power supply holder to the power supply (make sure you get the right length so that you're not hitting anything inside the power supply unit if your screws are too long. You can trim screws with a dremal and cutoff wheel.) For the rear side m4 screw, I used 4 flatwashers to take up the space between the power supply and the holder. ENJOY!!! ***EDITED 5/16/2020*** REV5.2 is uploaded. This is it- after printing 5.1, I modded 7 things: 1) Screw holes added to the side for mounting the power supply. 2) Back side screw hole moved to the right place. 3) Drill out the side screw holes. 4) Lengthened the mount. 5) Thinned the mount. 6) Removed screwholes that would not work. 7) Cleaned up the lines a little bit, and also added .3 mm of extra space beyond the exact 30mm powersupply accommodation (side-to-side). There was already a little bit of extra accommodation for the other direction (front-to-back). ***EDITED 5/03/2020*** Modded cosmetics only- cleaned up the lines a little bit, and also added .3 mm of extra space beyond the exact 30mm powersupply accommodation (side-to-side) that was there previously. ***EDITED 5/02/2020*** The original upload was too short distance-wise from the frame to the power supply mount. I have fixed this today, and re-uploaded REV2, which has been quadruple checked for the proper distance. Folks, I've been enjoying building a Prusa i3 mk2 clone. Seems I'm a few years behind the curve; it's 2020, and most people seemed to do these clones in 2017? Mean Well has retired their old 12v power supply, and now makes the LRS-350-12. It's the same exact specs on paper, but the footprint is different: it is thinner, but longer- so the original Prusa power supply mount/cover part does not work. It seems that most other people using this power supply are using it for a Prusa i3 mk3, which uses a different frame. I really think the power supply should be mounted to the frame, as it appears to be a supporting member. I'm a total newb at CAD design for 3d parts- I used tinkercad, and modded the original Prusa part .stl file. It is not perfect looking- but I tried to make it look presentable enough- should fit perfect too. Note- to get my XYZ to calibrate with the Prusa firmware in my printer, I had to move the y-axis/frame to about 97mm from the frame- that's down from Prusa's recommended 100mm. This means that the the power supply holder here was designed for that setup. I lengthened, thinned the mount, and also removed screwholes that would not work (you'll have to drill the side ones). I moved the back screw hole to the right place. Print at your own risk- I've not been able to test this yet, as I haven't yet completed my printer! Just sharing- in case someone else benefits from this work (or can make it better).. When I looked, there was no such part available for this power supply for a mark 2! Enjoy!
With this file you will be able to print Prusa i3 mk2 "Tom's Dolly Clone" Mean Well LRS-350-12 Cover with your 3D printer. Click on the button and save the file on your computer to work, edit or customize your design. You can also find more 3D designs for printers on Prusa i3 mk2 "Tom's Dolly Clone" Mean Well LRS-350-12 Cover.