Prusa i3 MK2/3/S/+ Y Chassis Integrated Bushings (and Bearing Straps)
prusaprinters
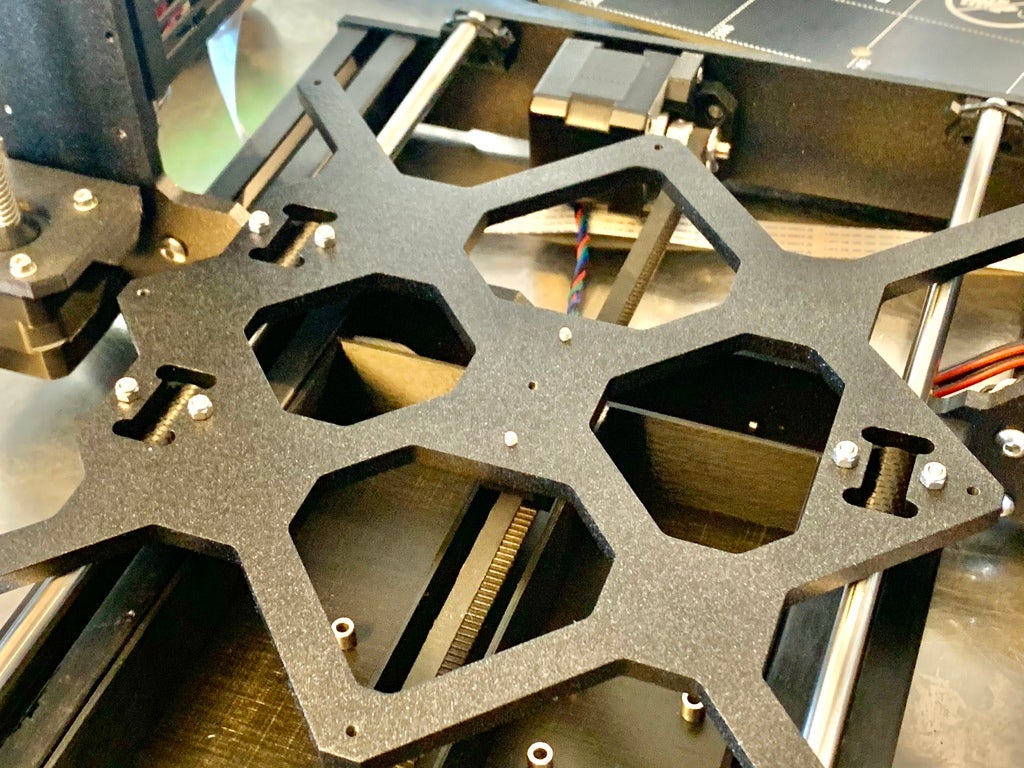
<p>Having recently purchased an Original Prusa i3 MK2 (and now MK3/S/+), I was originally dissatisfied with the poor bearing mounting method that can easily introduce variability in the Y and Z axes.</p><p>Inspired by other overly-complicated solutions to the problem, I designed easily-printed straps that when used with 6x M3x10mm machine screws, replace the zip-ties on the MK2 without any other changes and fully capture the bearings from movement.</p><p>With the MK3 purchase, I found the U-bolts not ideal as even the thickness of the high quality powder coating on the Y-axis bed frame could cause variations in the bearing alignment, leading to the Y-axis rod scoring that we i3 owners are so familiar with.</p><p>That's when I decided to experiment, and here is the culmination of over 3 years of design iteration and over 14,000hrs (yes, thousand !) hours of print testing. If these integrated bushings printed in simple run-of-the-mill PLA don't improve your print quality, then you didn't install them correctly (yes, they do take a bit of work to “hone” to perfect zero-tolerance).</p><p>Easily installed on Prusa i3 MK2/3/+ by removing only the MK42 Y-carriage assembly (take a read through the notes section for details before embarking).</p><p>Enjoy your slightly improved (and now silent/non-y-axis-rod-scoring/wearing) printer ! <3</p><p>-=dave</p><p> </p><p>Video of them in action: <a href="https://youtu.be/RJopBbkPseA">https://youtu.be/RJopBbkPseA</a></p><p> </p><p>Below are my updates over the years in reverse-cronological order. Come with me on the journey…</p><p><i><strong>2020apr26 Update</strong></i> - I've had a few requests for an idea that I should have thought of myself: with this latest release you can now simply re-use the existing "U" bolts that come with the MK3/S, eliminating the need for sourcing additional M3 bolts. I've also updated the OpenSCAD source to include this new bushing type as "mk3" which will work with the U-bolts for any MK3 version. I've also found that slicing with the latest PrusaSlicer (2.2.0 as of today) the ID of the integrated bushing version is no longer tight enough, so I've updated the source parameters to correct for this. Lastly, I've included a .3mf file for use with PrusaSlicer 2.2.0 (or presumably later) so that you can slice your customized version yourself and not have to spend several prints to get the right settings.</p><p>After over 3 years of continuous optimization, I can say with 100% certainty that this latest "mk3" integrated bushing version, when hand-worn in per the instructions by @nic print as good as the MK3/S is capable of with respect to bed play (since there essentially is none, but more importantly, no metal-on-metal contact so that bed resonances are minimized.</p><p>I suspect this will be the last revision of this part since, like many, I am hoping the Prusa XL (core-xy based) printer will be the next Prusa printer we all begin playing with. Meanwhile, the MK3/S keep plugging away as some of the most tireless workhorse 3D printers in the world.</p><p>Thank you to all who have reached out, commented, posted makes, and especially before-after prints showing the improvement. It feels nice to share something with others that makes an already excellent printer even better.</p><p>Don't forget, when it doubt, print it out !</p><p>Enjoy !</p><p>-=dave</p><p><i><strong>2018aug19 Update</strong></i> - I can now confirm that using 3 "Rights" of the integrated bushing version works like a charm to replace the original bearings and u-bolts on the MK3 and takes what little noise was present with the original bearings down to nearly inaudible :)</p><p>Enjoy !</p><p>-=dave</p><p><i><strong>2017nov18 Big Update</strong></i> - What is even better than ensuring your bearings are secured with rigid straps instead of zip-ties ? Making them one-piece printed and bolted in of course. I have been testing various printed bearings over the course of the last year and am finally ready to release what I am quite confident as the best Y axis bearing upgrade you can perform on your MK2, MK2S, or (most likely) MK3.</p><p>Video of them in action: <a href="https://youtu.be/RJopBbkPseA">https://youtu.be/RJopBbkPseA</a></p><p>The v1.0.2 straps are still there for use with original bearings of course, but for the quietest and most rigid bed attachment, these have been tried and true for over a year of active printing.</p><p>Big thanks to @nicw for all the empirical and objective testing, as well as for writing the installation/alignment instructions.***</p><p>Enjoy !</p><p>-=dave</p><p><i><strong>2016dec12 Update</strong></i> - I'm glad so many of you have found these useful. I've made some small changes to make them even better (full history below).</p><p>Having recently purchased an Original Prusa i3 MK2, I was dissatisfied with the poor bearing mounting method that can easily introduce variability in the Y and Z axes.</p><p>Inspired by other overly-complicated solutions to the problem, I designed these easily-printed straps that when used with 6x M3x10mm machine screws, replace the zip-ties on the MK2 without any other changes and fully capture the bearings from movement.</p><p>Easily installed on Prusa i3 MK2 by removing only the MK42 heated bed element.</p><p>Enjoy !</p><p>-=dave</p><p>// history:<br>// -1.2.2 - 2020apr26 - Added "mk3" bushing type for use with original MK3/MK3S "U" bolts instead of<br>// M3 machine screws<br>// - Adjusted bushing ID size down to match latest PrusaSlicer 2.2.0 profiles<br>// - Added .3mf project file generated with PrusaSlicer 2.2.0<br>// - Added gcode for MK3 and MK3S<br>// -1.2.1 - 2017nov19 - Integrated @andyhomes stringed LM8UU bushing library so will work with Customizer<br>// - Fixed layerHeight calculation and other Customizer bugs introduced with 1.2.0<br>// -1.2.0 - 2017nov18 - Removed all bearing options other than @andyhomes version<br>// - Added printed bearing install instructions from @nicw<br>// -1.1.4 - 2017jul02 - Added @mightynozzle <a href="https://www.thingiverse.com/thing:2202854">https://www.thingiverse.com/thing:2202854</a> option<br>// -1.1.3 - 2017jun04 - Added @wbrucem <a href="https://www.thingiverse.com/thing:2144803">https://www.thingiverse.com/thing:2144803</a> "heavy duty" option<br>// -1.1.2 - 2017feb26 - Added @ksa <a href="https://www.thingiverse.com/thing:396232">https://www.thingiverse.com/thing:396232</a> option<br>// -1.1.1 - 2017jan02 - Added @Argutus <a href="https://www.thingiverse.com/thing:1864526">http://www.thingiverse.com/thing:1864526</a> option<br>// -1.1.0 - 2016dec29 - Incorporated @andyhomes stringed LM8UU bushing <a href="/make:282174">https://www.thingiverse.com/make:282174</a><br>// -1.0.2 - 2016nov04 - Increased width of tabs and introduced adjustable screw length so holes don't go all the way through, to help some with poor layer adhesion causing PLA-printed straps to crack<br>// -1.0.1 - 2016nov01 - Fixed incorrect tab thickness calculation (tab thickness would actually reduce when increasing shells or nozzle width, causing Customizer versions to potentially be unusable)<br>// -1.0.0 - 2016oct11 - Released</p><h3>Print instructions</h3><h3>Category: 3D Printer Parts Summary</h3><p> </p><p>I've included a .3mf file for use with PrusaSlicer 2.2.0 (or presumably later) so that you can slice your customized version yourself and not have to spend several prints to get the right settings. Note that because this mode requires disassembly of the printer, you may want to print several successive sizes of bearings in case your printer is slightly out of calibration, just to make sure that one set is “tight” enough for you to “hone” the bushings in to perfection.</p><p><strong>Hardware</strong><i><strong>:</strong></i></p><p><strong>MK3 (any version):</strong> Print 3x "Rights" and use the original u-bolts for attachment</p><p><strong>MK2S: </strong>Print 2x “Lefts” and 1x “Right” and use the original u-bolts for attachment</p><p><strong>MK2:</strong> Print 2x “Lefts” and 1x “Right” and use 6x M3x10 bolts and corresponding nuts for attachment</p><p>The v1.0.2 straps are still there for use with original bearings of course but deprecated. For the quietest and most rigid bed attachment, the integrated bushing versions are what you want.</p><p>Big thanks to @nicw for all the empirical and objective testing, as well as for writing the installation/alignment guide.***</p><p>Enjoy !</p><p>-=dave</p><p> </p><p> </p><h3>Print Settings</h3><p><strong>Printer:</strong> Prusa i3 MK2</p><p><strong>Rafts:</strong> No</p><p><strong>Supports:</strong> No</p><p><strong>Resolution:</strong> 200 microns for strap version, 300 microns for integrated bushing version</p><p><strong>Infill:</strong> 100%</p><p><strong>Notes:</strong></p><p>If printing integrated bearing version, you must print in PLA. PETG, ABS, and HIPS have been tested and shown to be inferrior or not work at all. Nylon has not been tested.</p><p>Note: if they don't come out the perfect ID for the 8mm rod for you, you owe it to yourself to make necessary adjustments with the OpenSCAD Customizer or download/compile yourself. If you want average tolerances, stick with stock bushings and my straps. If you are looking for perfection (and quiet printing) put the effort in to hand-fit the integrated bushing version and be amazed at the results.</p><h3>Post-Printing</h3><p>// model: Prusa i3 MK2/3/S/+ Y Chassis Bearing Straps with Integrated Bushings<br>//.<br>// author: fiveangle@gmail.com<br>// date: 2017nov18<br>// notes: Big thanks to @nicw who performed extensive empirical and objective testing, and wrote the original installation guide below.<br>// - Print 2x "left" and 1x "right". Use 6x M3x10mm button-head or socket-head screws to secure. If using the integrated bearing version, use this procedure for the best experience:<br>// - Rinse removed Y-carriage dowel rods with isopropyl alcohol<br>// - Mount both left bushings snug but not tight to bed carriage<br>// - Thread rods through both left side bushings while spinning, using isopropyl alcohol as a lubricant (taking all flammability precautions).<br>// - Keep spinning rod to hone the bushing to the correct size until the bracket itself slides down by gravity alone on the rod (slight angle) Note that for faster break-in, placing the rod in the chuck of a drill driver and using it to spin the rod within the bushing(s) is quite handy. It is okay to have very miner stiction, but shouldn't take a lot of force to move. Keep the rods moist with isopropyl alcohol to ensure PLA bearing surfaces are not melted due to friction during the process. You want the bearings to stretch/wear, but not melt.<br>// - Tighten the bearings on the left rod evenly while moving rod through both bearings to ensure they are in perfect alignment with each other. You will likely have to try several times while tightening the U-bolts or M3 bolts before you attain perfect alignment of the 2 left bushings.<br>// - Do the same wear-in procedure with the single right bearing without mounting to bed (you will align right bearing parallel to left rod after bed installation).<br>// - Mount the right bearing snug but not tight to the bed carriage<br>// - Mount bed carriage with rods on Prusa. For MK2, adjust width and skew of threaded frame rods until the right rod is perfectly parallel to the left. When parallel, the bed moves without belt connected smoothly the entire length of the bed (bearings will stick at either end or in the middle if rods are not parallel to each other).<br>// - Begin to tighten the mounting screws for the right bracket. This should result in the bed sticking again at some point(s) of it's travel. Continue to adjust the the bushing as you tighten until it is fully tightened but the bed moves smoothly and consistently the entire range of motion. This will be the most tedious part of the installation, especially for MK2 users (due to threaded frame rods changing alignment after tightening [Protop: this process also just happens to be the best method to align the Y axis smooth rods, even if you intend to replace the integrated bearings with standard ones after alignment, since linear bearings will dig into rods instead of sticking like PLA does, if not parallel]).<br>// - Slide bed all the way forward. Then tighten down fully, keeping bracket there for reinforcement.<br>// - Check that the stiction isn't too great. There should be NO stiction if you could theoretically push with equal force on both sides.<br>// - Attach belt attachment bracket to bed.<br>// - Double-check your y-axis belt angles.<br>// - Print like nobody's watching.</p>
With this file you will be able to print Prusa i3 MK2/3/S/+ Y Chassis Integrated Bushings (and Bearing Straps) with your 3D printer. Click on the button and save the file on your computer to work, edit or customize your design. You can also find more 3D designs for printers on Prusa i3 MK2/3/S/+ Y Chassis Integrated Bushings (and Bearing Straps).