Prusa Bear-BMG Fusion for MMU2s
prusaprinters
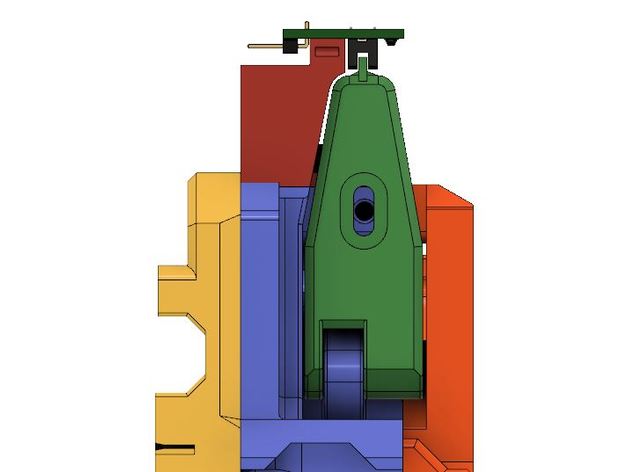
<p>I Remixed Marco's original design:<br/> <a href="https://www.thingiverse.com/thing:3254804">https://www.thingiverse.com/thing:3254804</a><br/> to incorporate changes for the MMU2s. The MMU2s adapter was originally created by Joe Prints here:<br/> <a href="https://www.myminifactory.com/object/3d-print-prusa-mk3s-mmu2s-ir-sensor-mount-bondtech-bmg-89362">https://www.myminifactory.com/object/3d-print-prusa-mk3s-mmu2s-ir-sensor-mount-bondtech-bmg-89362</a></p> <p>I also included some changes that I thought would be good.</p> <ul> <li>Removed the indirect filament sensor. Made straight path to extruder.</li> <li>Created funnels for filament inputs (Festo and Gears)</li> <li>Added a lid in order to fine tune sensor placement and allow for users to remix for different Festos</li> <li>Made distance between the front and back of the gearbox a little smaller and raised the bearing platform. This closely resembles the official BMG gearbox and makes less front/back shaft movement. Also, I think the bearing acts as a spacer now.</li> <li>Removed the need for a threaded insert, replaced with square nut</li> <li>Made the filament path smaller (2mm). Make sure to drill out burrs from the path after printing to make as smooth as possible.</li> </ul> <p><strong>Changelog</strong></p> <p>4/14/2019 - Moved the sensor 2mm to the left to account for slight angle of unloaded door. This required to alter the extruder bottom. If you've already printed the bottom, simply shave the left lip that holds the lid in place. Tested the sensor and it works great! Make sure to go to support -> sensor info and make sure 0 is unloaded and 1 is loaded.</p> <p>4/18/2019 - Made the clamp for the hotend and PTFE tube more traditional like the official BMG. This reduced chance of kinking the PTFE if you don't properly seat it. This is obviously a big deal for the filament load/unload.</p> <p>4/18/2019 - Rev 2. Made the extruder bottom hotend clamp beveled to make hotend placement easier. This is especially true if you are not removing your hotend cartridges.</p> <p>4/22/2019 - Added MK2.5 carriage.</p> <p><strong>Other</strong></p> <p>I also use a custom BMG firmware, but need to test it more:<br/> <a href="https://github.com/bgiot/Prusa-Firmware-BMG">https://github.com/bgiot/Prusa-Firmware-BMG</a><br/> I think it helps with the purge as the length is different and also the unload current is raised.</p> <p>If you're coming from Marco's design and want to change over to MMU2s, print out the lever, extruder bottom, exturder top, lid, and sensor cover. If your x carriage has a threaded insert from the last design, it should work fine!</p> <p>I printed this using Marco's original design with Atomic Carbon PETG at .15 layer height and got excellent print results. I fully printed this and tested it, and the load/unload is great, just need to dial in my config.</p> <h3>Print instructions</h3><ul> <li>Printed at .15 with Atomic Carbon PETG and a Vanadium Nozzle. </li> <li>Used Chris' Atomic Carbon profile with no changes.</li> <li>Printed with supports on the Extruder Bottom only.</li> </ul>
With this file you will be able to print Prusa Bear-BMG Fusion for MMU2s with your 3D printer. Click on the button and save the file on your computer to work, edit or customize your design. You can also find more 3D designs for printers on Prusa Bear-BMG Fusion for MMU2s.