Prusa Automatic Nozzle Cleaner for remote control (Octoprint)
prusaprinters
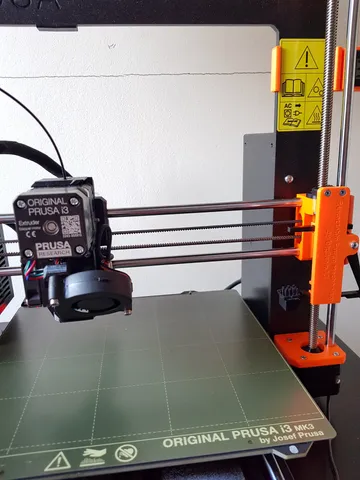
Prusa Automatic Nozzle CleanerThis solution is for the Prusa MK-series printers, that don't really have an out-of-print area, most solutions will either collide during bed-leveling or can't coop with the PINDA-sensor. If your printer does have such an out-of-print area, take a look at Simple Automatic Nozzle Cleaner for remote control (Octoprint).This Automatic Nozzle Cleaner remix is based on the original design from “BigBrain3D” of his Purge Mechanism and a remix of that design by “Kim, Kyoung-Joong” in Prusa Auto Nozzle Clear. Thank you BigBrain3D and Kim, Kyoung-Joong !!! Strong recommendation to also look at the information in their prints to get the complete picture. What this remix mainly adds, is the silicone brush, the specific mixture of parts, the G-code and the practical application.Features:Using a silicone brush that is able to withstand up to 300 °C when engaged for short periods.The type of brush used, works well for residues and oozes on the nozzle and will hardly wear out.The Prusa Automatic Nozzle Cleaner does not interfere with normal movements of the printer-head.The Prusa Automatic Nozzle Cleaner does even work when a PINDA sensor is installed. Prusa Automatic Nozzle Cleaner G-codeInsert the Nozzle Clean Mode block into the original Prusa Start G-code (two top lines and two bottom lines are from the Prusa G-code where the block needs to be inserted). M109 S[first_layer_temperature] ; wait for extruder tempG28 W ; home all without mesh bed level;//Nozzle Clean Mode StartG1 Z25 F720 ;move head into Z-positionG1 Y-3 F1000 ;move head into Y-positionG1 X240 F1000 ;move head into X-positionG1 X249 F500 ;swipe head over Prusa Automatic Nozzle CleanerG1 X240 F500 ;swipe head over Prusa Automatic Nozzle CleanerG1 X249 F500 ;swipe head over Prusa Automatic Nozzle CleanerG1 X240 F500 ;swipe head over Prusa Automatic Nozzle CleanerG1 X249 F500 ;swipe head over Prusa Automatic Nozzle CleanerG1 X240 F500 ;swipe head over Prusa Automatic Nozzle CleanerG1 X0 F1000 ;move head into home X-positionG1 Y0 F1000 ;move head into home Y-position;//Nozzle Clean Mode EndG80 ; mesh bed levelingG1 Z0.2 F720Tip: for testing the new G-code lines, execute them manually first by using your printers manual X-, Y- and Z-position “Settings” menu. Always “Auto-home” first in the “Calibrate” menu before starting to (re-)test, to prevent that your settings are influenced by skipped steps during the testing.Prusa Automatic Nozzle Cleaner parts-list1x Silicone Basting Brush (only brush part needed) e.g. amazon.nl, amazon.com, amazon.de or on Aliexpress (app. 55 x 40 x 15 mm)2x M3x10mm flathead bolt1x M3x10mm panhead bolt2x Tension spring 20.2 x 5.5 x 0.5 mm, Conrad Part Number 889250 for 5x (enter the number into “Part Search”)1x 3D-printed Prusa Automatic Nozzle Cleaner set of printsA tad of synthetic plastic-friendly grease for the moving parts. The author is using “Super Lube”.Printing the Prusa Automatic Nozzle CleanerThe 3D-print consists out of two sets: one black set and one orange set, but you can assemble as you wish from those sets or the STLs. The author's device was printed with Prusament PLA in 0.2mm quality mode with supports “Everywhere”. Preparing the Prusa Automatic Nozzle Cleaner brushFirst take a look at the pictures that show the prepared brush-part. Looking at the brush from the parts-list, “hairs” up, wide side in front of you. With a Stanley knife, cut a straight piece from the right side removing the most two right 3-hair rows. Cut off the left-side, of the remaining piece, preserving 5 rows of “hairs” for the remaining piece. Cut the remaining “hairs” to a length of 8mm with a pair of scissors.Looking at the remaining piece, still in the same orientation, cut a part out of the bottom of the piece under row 4+5 (row 1 is left), like in the pictures. Now the “new” brush should fit in the brush container.If you have a PINDA sensor installed, then you need to remove the “hairs” completely that interfere too much with the sensor. Still leaving enough for the nozzle area. Like in the pictures.Once this is finished, the customized brush should “snugly” fit into the brush container, when too difficult, try by applying some synthetic grease. If the brush-part is being pulled out of the brush-container too easy, then apply some drops of glue between the container and the brush (polyurethane glue preferred).Assembly of the Prusa Automatic Nozzle CleanerAfter printing all the parts, it is mandatory that you sand, at least, the sides of the parts that are moving and the areas that the moving parts are touching. The author used grits 120, 240, 800 and 2000, in that order, out of this set: Additional labels for Customized Sanding Sticks.Then you need to assemble the parts into a complete device according the pictures and meanwhile prudently grease all the sides and areas of parts that are moving with a thin layer of synthetic grease. To distribute the grease evenly and to check the functioning of the device, operate the assembled mechanism, before mounting it, a couple of hundred times by hand squeezing, after that remove any superfluous grease. If you have difficult understanding the assembly process, recommendation is then to view this video of the original designer of the mechanism where you can skip the specific “purging” parts: How to assemble a Retractable purge mechanism.Fine-tuning of the Prusa Automatic Nozzle CleanerTip: for testing your Prusa Automatic Nozzle Cleaner, position your printer-head manually first by using your printers manual X-, Y- and Z-position “Settings” menu. Always “Auto-home” first in the “Calibrate” menu before starting to (re-)test, to prevent that your settings are influenced by skipped steps during the testing.Check if the bed is touching the Prusa Automatic Nozzle Cleaner on the left side, if so, then cut a thin piece from the left side of the brush with a pair of scissors, till it is not touching anymore.EpilogueTheoretically, the print could still collide with the Prusa Automatic Nozzle Cleaner, if it uses the utter right 7 mm of the bed. If you are using Octoprint to remotely start the print, it has an “Exclude Region” extension which can help you to exclude that region ([(243,0);(249.99,0);(249.99,209.99);(243,209.99)] for an MKS3+) from being used while printing and use the Y=-3 region (allow Y=-3 area in the “Exclude Region” extension) to move the printer-head over the Prusa Automatic Nozzle Cleaner in the X-direction (as in above G-code). The author is still long term testing the device, up to now it works as expected, some esthetical improvements (e.g. the brush container shape) are already envisioned, but function-wise it is fine.Update 20220324: OctoLapse did cause a problem because it used the highest X-position at my setting (“Right back”) for the print-head during the taking of the layer picture. I did set it to “Left back” and the problem was solved.
With this file you will be able to print Prusa Automatic Nozzle Cleaner for remote control (Octoprint) with your 3D printer. Click on the button and save the file on your computer to work, edit or customize your design. You can also find more 3D designs for printers on Prusa Automatic Nozzle Cleaner for remote control (Octoprint).