Production of self-adhesive silicone parts (Example: Rubber discs for Tefifon Holiday/KC-4)
prusaprinters
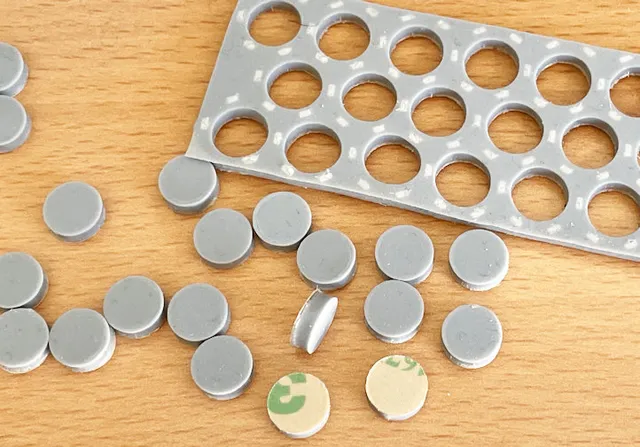
Update June 27th, 2022:In the meantime, I have also found another way of bonding silicone rubber without the chemical treatment trick described here. I have added the description of this alternative at the end of the article.PrefaceWith this project, I would like to show how self-adhesive parts can be made from silicone rubber with the help of the creative application of 3D printing. The main challenge here is that silicone rubber cannot normally be glued. I solved this problem for making replacement parts for a Tefifon. Since I have not seen the technique used anywhere on the Internet, it is very important to me to document it here. I am sure that it can be applied to other projects as well.Starting pointThe two Tefifons Holiday and KC-4 each have 3 gray rubber disks on their upper side, on which the cassette rests during operation:If the rubber discs have not already been lost, they are definitely hardened and yellowed after the many decades, sometimes even deformed. They no longer perform their task of providing damped support for the cassette well and, above all, are no longer attractive to look at.ChallengeThere is no question that these rubber discs need to be replaced with new ones. And how hard can it be to manufacture these 8mm discs in a thickness of 2.6mm and then glue them on? Surely, with the wide availability of silicone and PU rubber, this shouldn't be too difficult. But far from it:PU rubber is easy to make and also to glue, but then discolors very quickly to a yellowish color in daylight due to the material and is then no longer beautiful (I have tried it).Silicone rubber does not have the problem with yellowing. But has anyone ever managed to glue silicone? It is practically impossible. Silicone is characterized by the fact that nothing really sticks to it. In the dental field, there are adhesives that can be used to bind silicone to metal during mixing. Perhaps you could apply silicone to a metal foil and then glue the silicone discs to the foil? No idea if that would work. But since you can't get hold of this chemical as a private person, I discarded this approach.The new solutionI have chosen to cast the spare parts from silicone rubber. So that the discs can be glued, they have a base made of PLA. An adhesive film can then adhere to the PLA. To be able to connect the PLA with the silicone, a 3D jerked structure is molded into the silicone. Here is a view of the 3D model for illustration:In red the silicone is indicated, in green you can see the molded-in base made of PLA. The many holes in the 3D structure allow the silicone to adhere sufficiently well to the PLA part after curing. An adhesive film is applied to the PLA, which then creates the adhesion to the device.I have successfully used this type of silicone-PLA composite technique before to make silicone feet for screw attachment.The practical realizationAs with many of my projects, 3D design is one of the crucial aspects of putting theory into practice. After several iterations, I ended up with this design: It consists of two components. The core is, of course, the basic PLA structure, which then looks like this in printed form:With 8mm diameter and 2.6mm height of the discs, there is not much room for the inner structure here. Especially if you don't want to see the inner life of the silicone disc at the end and if you consider that the punching of the disks is also not accurate to the 10th of a millimeter. In the slicer, you can see that only a few threads of plastic are involved here, which are pulled by the printer: On the printed part, you can also see well from below how the base parts of each individual disc are arranged in a hexagonal structure on a 0.2mm thin layer:In contrast to the grid, the design of the casting mold printed from PETG is downright simple: Three strips of silicone rubber are cast in one go. To give the discs a matte surface, the casting mold is finished at the top with a plate of acrylic glass that has been roughened with 400-grit water sandpaper. A screen printing plate is then used for uniformly flat pressing.The PLA parts are first coated with an ultra-thin adhesive film. The company 3M offers excellent material for this in the form of 467MP: Three of the strips are then inserted into the mold: For the silicone, I use Type 12 from Troll Factory (TFC) in Germany and black silicone paint from the same manufacturer (any brand should do): The recipe is:9g part A9g part B0,08g blackThe gray is about RAL 7046 telegrey 2.After mixing, the silicone is first deaerated in a vacuum: The silicone is then poured into the mold: I think it is clear to everyone that there are many air bubbles hiding in the fissured structure. They are removed by venting three times in a vacuum: The acrylic sheet is rolled onto the silicone with the rough side and the mold is pressed with the help of the screen printing plate and several clamps: After 6-8 hours, the silicone is cured:The hexagonal structure of the PLA part is now clearly visible through the acrylic disk. On the one hand, it serves to hold the PLA part at the bottom of the mold. Another function is that you can see where the individual slices for punching the discs are located.The release from the mold must be done carefully so that the PLA structure does not break in the process. The silicone first comes off the PETG mold and sticks to the acrylic: On the underside, you can see that a tiny bit of the silicone has also pressed itself under the protective film of the adhesive film: The silicone can be easily rubbed off here and thus no longer interferes. It is important that the silicone does not penetrate between the PLA and the adhesive film - and fortunately I have not had any problems with this yet.The blanks are now finished and the mold is ready for the next filling: That's the beauty of working with silicone rubber: you can rub it off quite easily, and you don't have to fiddle with release agents or the like.Now the discs have to be punched out of the blanks. For this purpose, a punch is used, which I adapted to my eyelet press with an adapter printed from PCCF: The adapter also has the additional function of an ejector, as we will see later.The punch is screwed into the eyelet press with the adapter. At the bottom, a part printed from PA (nylon) serves as a blade-protecting counterpart: With good lighting, you can now see where to punch by looking at the PLA markings: When punching, the punch is not completely screwed onto the adapter. This leaves enough space inside the punch for the rubber washer. To then drive the punched part out of the punch, it is screwed onto the adapter as far as it will go. The punch thus pushes out the rubber disk: This ejection mechanism is extremely important: Due to the solid PLA on the bottom side, the disc gets jammed in the punch. Attempts to achieve the ejection with a spring mechanism were unfortunately not crowned with success. It is also important not to load the disc unevenly when punching out or otherwise reworking it, as otherwise the PLA support structure inside can break, which would then also be visible externally.With a little practice, punching goes relatively well off the hand: The yield of one batch is 72 slices. Due to occasional air bubbles and, above all, errors when punching the PLA, you have to reckon with just under 10% scrap: Sticking on the self-adhesive silicone disksAfter all the effort to produce, finally comes the satisfying moment of attaching the rubber discs to the devices. Peeling off the protective film goes quite well: You can clearly see the layer of PLA, which is only 0.2mm thick at the outer edge, with the typical lines of 3D printing. The adhesive film holds perfectly on it. You could almost have the impression of having an industrially manufactured product in front of you.On the Tefifon Holiday (and also on the KC-4), the rubber discs make a much better impression than the old originals: And once again, I am very pleased with the result of this little project. The only downside with the Tefifons is that you can't see the rubber discs at all once a cassette is put on: And it's also nice that a limit has finally been reached with the procedure shown here: Silicone rubber can be glued after all!Alternative approach through chemical treatment of the silicone rubberBy fiddling around and a bit of luck, I have now found a way to provide silicone rubber directly with an adhesive film by chemical treatment. This makes the process described above with the casting of the PLA plates obsolete.And here is the modified procedure:First, make the silicone as described above - but without the adhesive film and without the plastic insert. Then you get silicone remover at the hardware store. This is normally used to remove the remains of silicone joints without leaving any residue. It contains a solvent that dissolves hardened silicone.The silicone remover is applied to the underside of the silicone sheet with a brush to a reasonably thick layer:The silicone remover penetrates the material. If dry spots form, brush on more remover. The exposure time should be about one minute, a little more should not hurt. Then wipe the silicone remover off the silicone with a kitchen towel with isopropanol so that the material is clean again and without any annoying residues:The softening process causes the silicone to bulge, depending on its thickness. The procedure is therefore likely to be problematic for thin material.The adhesive film is immediately applied to the softened silicone:To ensure that the adhesive film bonds well with the dissolved silicone, place a heavy plate on top for one hour. After that, the whole thing is left to flash off in the air for a day. The solvent continues to disperse in the silicone and gradually evaporates. The deformation then also recedes as far as possible over time.Now the feet can be punched out as described above. Since you no longer have to pay attention to the fixed grid as above, the yield is greater:...and the result delights:I am now completely switching to the new approach in the production of these rubber discs. However, I am sure that there are applications in which it is good to be able to fall back on the other approach with the molded-in printed parts.
With this file you will be able to print Production of self-adhesive silicone parts (Example: Rubber discs for Tefifon Holiday/KC-4) with your 3D printer. Click on the button and save the file on your computer to work, edit or customize your design. You can also find more 3D designs for printers on Production of self-adhesive silicone parts (Example: Rubber discs for Tefifon Holiday/KC-4).