Printrbot PLUS v2.0 to 2.1 Carriage Conversion Kit
thingiverse
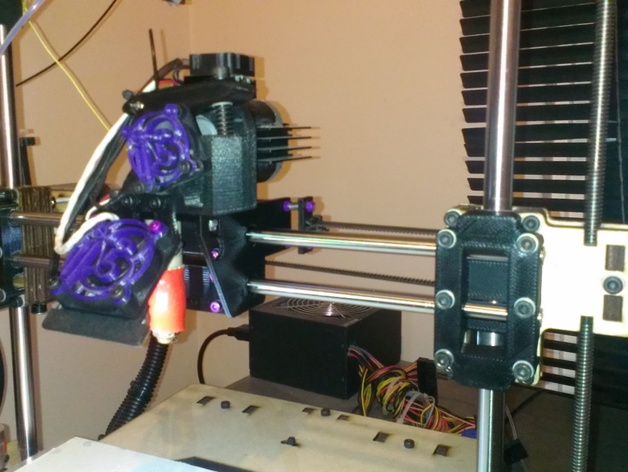
Hello there! I'm impressed by the innovative carriage design on the new Printrbot PLUS 2.1 by Brook and the team. However, it was disheartening to find no conversion kit available. Nevertheless, I've come up with a homemade conversion for the Printrbot PLUS 2.1 featuring my heavy-duty extruder block. This extruder has successfully completed hundreds of hours of printing without any issues. I don't have a Bill of Materials (BOM) ready yet, but it's in the works. You will need a mix of M3 and M4 screws for assembly, with socket head cap screws being recommended but not mandatory. Additionally, you'll require a spring to provide tension on the extruder lever. This modification offers a LIGHTWEIGHT carriage assembly (with the primary weight coming from bearings and motor), along with mounting points for a fan to cool the filament near the drive gear. This helps address a common point of failure in the stock PB extruders. You can also attach my LED light strip plates to the fan, as shown in my other designs. To install, first remove your old carriage and place the LM8UU bearings into the printed bearing blocks. Then, bolt these inside the new carriage. Add your extruder on top (the original laser-cut Wade's extruder will fit perfectly). Attach the belt to the belt mount and X motor side of the carriage. Finally, install the new carriage mounts on both ends of the carriage. Follow these instructions carefully, as a detailed BOM and more comprehensive guide will be available soon. With basic tool skills, you should have no difficulties executing this modification.
With this file you will be able to print Printrbot PLUS v2.0 to 2.1 Carriage Conversion Kit with your 3D printer. Click on the button and save the file on your computer to work, edit or customize your design. You can also find more 3D designs for printers on Printrbot PLUS v2.0 to 2.1 Carriage Conversion Kit.