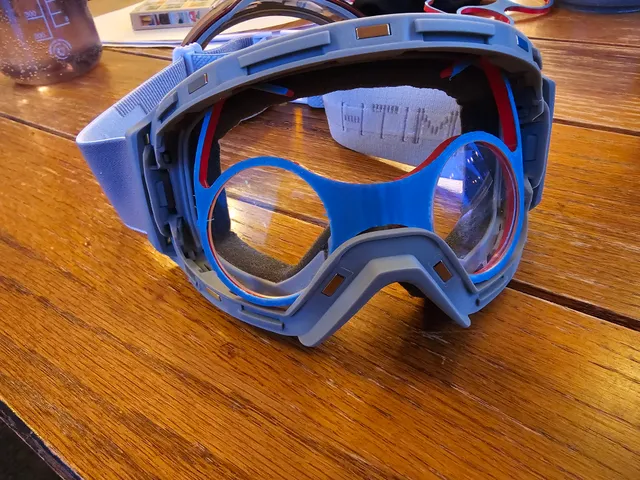
Prescription Lens Insert for Ski Goggles
prusaprinters
OverviewIf you wear glasses and like to ski or snowboard, you know how difficult it is to do both at once. Over-glasses goggles exist, but are often still awkward to use. I searched for a good option to hold an armless pair of glasses but never quite found what I needed, so I designed these. They make use of very cheap prescription lenes inserted into a semi-flexible frame that fits snugly into your goggles. Buying LensesFirst, you need the lenses. I designed the frame to fit lenses you can buy in the incredibly affordable Round Glasses 550021 from Zenni.com, available at time of writing for USD$12.99. Go ahead and get a pair of these (I sprung for the anti-fog coating as well, which seems to work reasonably well). Once you have the lenses, you will need to remove them from the frames. IF YOUR PESCRIPTION HAS A CYLINDRICAL COMPONENT, BE SURE TO PUT A SMALL MARK ON THE TOP RIM OF THE LENS FOR ALIGNMENT. Your cylindrical lenses must be correctly oriented in the frame or they will not work properly. Once marked, use a screwdriver to unscrew the frames and the lenes will come free easily. Make sure you remember which eye is which as well, if you have a different prescription for each eye.Printing the FramesThese frames use a somewhat experimental composite of PETG (red in the photos) and TPU (also called Flex, blue in the photos). Originally, I used PETG only, but I found the the hinge and arm areas became brittle in cold weather conditions and would fail. All-TPU frames were too floppy to be of use. I found that a mix of TPU and PETG produces a pair of frames that are durable and robust in a wide variety of conditions. You may have success with all PETG, but be warned, it did not work for me. I do not recommend PLA at all, as it gets far too brittle in the cold and you really don't want these breaking after a fall.To print with dual materials, simply add a color change in Prusaslicer so that the hinge portion is all one color, and the remaining layers are another (see slicer screenshot). Since my TPU and PETG both print just fine at 230 C, I did not bother with any temperature changes - in the GCODE, it's TPU all the way through. The default settings for TPU are slower than PETG, but this isn't a problem since the part is small anyway. Just schedule the color change, and swap in your PETG when it comes, allowing the print to finish with PETG. An example .3mf is provided, but you will likely need to change the layers/nozzle size to match your situation.InstallationOnce printed, just pop in the lenses (ensuring you maintain orientation and left/rightedness). The frames should be inserted into the goggle with the lower arch sitting right on the goggle node bridge, with the arms slightly flexed and pushing against the top of the goggle frame. If you have removable lenses, it's much easier to take the goggle lens off and put your insert in from the front. If the arms are too long or short, I recommend simply editing the source file and reprinting. If you are worried about fit and don't want to waste filament, a test print that's just a few layers tall will work well.AdjustmentsThis model was designed in OnShape, which makes it easy to adjust the design; just click here to copy and modify the design. I have made it easy to adjust the shape by modifying the “Basic Shape Sketch”.Tips & TroubleshootingSince this piece of gear is adding extra lenses inside your ski goggle, it does increase the chance that extra fog condenses inside them. Here are some things you can do to prevent that:Start with goggle and prescription lenses that both have anti-fog coatingsPut your goggles on while inside and warm. Fog condenses when warm, moist air touches cold lenses; putting your goggles on in a warm environment seals the inner lenses in a packet of warm face air so they don't have a chance to get cold. This will protect you while you move at slow speeds (walking/skating) from the lodge to the liftOnce you start skiing, cold air will enter through the goggle vents, cooling the interior. This will diminish the benefits of the last step, but is generally a good thing. Fresh air intake helps drive hot, moist air out from the goggle interior. This means the goggles won't fog as long as you keep moving. As a result of the cooling effect, after your first run, if you start getting fog when you slow down or stop, try taking take the goggles off your face any time you aren't moving to prevent moisture buildup. You may do the same if you find yourself on a long flat where you will be skating a lot (moving slow + sweating + breathing hard = fog).Resist wiping the inside of the goggles or the lenes themselves as much as possible. The anti-fog coatings tend to be delicate, and repeated wiping can damage them.If you wear a ski mask/neck gaiter over your face, make sure it isn't directing your breath upward. Your moist breath can easily travel through the lower vents and completely fog your goggles in seconds. If you have to, remove your mask whenever you stop!
With this file you will be able to print Prescription Lens Insert for Ski Goggles with your 3D printer. Click on the button and save the file on your computer to work, edit or customize your design. You can also find more 3D designs for printers on Prescription Lens Insert for Ski Goggles.
