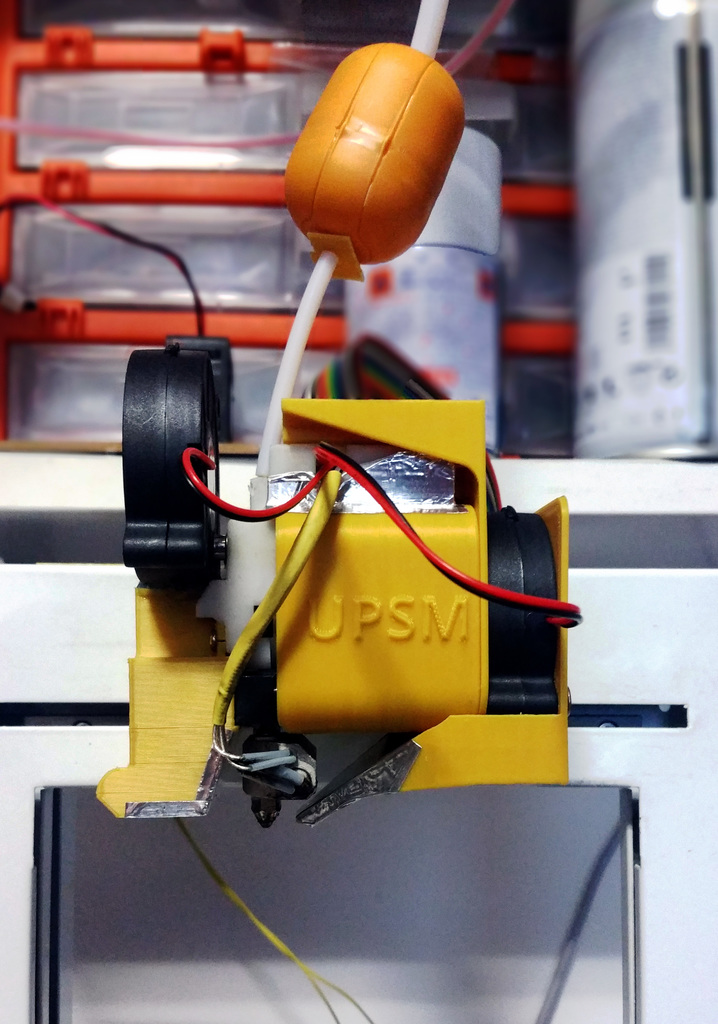
PP3DP UP Plus 2 PLA printing kit
thingiverse
PP3DP UP Plus and UP Plus 2 often struggle with printing PLA due to three significant problems. The first issue is that the throat of the hotend gets too hot as heat creeps up the steel tube, causing the PLA to bulge there and making it impossible to reliably extrude. The second major problem is that the extruder stepper motor gets hot during print, both from the fact that it's a weak motor doing a lot of work and because it's used partially as a cooler for the cold part of the hotend. This heats up the PLA print and prevents it from solidifying properly, resulting in poor-quality prints with overhangs and bridges. The third issue is that PLA requires cooling, but the original "solution" provided by the UP Plus and UP Plus 2 is ineffective. The hotend cooling duct has a "door" that allows some air to enter, but this doesn't work as intended. To solve these problems, I redesigned the extruder cooling system, which addresses both issues with bulging inside the hotend and excessive heat from the hotend. This redesign solves print issues with ABS, PETG, PC, and Nylon, but additional measures are needed for PLA. To tackle the second and third problems, a small project was created to improve airflow around the stepper motor and provide part cooling for PLA prints. The fan duct goes over the stepper motor, allowing air to pass around it and exit back to cool the motor. Make sure to extract air and not push it in. The cover part clips into the original top part of the UP Plus or UP Plus 2, keeping the fan duct in place. Two sets of screw holes are provided for a 40mm axial fan and a radial fan. If you don't need part cooling, mount the 40mm axial fan to extract air and achieve better prints. If you want to use part cooling with PLA, recycle the air by pushing it into the part. This way, the air is not too cold and won't stress either the part or the nozzle. The part cooling duct houses a radial fan and screws through the back of the cover into the duct. I'm using custom firmware on my UP Plus 2 to control the fan. On the top board, three 3-pin connectors are available for connecting the extruder cooler, fan, and PWM-able connector. If you're using only motor cooling, connect your fan to the middle connector. The rightmost connector is PWM-able and can be used for part cooling. Smoothieware configuration: ``` switch.fan.enable true switch.fan.input_on_command M106 switch.fan.input_off_command M107 switch.fan.output_pin 1.18 switch.fan.output_type hwpwm switch.fan.max_pwm 100 switch.fan.ignore_on_halt true switch.fan.startup_state true switch.fan.startup_value 0 switch.sw1.fail_safe_set_to 100 ``` **UPDATE 20191125:** * COVER V2 - Make the cover more rigid, especially when printing with materials that are not stiff enough (e.g., PETG can be too elastic for V1). * part_cooling_duct-main V2.stl and part_cooling_duct-tip V2.stl replace the original part_cooling_duct.stl. This is now a 2-piece part that snaps together, allowing easier tip changes and trying out multiple tips. The new tip blows air from two sides instead of one, resulting in nicer prints but requiring support to print (turn on only bed support).
With this file you will be able to print PP3DP UP Plus 2 PLA printing kit with your 3D printer. Click on the button and save the file on your computer to work, edit or customize your design. You can also find more 3D designs for printers on PP3DP UP Plus 2 PLA printing kit.
