PowerA Fusion Pro Xbox Controller - back pack replacement part
thingiverse
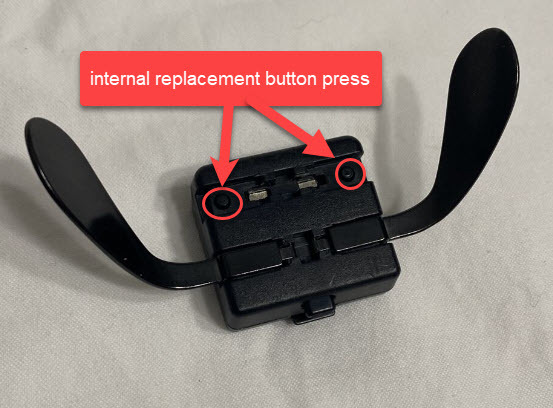
This internal part sits between the paddle and the button on the internal board. The side posts often break at the joint of the arm and the round magnet holders. Print this part on its side as shown in the third image for stronger joints. Printing this object on its back side will result in week arms that will snap off because of weak layering joints. After removing the back two screws to open it up to the internals, be careful with the 2 magnets that sit in the two wells. These magnets can be seen from the back and are sandwiched between this part and the shell. You should see a seem between the sections. Leave the back paddles in place to keep the magnets in place as you remove the part. I cut mine at the section between the magnets to disconnect it instead of removing the retaining screw on the inside panel. This kept the working side intact. After removing, clean up the surface with a pair of snips to make sure the new part sits flush in place. I used a minimal amount of super glue to adhere the replacement part and clamped it in place. Don't get glue on the side arms or they will not be able to flex when the paddle is pressed. Good luck! It worked great for me. Just make sure that you get proper penetration for the posts where the paddles will press (see first image). Removing too much of the existing surface may cause the part to sit too low and the paddles won't press properly. You can adjust the pin in the model if needed to correct this issue.
With this file you will be able to print PowerA Fusion Pro Xbox Controller - back pack replacement part with your 3D printer. Click on the button and save the file on your computer to work, edit or customize your design. You can also find more 3D designs for printers on PowerA Fusion Pro Xbox Controller - back pack replacement part.
