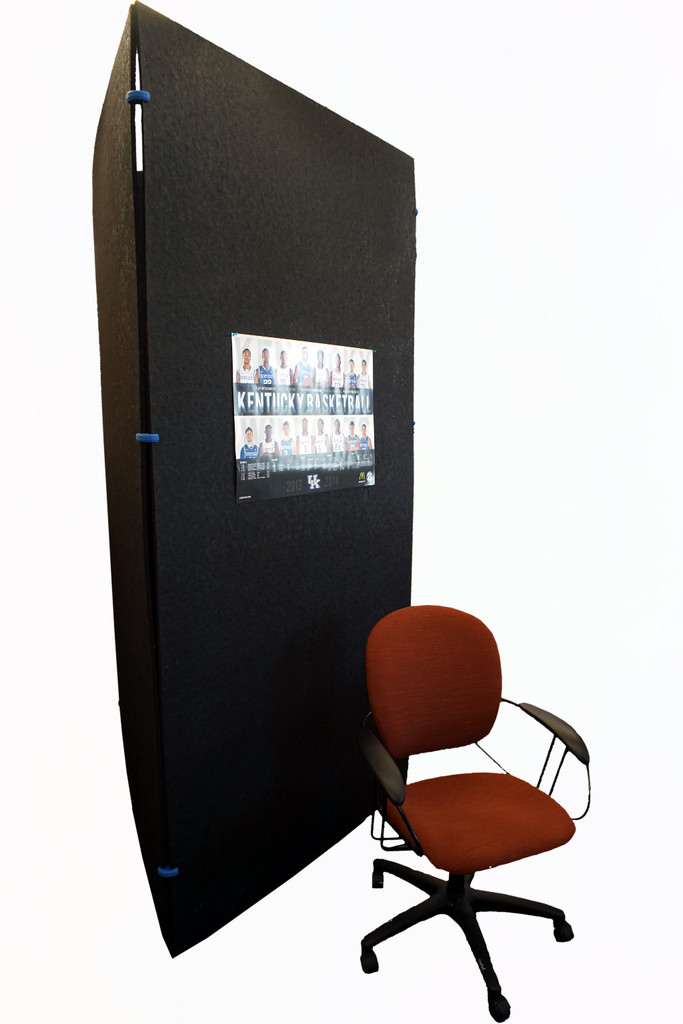
Poster Display Monolith
prusaprinters
<p>As technical program chair for IEEE SoutheastCon 2014, I needed to decide how the short paper posters would be displayed. I wanted something cheap, fast to set-up, and impressive... something that also would give a better traffic flow pattern than the usual line-of-posters arrangement. Thus, I created these 8-foot-tall, 4-foot-wide, freestanding, triangular-footprint, monoliths.</p> <p>Each monolith consists of three 4'x8' sheets of 1/2" thick black sound insulation board (total less than $30) held together by nine 3D-printed clips. A monolith can be assembled or disassembled in a few minutes without using any tools. You mount your posters or other materials on the textured black board surface using standard push pins.</p> <h3>Instructions</h3> <p>The original idea for this was something my group did for our research exhibit at IEEE/ACM SC2002. In the right side of the photo with the laptop video wall, you can see our triangular monolith made using duct tape and 1/2" thick 4'x8' sheets of foil-backed foam insulation board. That worked well, but didn't have enough mass to stay put, and applying the duct tape wasn't really a fun job.... Duct tape also wouldn't work well with more robust materials, such as OSB, which also did not look as nice.</p> <p>The black sound-absorbing panel is available at Home Depot and Lowes (and probably any similar store) is a much nicer-looking and pleasantly heavier material. It's also slightly cheaper than foil-backed foam, at a little under $10 per 1/2" thick 4'x8' sheet. Each monolith requires three sheets. You might be thinking you could cut sheets to make smaller monoliths, and you probably could, but be warned these sheets don't cut easily. When new, the black finish on them also can leave marks on things they rub against... but a day or two of air drying seems to fix that problem. In short, they are nice material, but hard to work with.</p> <p>The trick is the 3D-printed clips. Three clips hold each edge of the freestanding triangle together, so you need a total of nine clips per monolith. You simply push three clips on the edge of one board and then nudge the mating edge into the clips. Handling the 4'x8' sheets is a two-person job, but it takes just seconds per clip without needing any tools.</p> <p>The clips need to be strong. The design is shaped to provide that strength with very light filling -- we used 2 shells of PLA with just 8% fill. We also oriented the parts so that 45-degree rectangular fill would brace the key points. It's an easy print. We were in a bit of a rush, so we printed a set of 9 at a time on our MakerGear M2 at 120mm/s with 0.25mm extrusion. No problems at all.</p> <p>You've probably noticed that the clips have teeth inside to grasp the board better. Actually, the thickness of the 1/2" board varies a lot (over 4mm) and they're all undersized -- the teeth make it easy to push on while allowing each clip to hold despite the thickness variations. Should you happen to get board with a significantly different thickness, be sure to test and scale the clips if needed.</p> Category: Office
With this file you will be able to print Poster Display Monolith with your 3D printer. Click on the button and save the file on your computer to work, edit or customize your design. You can also find more 3D designs for printers on Poster Display Monolith.
