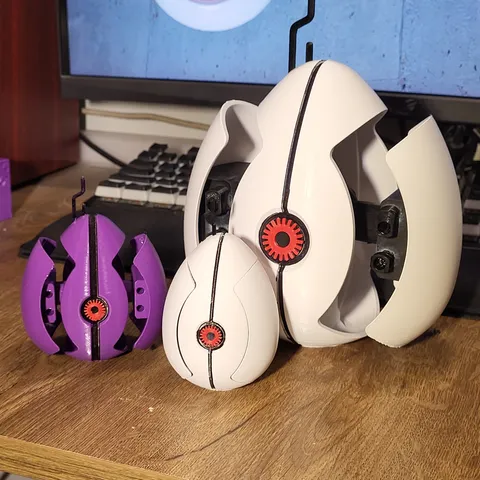
Portal Turret Articulated Egg
prusaprinters
It's a Portal turret shaped more like an egg that can open like the actual turret in-game! Notes:- Every stl was positioned for the recommended printing orientation. - The 100% egg is 8cm tall (without antennae) and 200% egg 16cm (without antennae).- Most tolerances between parts have been done with an offset of (-0.15mm), the 200% egg keeps most offsets the same, the parts are just scaled to 200% and screw holes adjusted to work with M3 screws.- If you're finding the 100% egg difficult to move or the “Levers.stl” difficult to insert into the “WheelPins.stl”, you can try drilling the hole in the lever with a 3mm drill bit.- Everything was printed with a 0.4mm nozzle.- The bottom of the “Egg.stl” was printed with variable layer height to help with layers properly overlapping each other and keeping the egg looking smooth.- You need to print every file once for one turret egg.- For the 100% egg the below listed parts were printed with a layer height of 0.16mm • AntennaLong.stl • AntennaShort.stl • GunRail.stl • Knob.stl • Levers.stl • RotatePin.stl • Wheel.stl • WheelPins.stl- Parts that need supports are: • GunBase1.stl • GunBase2.stl • WheelPins.stl • Wing1.stl • Wing2.stl- Print the wings like this, both for 100% and 200%, I used organic supports here: Assembly:1.Get the “Egg.stl”.2.Screw “GunRail.stl” inside the Egg using two M3 screws:100% Egg: M3 5mm200% Egg: M3 10mm3.Get “Wheel.stl” and "WheelPins.stl".4.Insert the pins into the wheel:100%: Use cyanoacrylate glue to secure the pins in the wheel. 200%: Use glue if you want to, wasn't necessary for me.5.Get “RotatePin.stl”, and insert it as far as it goes.6.Insert the wheel with attached pins onto the “RotatePin.stl”.7.Move the rotation pin back out…8.… and attach the knob.(should go in without glue and stay in place)9.Get “GunBaseX.stl” and “Guns.stl”.10.Glue the guns and insert them into the base.11.Now insert the “Levers.stl” into the gunbase.12.And insert the lever onto the wheel pin, and gunbase onto the gun rail. Note the circle added to the levers, it is supposed to be next to the wheel.(You can insert the lever alone, onto the wheel pin first too, and then attach the gunbase)Secure the lever in the gunbase with an M3 screw.100%: M3 8mm200%: M3 16mm13.Repeat steps 9-12 for the other side. 14.Attach the “WingX.stl” to either side, you should preferably glue them to the gunbases.15.Insert both antennae, you can drop a little glue into the holes.Use a black marker to paint the middle seam of the “Egg.stl”, as well as the circle where the eye will go. Glue the eye to the front, print it in different colours by swapping filament mid-print. 16.Succumb to paradoxes. Let me know if I need to explain something further and post a make if you make one! :)
With this file you will be able to print Portal Turret Articulated Egg with your 3D printer. Click on the button and save the file on your computer to work, edit or customize your design. You can also find more 3D designs for printers on Portal Turret Articulated Egg.
