Pop-Open Card Wallet
prusaprinters
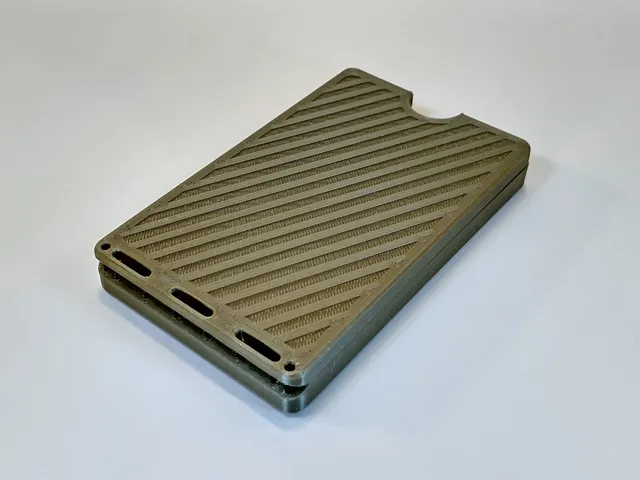
The top and bottom parts of this clam-shell wallet are laced together with a piece of springy TPU filament. Closing the case stretches the cords so that when the latch is released, the case springs open! Holds 5-8 cards, plus a little room for a few bills and coins.The hinge is held together with the TPU cord, but there is a tiny ball and socket that keeps the lid aligned and free to pivot slightly. Pivoting the lid is how you release the latch. To keep the case from opening unexpectedly in your pocket, there is a small safety latch (4th photo) that you press down on to enable the lid to release.PrintingUse a 0.2mm layer thickness and 0.4mm line width for both parts. Do not use a brim, raft or supports. (Both parts have small built-in supports under the latch hook overhangs.) After slicing, make sure to preview the gcode to make sure that the first layer above the decorative embossing (the second layer) has layer lines printed more or less orthogonal to the surface stripes. You may need to adjust the bridging or infill angle if your slicer creates fill lines parallel to the first layer lines.AssemblyAfter printing, break away the built-in supports under the latch hooks. Test fit the latches. It may be necessary to clean up the surfaces around the hooks with a small file or sandpaper to get the latches to mate properly. Also, clean up any nits on the little ball on the cover hinge.For the hinge cord, start off with about 200 mm of 1.75mm TPU filament. With the case closed, thread the filament starting on one the top side holes at one of the ends. Pull the cord all the way through leaving a short tail. Continue threading the filament up and down through the holes but don't pull it tight – leave small loops on either side. You'll notice that on the bottom side in the cord grooves, there are some pinch points to grab onto the filament. At the end you started with, hold the case open and pull both ends of the cord taut so that the TPU is pinched in the first pinch point. Continue along the through the rest of the holes pulling the cord tight into the pinch points. When you are done, the case lid should be sprung open by the cords, but have enough give to be able to close the case. You may need to adjust the cord tension here and there to get it pulled uniformly taut. Once you are satisfied with the fit of everything, trim the cord ends off flush when the case is in the open position.
With this file you will be able to print Pop-Open Card Wallet with your 3D printer. Click on the button and save the file on your computer to work, edit or customize your design. You can also find more 3D designs for printers on Pop-Open Card Wallet.