PoorMaster
prusaprinters
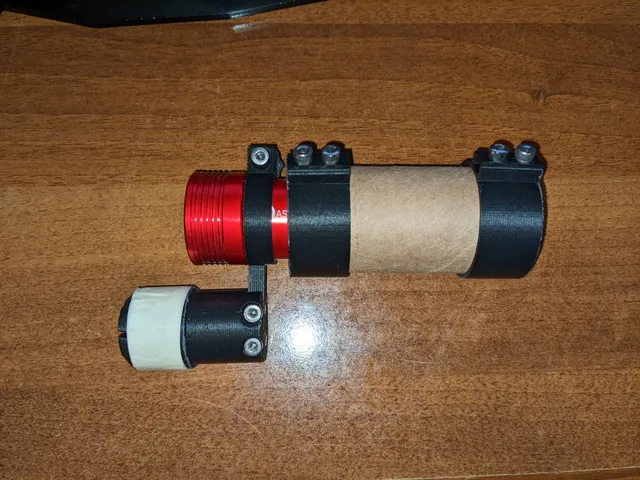
In my on-going attempt to prove that the astronomy hobby is unjustifiably expensive for “good tools” (yes I know you can do astronomy with little to nothing or just binoculars) let me introduce :The PoorMaster!Featuring:Selectable camera of your choiceMounting option of your choiceFocal length of your choiceSave money of your choice! All you need is :a spare 1.25" eyepiece (any focal length will do but longer will result in better polar alignment)A sensitive enough camera able to be mounted into 1.25" fittings (maybe you could adapt a webcam to 1.25" to save money here too)7x M4 Nuts2x M4x8mm Bolts2x M4x12mm Bolts2x M4x16mm Bolts1x M4x20mm Bolt4x M4 Washers (or something similar, just for clamp spacing)A length of 1.5" cardboard tubing, typically found from a paper towel rollPolar alignment software that functions on RA rotation - I use the Ekos Polar Alignment tool which is also free and accepts so many various cameras via Indi Assembly instructions (some pictures included):Print all the pieces and gather all the materialsAttach clamp piece to the SWSA base via 2x M4x16mm bolts and 2 nutsNOTE: Make sure the clamp side with more height than the bolted base faces AWAY from the side with the collet Put the M4x20mm bolt through the clamp top, along with 4 washers and a turn knob with the nut facing outwardSlide in your desired camera and clamp such that the back of the camera is as close to the clamp as possible. This gives you room to not hit your mountCut the paper towel roll to the appropriate sizeSelect desired focal length eyepiece, one could theoretically also use a barlow with this as well, but at that point it makes more sense to use a finderscope for thisUsing just the camera (clamped or not) and the eyepiece, make the camera look through the eyepiece and bring to focus on a distant object if possibleThis should be around the focal length of the eyepiece but due to eye relief optics this may be a little differentMeasure approximate distance from clamp top to eyepiece end, subtract about 1cm from that to give yourself room to adjust in and back focusCut!Slide cut paper towel roll into 1st tube adapter and screw in the bottom bolt with an M4x8 bolt and nutInsert M4x12 bolt and nut all the way through until it pokes a hole in the rollIf you don't want to scuff your eyepiece proceed to pack the inner hole with some cardboardIf not you may need an M4x14 (if those exist) or longerSlide eyepiece in to desired height and tighten M4x12mm bolt - leaving it more recessed in will help block stray lightRepeat the last 3 steps for the top assemblyOpen camera software and adjust camera depth by loosening M4x12mm bolt until focus on distant object is achievedRe-tighten If you need to attach to an HEQ5 an adapter to the base one is provided, if it is not a snug fit, simply put some masking tape around it Notes: - In the software you choose to use this, the focal length of your system will be the focal length of the eyepiece, even if the distance from the front of the eyepiece to detector is not. There may be complicated optics involved or it might just be that the center of your eyepiece is much deeper in than the front or back surface- You can grab the turn knob from here, I've chosen to not repost it in here to avoid duplication of models- All files should be able to be printed without supports With just a simple 20mm eyepiece I was able to achieve ~7 arcminutes, your pointing accuracy will come down to your camera, chosen focal length and how well you can adjust your mount.
With this file you will be able to print PoorMaster with your 3D printer. Click on the button and save the file on your computer to work, edit or customize your design. You can also find more 3D designs for printers on PoorMaster.