Pocketchip Cover 2
pinshape
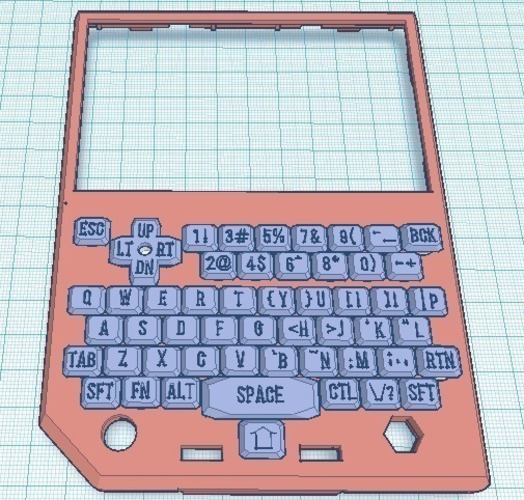
This is the redesigned pocketchip cover. It's untested, but based on 1/4th test results, it looks to be in order. Be sure to follow the printing instructions below and closely monitor your printer as there are many small and detailed parts involved. Printing this at your own risk is advised due to its complexity. I strongly recommend having the lettered keys printed on a high-end printer like Stratasys or by a professional printing company. Many users wanted a half-cover case, but @Paratyphi has already created an excellent one that can be found here: http://www.thingiverse.com/thing:1790510, http://www.thingiverse.com/thing:1686723. I've designed a similar button layout to accompany his cover. If you print this successfully, please consider tipping as it took considerable time, effort, and resources to create this design. I'd like to extend my gratitude to the supporters who have made this possible. In case of any issues or problems, please send me a private message along with pictures and your concerns, and I'll do my best to address them promptly. To remove the cover, stand the Pocketchip on its end on a flat surface with the front facing you. Place your fingers on the top clips and grip both slightly while giving it a gentle pull towards you; this should cause the cover to detach easily. Print Settings: - Printer Brand: Printrbot - Printer: Simple White - Rafts: Not Required - Supports: None - Resolution: 0.2mm - Infill: 100% Notes: - Print the cover at a layer height of 0.1 or 0.2mm with an 8mm shell thickness and 25% infill for optimal results. - If you still experience tight fits with the buttons in the case, consider reprinting the cover at a 4mm shell thickness with 100% infill. - Print the buttons and keys at a layer height of 0.1 or 0.2mm with a 4mm shell thickness and 100% infill for the best results. - Use the slowest print setting possible, as this will result in better quality prints. Post-printing, you may want to glue your keys into place by attaching them from bottom to top. The keys follow a simple layout: any key with three symbols on its left side is an FN symbol and the right side represents the shift symbol. Keys with two symbols have the left as FN and the right as primary character. Also, if you write anything on the unlettered keys, using a pencil to write it first and then spraying a coat of clear spray paint over it will help prevent the written text from smudging or bleeding off.
With this file you will be able to print Pocketchip Cover 2 with your 3D printer. Click on the button and save the file on your computer to work, edit or customize your design. You can also find more 3D designs for printers on Pocketchip Cover 2.