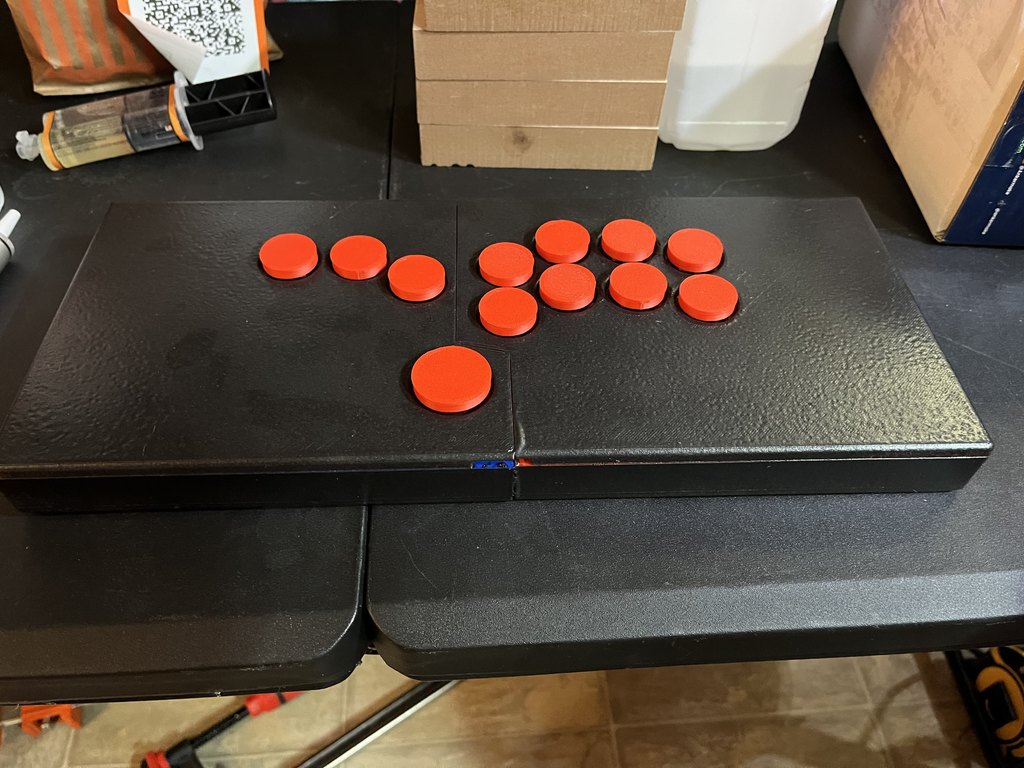
Ploompbox FS12 Full Size Modular Leverless Fightstick
thingiverse
A full size leverless stick made to be split into two pieces for smaller printers volumes. Update: Added a riser kit to allow the Ploompbox to JLF Joysticks and standard Sanwa 24mm buttons (see added top files too). Soon once I figure out the measurements I'll add a top left panel that accomodates joysticks. Ploompbox FS12 Full w/keyboard switches: * ploompbox-FS12-full-bottom-right X 1 * ploompbox-FS12-full-bottom-left X 1 * ploompbox-FS12-full-top-right X 1 * ploompbox-FS12-full-top-left X 1 * ploompbox-FS12-full-vertical-flange X 2 * Gateron Low Profile Keys X 12 (https://www.amazon.com/dp/B09WYLN4WG?ref=ppx_yo2ov_dt_b_product_details&th=1) * 25mmX5mmX3mm Magnets X 8 (https://www.amazon.com/dp/B0B6VNMJP7?ref=ppx_yo2ov_dt_b_product_details&th=1) * 12mm Push Buttons X 4 (https://www.amazon.com/dp/B09BKWMNJ9?ref=ppx_yo2ov_dt_b_product_details&th=1) * Raspberry Pi Pico (https://www.amazon.com/dp/B0B4VLYM4B?ref=ppx_yo2ov_dt_b_product_details&th=1) Ploompbox FS12 Full Modular w/Sanwa Buttons: * ploompbox-FS12-full-bottom-right X 1 * ploompbox-FS12-full-bottom-left X 1 * ploompbox-FS12-full-top-right-sanwa X 1 * ploompbox-FS12-full-top-left-sanwa X 1 * ploompbox-FS12-full-24mm-riser-right X 2 * ploompbox-FS12-full-24mm-riser-left X 2 * Sanwa 24mm Buttons X 11 (https://www.amazon.com/OBSF-24-Replacement-Arcade-Button-Sticks/dp/B01FWHAKLY/ref=sr_1_1?crid=3DR7NECFD00TE&keywords=Sanwa+24mm+buttons&qid=1692131210&sprefix=sanwa+24mm+buttons%2Caps%2C129&sr=8-1) * Sanwa 30mm Buttons X 1 (https://www.amazon.com/Sanwa-OBSF-30-Arcade-Push-Button/dp/B00K7Z58L4/ref=sr_1_1_sspa?crid=3SSGYDVMLDJF7&keywords=Sanwa+30mm+buttons&qid=1692131251&sprefix=sanwa+30mm+buttons%2Caps%2C126&sr=8-1-spons&sp_csd=d2lkZ2V0TmFtZT1zcF9hdGY&psc=1) * 25mmX5mmX3mm Magnets X 8 (https://www.amazon.com/dp/B0B6VNMJP7?ref=ppx_yo2ov_dt_b_product_details&th=1) * 12mm Push Buttons X 4 (https://www.amazon.com/dp/B09BKWMNJ9?ref=ppx_yo2ov_dt_b_product_details&th=1) * Raspberry Pi Pico (https://www.amazon.com/dp/B0B4VLYM4B?ref=ppx_yo2ov_dt_b_product_details&th=1) Ploompbox FS12 Full w/Sanwa Buttons: * ploompbox-FS12-full-bottom-tall-right X 1 * ploompbox-FS12-full-bottom-tall-left X 1 * ploompbox-FS12-full-top-right-sanwa X 1 * ploompbox-FS12-full-top-left-sanwa X 1 * Sanwa 24mm Buttons X 11 (https://www.amazon.com/OBSF-24-Replacement-Arcade-Button-Sticks/dp/B01FWHAKLY/ref=sr_1_1?crid=3DR7NECFD00TE&keywords=Sanwa+24mm+buttons&qid=1692131210&sprefix=sanwa+24mm+buttons%2Caps%2C129&sr=8-1) * Sanwa 30mm Buttons X 1 (https://www.amazon.com/Sanwa-OBSF-30-Arcade-Push-Button/dp/B00K7Z58L4/ref=sr_1_1_sspa?crid=3SSGYDVMLDJF7&keywords=Sanwa+30mm+buttons&qid=1692131251&sprefix=sanwa+30mm+buttons%2Caps%2C126&sr=8-1-spons&sp_csd=d2lkZ2V0TmFtZT1zcF9hdGY&psc=1) * 25mmX5mmX3mm Magnets X 8 (https://www.amazon.com/dp/B0B6VNMJP7?ref=ppx_yo2ov_dt_b_product_details&th=1) * 12mm Push Buttons X 4 (https://www.amazon.com/dp/B09BKWMNJ9?ref=ppx_yo2ov_dt_b_product_details&th=1) * Raspberry Pi Pico (https://www.amazon.com/dp/B0B4VLYM4B?ref=ppx_yo2ov_dt_b_product_details&th=1) All parts are made to be printed flat with minimal supports. To connect the two bottom halves simply use 2.5x6mm metric bolts and for extra sturdiness apply a light layer of epoxy along the connecting edges. Add 4 3X5X25mm bar magnets to the bottom and lid halves. Use super glue or epoxy to press the flanges into the two slots on the bottom of the lid. Place a piece of plastic sheeting or wax paper between the lid and the bottom, apply a thin layer of epoxy to the lid’s connecting edges and let the magnets do the work of pressing the edges together. For a better bond once it’s in this state I recommend using a bar clamp to hold the bottom and lid together as tight as you can without bowing the plastic. Once dry, remove lid and plastic sheeting/wax paper and thread 4 12mm panel mount momentary push buttons into the back of the bottom of the case (I recommend putting butt connectors on these so that the joystick can be taken apart). Then push 12 low profile keyboard switches into the top sockets (they should snap into place, but if not you might need to adjust your tolerances or epoxy/super glue them into place). The buttons I provide with this are for Cherry MX stems. I will eventually add buttons for Kalih switches and an alternate bottom to accommodate full-size Sanwa buttons. Once you have the switches in place, push the buttons onto the top of the switches firmly and they will make a good tight fit. If they are too tight, adjust your tolerances on your printer settings. Finally get some 24awg wire and connect one of the two leads on the bottoms of all the switches to a common ground wire, and then connect individual wires to the other lead of each switch and then connect to the board of your choice. If you go with a Raspberry Pi Pico with GP2040 you can print and build this stick for about $30 in about two days.
With this file you will be able to print Ploompbox FS12 Full Size Modular Leverless Fightstick with your 3D printer. Click on the button and save the file on your computer to work, edit or customize your design. You can also find more 3D designs for printers on Ploompbox FS12 Full Size Modular Leverless Fightstick.
