Planterbox for down-spouts
prusaprinters
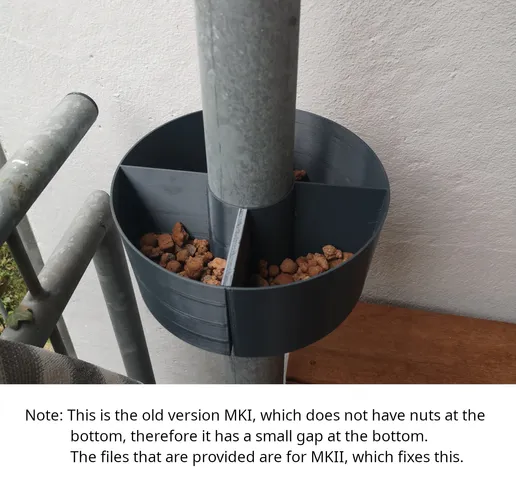
On my rather small balcony there is this down-spout and I always thought about using it to get more place to plant herbs and stuff. Now that I do own a 3D printer, I went and created a nice and customizable planting pot to finally make use of that otherwise rather useless down-spout. \o/Since everyone's situation will be different and there does not seem to be a standard when it comes to the diameter of down-spouts, I'm not supplying STL files but the Fusion 360 Project file. Using this, you can adjust every relevant parameter to make the planterbox the way you need and like. Fusion 360 is free for non-commercial use and it is really good, so give it a try. Please see the screenshots on how to adjust the parameters.If, for some reason, you do not manage to edit the fusion file and export yourself the models, leave a comment with the sizes (Upper-/Lower Diameter, Inner-Diameter, Height, Wall-Strength) you need and I'll export the model for you.Of course this model will only make sense, if your down-spout is not directly attached to the wall, so you can fit the pot around it. But if you have a balcony and there is one of these things running through it, chances are good that you can make use of this, I guess. :)Okay, so here is how it works:Measure the diameter of your down-spout. The easiest way to do that is to use a non-flexible cord or similar, put it around the spout and mark where the end meets the cord. Measure the distance. Now with some math, you can calculate the diameter: Measured distance / PI (3.1416) = diameter. So if the measured distance is like 25 cm, it's 25 cm / PI = 7,9577. Multiply by 10 to get the millimetres, which in this case would be 79,577. Open the project file in Fusion 360. On the “SOLID” tab, click on “Modify”, chose “Change Parameters” at the bottom of the drop down. At the top, there are favorited parameters that you can all change, where the ones that make the most sense for you probably are:InnerDiameterThis is where you put in the measured diameter of your down-spout HeightIn case you want the whole model to be higher or shorter. But 10 cm is a good height for like herbs and stuff. OuterDiameterTop, OuterDiameterBottomIf you have a printer with a different bed size, or you just want it to be smaller, change these.NOTE: Do not make the upper diameter smaller than the bottom one, the clamps obviously won't fit, so you would not be able to fixate the parts. Otherwise, go wild. :) WallStrengthIf you really want to save up on filament and trade in stability for it, go for it. But I'd rather not change this and please don't go below 1 mm, it won't work and it's not a good idea either. BottomStrengthJust in case you change the wall strength, you still might want the bottom layer to be printed with a higher thickness. Change that here. WallStrengthSeparatorOn each of the two parts, there is one separator for increased stability and for dividing the planting area, so you can plant more different herbs. You can easily make this one thinner here and not affect the other walls, if you want that. CreateDrainageHolesOkay this unfortunately does not work. I wanted to make it optional to drill holes into the bottom, but it does not work the way it was planned. If you don't want holes in the bottom, please just delete first “Hole” item in the history at the bottom of the screen. I've attached a screenshot to show you which one it is. Now, if you want to be absolutely sure that you have measured the right dimensions, there is a test item you can print quickly to check it. It is a half-circle with the diameter you have entered in the parameters. Print two of these and check if they fit nicely around your down-spout.To export these, open the “Bodies” on the left, right-click “Test-Item”, select “Save as STL”, save it, slice it, print it. If you're satisfied, open the “Bodies” on the left, right-click the item “Left”, select “Save as STL” and save your file. Do the same for the Body “Right”. Repeat the same for the bodies “Clamp 1” and “Clamp 2”. Repeat the same for the body “TPU Stripe”. Optionally do the same for “Bolts” - you probably won't need them, they are for holding the clamps in place in case they are too lose, which they should not be normally. Align and slice these parts with your favored slicer and print!The clamps should be printed upside-down, for the rest use common sense. ;-)All the parts, besides the stripes, should be printed in PETG, not PLA, since you're placing it outside. The stripes should be printed in TPU/Flex, you don't absolutely need them, but you need something similar to give your pot some extra grip, so it won't slide down the down-spout.Montage:I fixated the TPU stripes with some glue, just so they don't fall out when attaching the model to the down-spout. It does not need to be nice or super strong, they just need to be kept in place. You can use the glue stick that probably came with your printer. Add the left part to your down-spout. Add the right one from the other side, move it from the bottom upwards, so the connectors at the bottom slide into each other. Add the clamps from the top, they should fit over the walls of both parts and have a nice, tight fit, which keeps them in place. You might need some force, but that way they stay in place and give a good fixation. If they are too lose for some reason, put one of the bolts through the hole to fixate them. If the clamps seem not to fit in a whole, check the bottom part, if it actually slides into the fixation.Should you need to remove the clamps, know that it can be difficult. Use a screwdriver on the bottom cutouts to leverage the clamp out of the pot. Done! Happy planting! And please leave a photo and/or comment! :)Parts list:PartAmountMaterialLeft1PETGRight1PETGClamp 11PETGClamp 21PETGClamp Bolt2PETGTPU Stripe4TPU/Flex Print settings:Nozzle0.4 mm0.6 probably works too, but untested.Layer height0.2 mm or 0.3 mmJust as you like. I've used 0.3 mmInfill:10%Actually most parts don't have an infill.Supports:NoBrim:NoFilament:PETG and TPU/Flex (optional)
With this file you will be able to print Planterbox for down-spouts with your 3D printer. Click on the button and save the file on your computer to work, edit or customize your design. You can also find more 3D designs for printers on Planterbox for down-spouts.