 prusaprinters
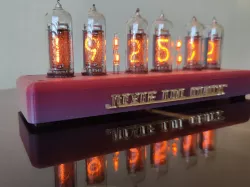
Pixie Clock 6 digits
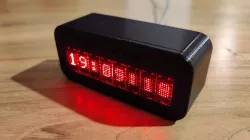
Pixie 6digit clockGitHub Repository: https://github.com/lorenzo-dl/Pixie_6digit_clockDescriptionThis clock uses the beautiful Pixies display from Lixie Labs, that consists of a dot matrix led display module.For this project I’ve used 4 of them and controlled them with a Wemos D1 Mini Esp8266. You can buy the display at this link: https://www.tindie.com/products/connornishijima/pixie-chainable-dual-57-micro-led-displays/The Wemos (or simply an ESP8266) can be bought easily at Ebay or AliExpress. https://it.aliexpress.com/item/32651747570.htmlFor mounting the back plate to the body I’ve used four M2x8mm screw and eight M2x6mm are needed to secure the display on the body To connect the power, I’ve used a mini usb breakout board that I’ve found on AliExpress: https://it.aliexpress.com/item/4000550118202.htmlThe Arduino sketch that I’ve used is an example of the Pixie library and you can find it at this link: https://github.com/connornishijima/Pixie/tree/master/examples/INTERNET_BASED/NTP_CLOCKFollow the instruction at the pixie GitHub page to install the Arduino library.FrontBackFind additional info about the parts needed in:3D partsLaser cutted partsImagesPrint SettingsI’ve used Prusa Slicer and an original Prusa MK3S with the powder coated bed for the 3d printed parts.All parts are printed from Prusament Petg Jet Black, with the “0.2mm SPEED” preset and no supportsAll the stls are in the right orientation.The back plate is intended to be laser cutted on 3mm acrylic (files included), but can be 3d printed as well, so I’ve included a stl file for it.Part ListPrinted partsLaser cutted parts (not necessary)1x Wemos D1 mini1x Micro USB board (not necessary but improves the look of the clock)4x Pixie By Lixie Labs Display Module4x M2x8 screw8x M2x6 screwAssembly instructionSetup the dasy chain of the four Pixie modules as show in the pixie GitHub, connect them with the Wemos and upload the sketch.If You want connect the 5V and the ground terminal of the Wemos to the 5V and GND of the micro usb module than secure it to the main body part with glue.Now get the back panel, insert in every 4 hole a screw and thread them on the plastic body.Happy printing and enjoy your new clock.licensing and contactsThank you for reading and your interest, if you want more details feel free to visit the project GitHub page or contact me on Instagram @delucalabs.This design is licensed under a : Creative Commons (4.0 International License) Attribution-NonCommercial.
Direct link to the original creator's page
More from lorenzodl
Similar Models
 prusaprinters
 prusaprinters
 prusaprinters
 prusaprinters
 prusaprinters
 prusaprinters
 prusaprinters
 prusaprinters
Model Specifications
Frequently Asked Questions
How do I download Pixie Clock 6 digits?
Click the "View on prusaprinters" button above to visit the original model page on prusaprinters. You can download the STL file directly from the creator's page for free.
What 3D printer can I use for this model?
This STL file is compatible with most FDM 3D printers (Creality Ender 3, Prusa MK3S+, Bambu Lab, etc.) and resin printers (Elegoo, Anycubic). Check the original page for recommended print settings and materials.
Is this 3D model free to download?
Yes, this model is available as a free download on prusaprinters. Some creators accept tips or donations.
Can I modify this STL file?
Most STL files can be modified using free software like Blender, TinkerCAD, or Meshmixer. Check the license on the original prusaprinters page to see if modifications are permitted by the creator.