Pirate Treasure Chest
prusaprinters
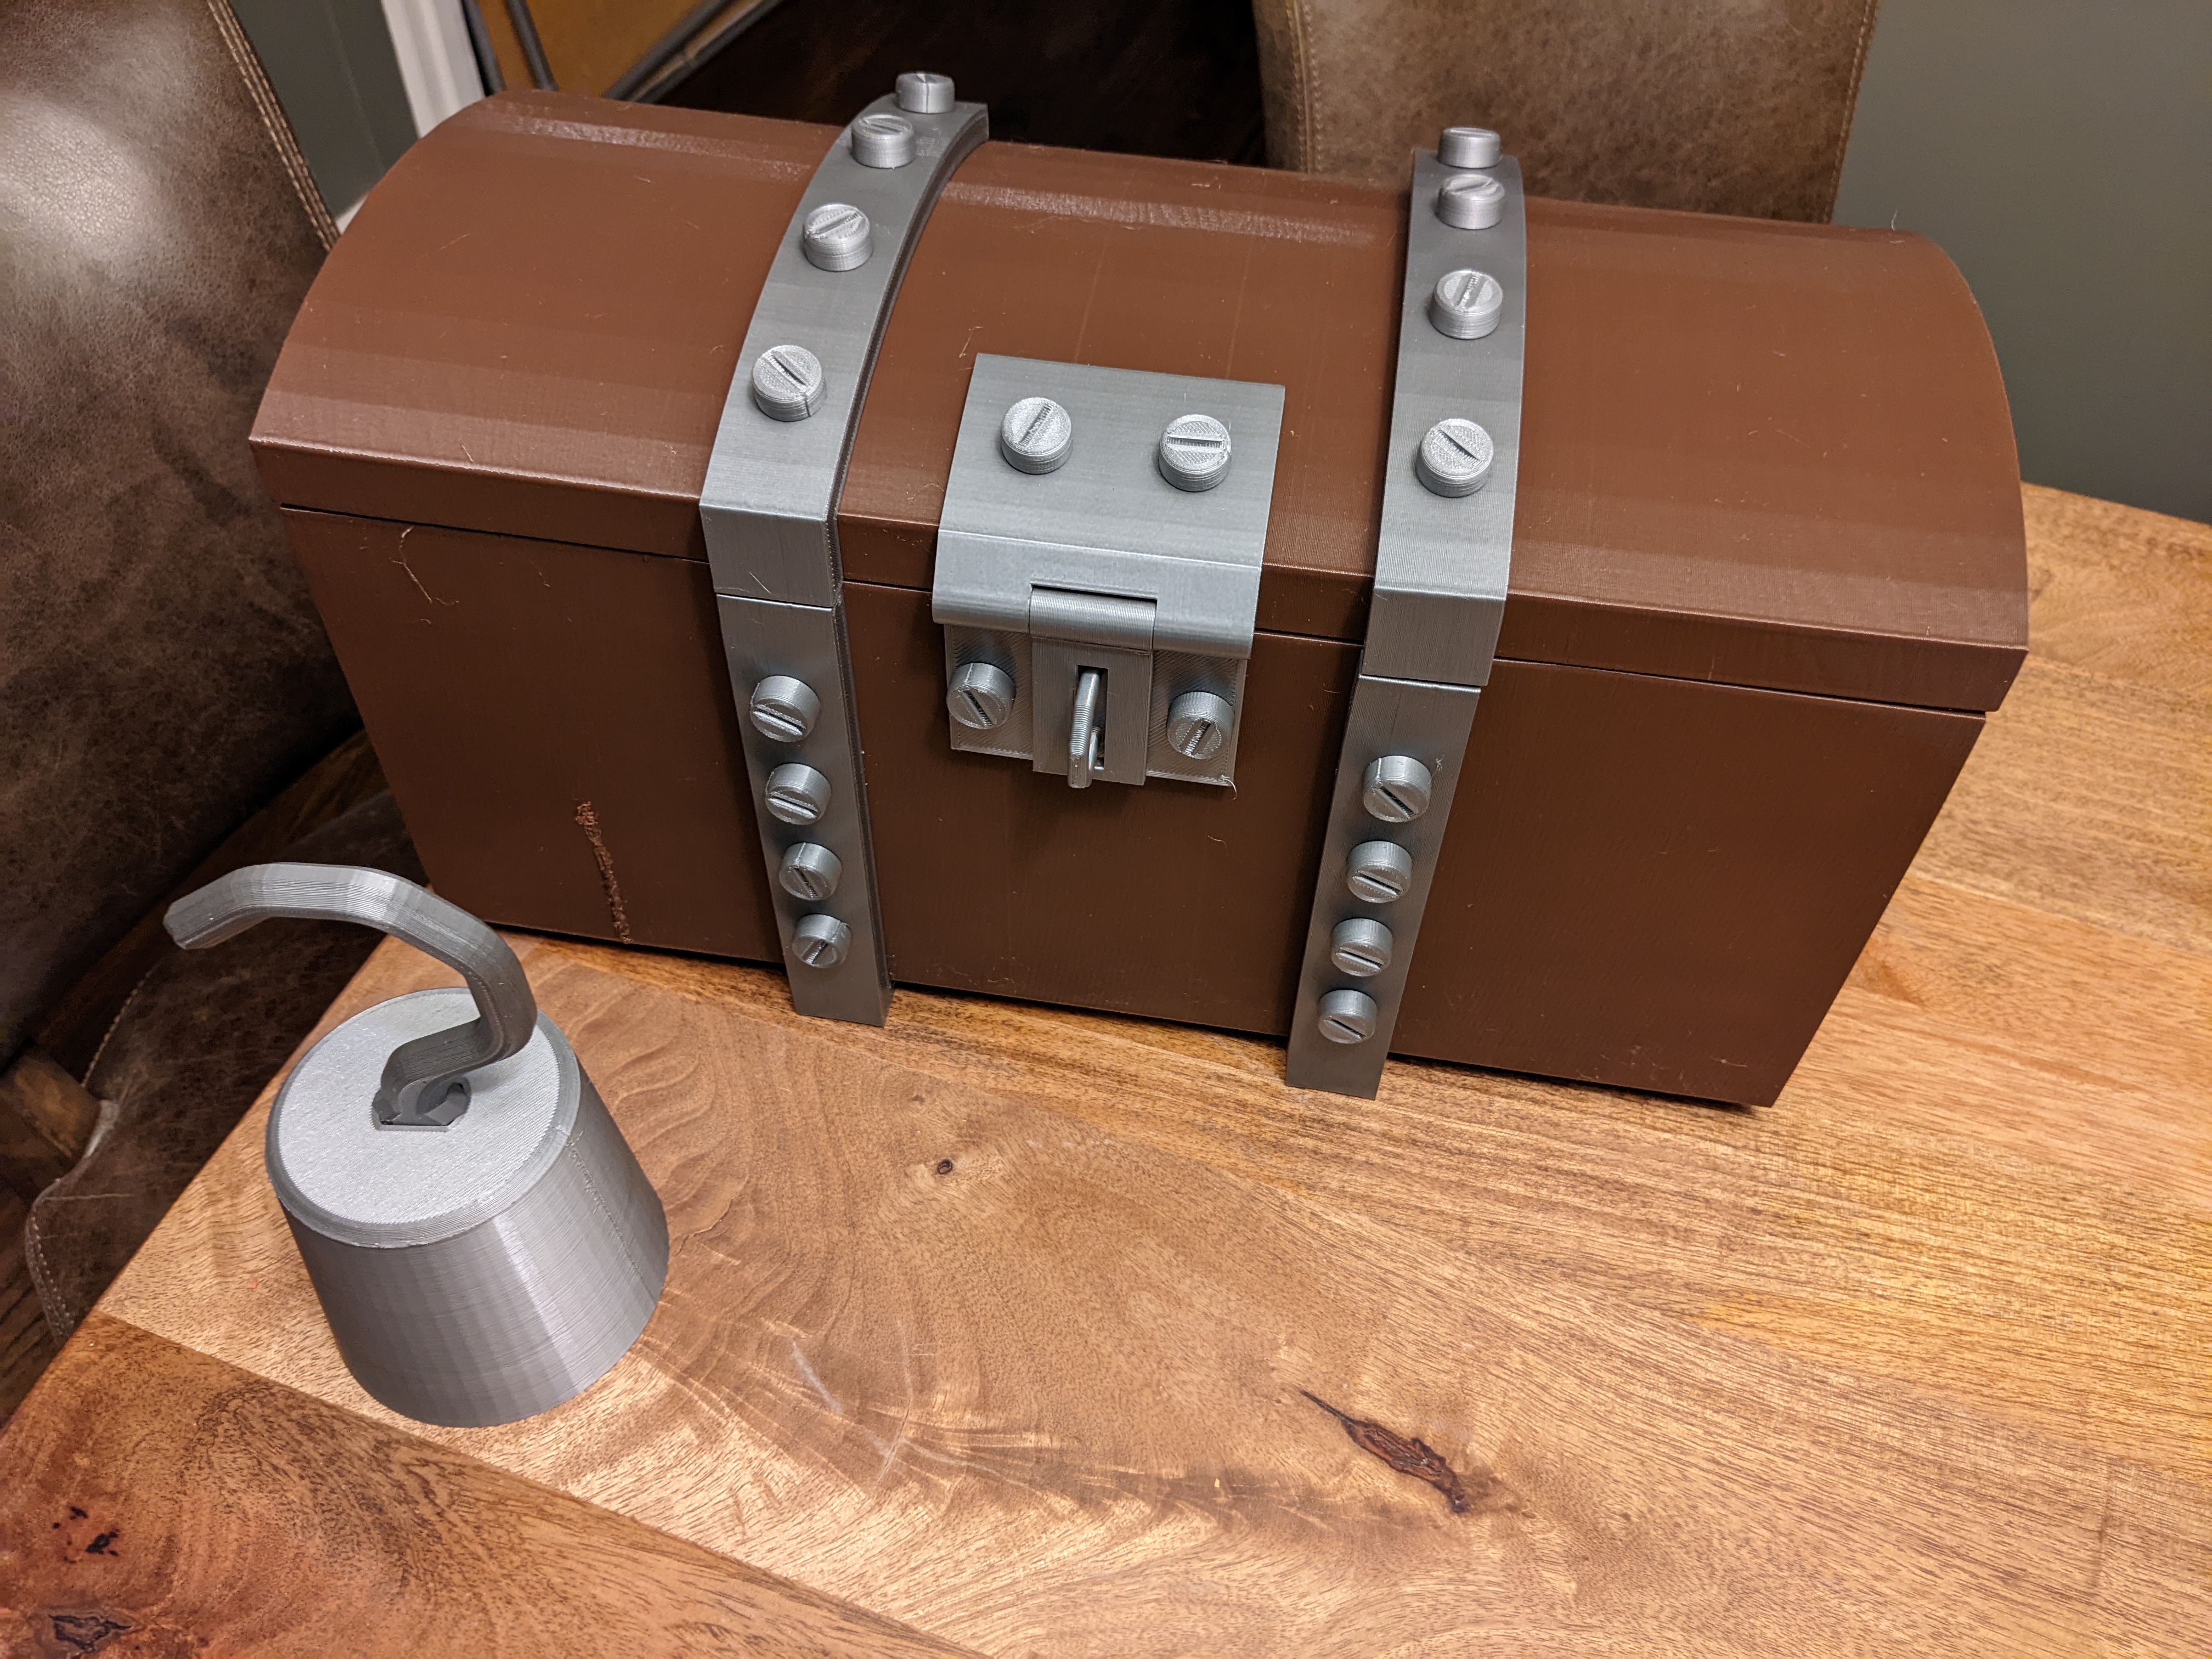
<p>I designed this model for my daughter, who wanted a treasure chest to go with her pirate costume. She wanted it to be “really big”, so this design utilizes the nearly the full volume of the MK3s to make three sections that bolt together. It has an optional feature to add a carry strap to it.</p><h3>Materials</h3><p>The amount of material <i>for my actual slicer settings</i> is shown below. So basically, 2 kg of brown and 1 kg of silver and you should have some left over. Your actual results may vary.</p><figure class="table"><table><tbody><tr><td style="height:15.0pt;width:70pt;"><strong>Part</strong></td><td style="width:83pt;"><strong>Silver (grams)</strong></td><td style="width:48pt;"><strong>Brown (grams)</strong></td></tr><tr><td style="height:15.0pt;">Hasp (3 parts)</td><td style="text-align:right;">73.9</td><td> </td></tr><tr><td style="height:15.0pt;">Upper mid (1)</td><td> </td><td style="text-align:right;">170.89</td></tr><tr><td style="height:15.0pt;">Upper ends (2)</td><td> </td><td style="text-align:right;">333.41</td></tr><tr><td style="height:15.0pt;">Lower mid (1)</td><td> </td><td style="text-align:right;">369.08</td></tr><tr><td style="height:15.0pt;">Lower end (1)</td><td> </td><td style="text-align:right;">461.4</td></tr><tr><td style="height:15.0pt;">Lower end (1)</td><td> </td><td style="text-align:right;">461.4</td></tr><tr><td style="height:15.0pt;">Upper bands (2)</td><td style="text-align:right;">111.23</td><td> </td></tr><tr><td style="height:15.0pt;">Lower band (1)</td><td style="text-align:right;">139.29</td><td> </td></tr><tr><td style="height:15.0pt;">Lower band (1)</td><td style="text-align:right;">139.29</td><td> </td></tr><tr><td style="height:15.0pt;">Fasteners (all)</td><td style="text-align:right;">89.74</td><td> </td></tr><tr><td style="height:15.0pt;">Pins (3)</td><td style="text-align:right;">5.28</td><td> </td></tr><tr><td style="height:15.0pt;"><strong>Totals</strong></td><td style="text-align:right;"><strong>558.73</strong></td><td style="text-align:right;"><strong>1796.18</strong></td></tr></tbody></table></figure><h3>Printing:</h3><p>For all parts with holes on a vertical surface, make sure the parts are oriented so that the triangular cutout is pointing up (see example_hole_orientation for an example). For everything but the fasteners, printing with a larger nozzle will save you lots of time – the prints pictured were done with 0.6mm nozzle except for the fasteners, which were done with an 0.4mm. See the orientation pictures to see the correct way to orient all the parts for printing.</p><p>Because the parts are so tall, I did have some warping and separation. You can see in the pictures where I repaired these with a 3d pen. If you have an enclosure, that might help.</p><p>All the prints are done with PETG for strength.</p><h4>Print list with details</h4><ul><li>Brown prints:<ul><li>treasure_chest_v2_upper_mid_body<ul><li>Print 1 copy.</li><li>Print standing end-on (see picture).</li><li>Make sure the triangles on the holes are pointed up. </li><li>The upper_mid_body needs supports on the downward facing side of the lower hinge (see picture). I used "painted on supports" with the “smart fill” option to select that face, then turn on “supports for enforcers only”.</li><li>You may want to use a raft to have more surface area on the build plate.</li></ul></li><li>treasure_chest_v2_lower_middle_body<ul><li>Print 1 copy.</li><li>Print with the end (four square holes) flat on the bed.</li><li>Make sure the triangles on the holes are pointed up.</li><li>You may want to use a raft to have more surface area on the build plate. </li></ul></li><li>treasure_chest_v2_upper_end_bodies<ul><li>Print one of each body in the file.</li><li>Note that they are mirror images, not interchangeable.</li><li>Print with the flat ends flat on the bed.</li><li>Make sure the triangles on the holes are pointed up. </li></ul></li><li>treasure_chest_v2_lower_end_no_carry_holes <strong>OR</strong> treasure_chest_v2_lower_end_with_carry_holes<ul><li>Print 2 copies.</li><li>Print with the end (the face with four square holes) flat on the bed.</li><li>Make sure the triangles on the holes are pointed up.</li><li>The with_carry_holes part has 4 rectangular holes to accommodate carry straps (see assembly for details).</li></ul></li></ul></li><li>Silver prints<ul><li>treasure_chest_v2_upper_band<ul><li>Print 2 copies</li><li>Make sure the triangles on the holes are pointed up.</li></ul></li><li>treasure_chest_v2_lower_band<ul><li>Print 2 copies</li><li>Make sure the triangles on the holes are pointed up.</li></ul></li><li>treasure_chest_v2_fasteners<ul><li>You may want to turn down your first layer speeds (I used 10mm/s or half the normal speed)</li><li>Use an 0.4mm nozzle for this. Everything else can be 0.6</li><li>Part counts:<ul><li>24 of the long bolts</li><li>4 of the short bolts</li><li>28 of the round nuts<ul><li>Make sure the threaded side is facing up</li></ul></li><li>3 pins <ul><li>One side of the slot in the end has an 0.2mm solid face. This helps with the stability of the print. Make sure it is on the print bed</li></ul></li></ul></li></ul></li><li>treasure_chest_v2_hasp_all<ul><li>See the picture for the orientation of the parts.</li><li>The hasp flap is printed on its end and needs supports on the downward facing side of the hinge (see picture). I used "painted on supports" with the “smart fill” option to select that face, then turn on “supports for enforcers only”.<br> </li></ul></li></ul></li></ul><h3>Assembly</h3><ul><li>Lower part<ul><li>Slide the lower_band around the lower_mid part, aligning the holes. Make sure that the hinge on the lower_band is on the <strong>opposite </strong>side from the two holes in the middle of the lower_mid (where the hasp will attach).</li><li>Slide the lower_end inside the lower_mid and align the holes on all three parts. The lower end parts are interchangeable.</li><li>Put a long bolt into the top hole and loosely attach a nut on the outside. <strong>Do not fully tighten. </strong>Repeat for the top hole on the other side.</li><li>Put bolts and attach a nut through the remaining holes, but do not tighten them.</li><li>Once you have fasteners in all the holes, tighten them one by one. The slot in the nut is designed to accommodate a US quarter.</li><li>Repeat to attach the other lower_end and lower_band. Make sure the hinge hole on both bands is on the same side.</li></ul></li><li>Upper part<ul><li>Slide the upper_band around the upper_mid part, aligning the holes. The upper_band does not wrap the upper_mid around at the back to make room for the hinge on the lower_band. Make sure that the overhang on the upper_band is on the <strong>same</strong> side as the two holes in the middle of the upper_mid (where the hasp will attach).</li><li>Slide the upper_end inside the upper_mid and align the holes on all three parts. Make sure the hinge hole is on the opposite side from the two holes in the upper_mid (where the hasp will attach). The upper_end parts are <strong>not</strong> interchangeable.</li><li>Put a long bolt into the top hole and loosely attach a nut on the outside. <strong>Do not fully tighten. </strong>Repeat for the other three holes.</li><li>Once you have fasteners in all the holes, tighten them one by one. The slot in the nut is designed to accommodate a US quarter.</li><li>Repeat to attach the other upper_end and upper_band. Make sure the overhang on the upper_bands are on the same side.</li></ul></li><li>Chest Hinge Pins<ul><li>Line the chest body and chest lid so that the hinge holes are aligned. </li><li>Squeeze the end of a hinge pin and insert it from the outside end of the hinge. </li><li>There is a small detent (see the hinge cutaway). The pin may catch on the nearer detent, but keep pushing and rotating, and it should slide past.</li><li>Keep pushing the pin in until you feel it catch in the detents the second time. You may want to use a 5mm Allen key to push it all the way in. The pin should be fully inside the hinge.</li><li>Repeat for the second hinge.</li></ul></li><li>Hasp<ul><li>Pin the hasp parts together – do this <strong>before</strong> attaching it to the chest.<ul><li>Align the top plate and the flap of the hinge so that the hinge holes line up.</li><li>Insert a pin following the same process as the chest pins. </li></ul></li><li>Use two short bolts and two nuts to attach the plate with the loop to the body of the chest. Make sure the nuts are on the outside.</li><li>Use two short bolts and two nuts to attach the hinged hasp assembly to the top of the chest. Make sure the nuts are on the outside.</li></ul></li><li>Carry straps (optional)<ul><li>If you printed the treasure_chest_v2_lower_end_with_carry_holes, it has four rectangular holes in the ends to accommodate ¾" or 19mm nylon strap.</li><li>These instructions pass the strap under the chest so that the straps bear the weight of the chest and its contents. Just attaching straps to the ends would stress the fasteners and plastic parts of the chest. </li><li>Thread the first strap:<ul><li>Thread the strap from the outside to the inside on the top hole, then back out the bottom hole. </li><li>Pass the strap under the chest.</li><li>On the other side, pass the strap in the lower hole and back out the top hole. Knot, sew, or or attach the strap ends with buckles.</li></ul></li><li>Repeat for the other strap. </li><li>If you make the strap closest to the hinge slightly shorter, then the chest will be more upright if you put both straps around your neck. For over-the-shoulder carry, make the straps the same length. </li></ul></li></ul><h3>License</h3><p>This design is licensed for non-commercial use. Please message me if you are interested in terms for a commercial license.</p>
With this file you will be able to print Pirate Treasure Chest with your 3D printer. Click on the button and save the file on your computer to work, edit or customize your design. You can also find more 3D designs for printers on Pirate Treasure Chest.