PiRack
prusaprinters
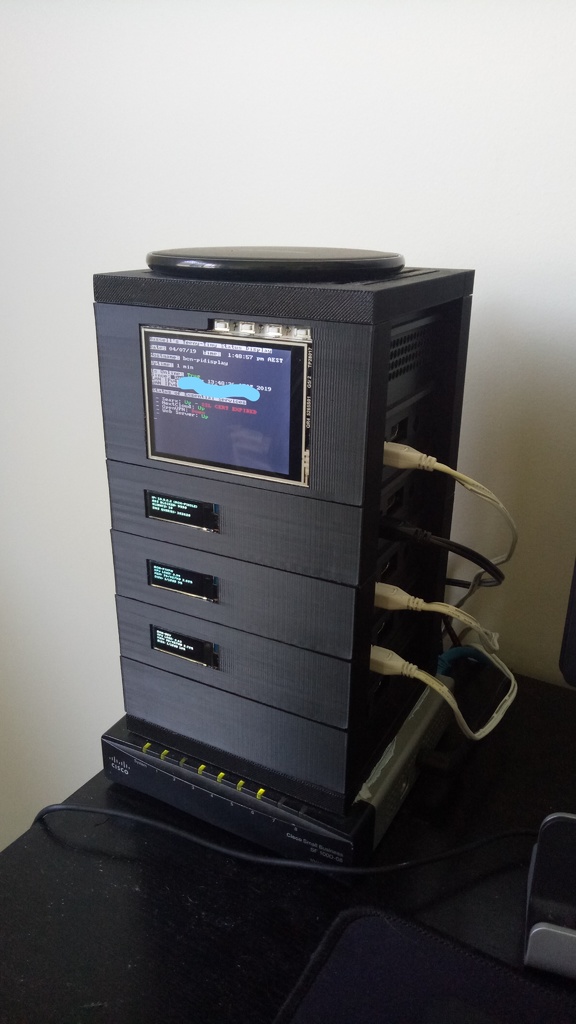
<p>This is a case system for Raspberry Pis (or same-size SBCs) that I've designed because I wanted to use a Pi case system with the following features:</p><ul><li>Entirely 3D-printable.<i>No additional parts or purchase necessary!</i></li><li>Expandable!<i>Make as many as you need, then make some more!</i></li><li>Each bay is independent.<i>Want to swap out a piece in the middle without needing to disturb the other units? You can!</i></li></ul><p>This system is a little larger than I had originally envisioned, but this is so I (or anyone else!) could design bay pieces that would not be possible with a rack system that was sized exclusively for RPi boards, such as a double-height piece that can hold a small display! I'll add that piece when it's ready; still quite rough at the moment.</p><p>Please let me know what you think, and please consider posting a make! I'd love to see how these turn out for you.</p><p>If interested, FCSTD.zip includes the FreeCAD files; please don't be afraid to modify or add to this project to suit your needs. Please consider sharing your changes if you do!</p><h3>Important Notes</h3><p><strong>Project Updates</strong></p><p><strong>20/01/20 </strong>- Raspberry Pi 4 versions of each bay piece made for the Raspberry Pi 3 have been created. Raspberry Pi 0/0W versions of each Pi 3 bay piece have also been created! (If you want to use the compatible OLED/LCD displays, I recommend soldering GPIO pin headers to your nominated Raspberry Pi 0, [such as these](https://www.jaycar.com.au/40-pin-header-terminal-strip/p/HM3212). Additionally, I've added a small guide pin on the side of each bay piece to assist in mounting a 30x30mm fan.</p><p><strong>10/03/19</strong> - Added two single-bay display pieces! Using <a href="https://www.littlebird.com.au/adafruit-pioled-128x32-monochrome-oled-add-on-for-raspberry-pi">this 128x32 OLED display</a>, you can now have your Pi2/3B/B+ display text! Also included a piece for Pi 0/0W.</p><p><strong>4/3/19</strong> - First Pi display piece has been added, <a href="https://www.jaycar.com.au/2-8-inch-touchscreen-for-raspberry-pi/p/XC9022">using this 2.8" display</a>. Additionally, replaced photos with current versions of pieces. Most notable with the display piece being the current version.</p><p><strong>3/3/19</strong> - Pi 0/0W piece has been added!</p><p><strong>Compatibility</strong></p><p>The Pi 4 bay pieces have been tested with the following:</p><ul><li> Raspberry Pi 4B</li></ul><p>The standard Pi 3 bay piece has been tested with the following:</p><ul><li>Raspberry Pi 3B</li><li>Raspberry Pi 3B+</li><li>Libre Computer Board (Le Potato)</li></ul><p>The Pi 0 piece has been tested with the following:</p><ul><li>Raspberry Pi Zero W</li></ul><p>The Pi LCD display bay pieces are designed for use with the following display:</p><ul><li><a href="https://www.jaycar.com.au/2-8-inch-touchscreen-for-raspberry-pi/p/XC9022">2.8" display from Jaycar</a> (also, you will need <a href="https://www.jaycar.com.au/150mm-plug-to-socket-jumper-leads-40-pieces/p/WC6028">these</a> to connect the display to your Raspberry Pi. Optional, but would also recommend something to help hold the display in place; I opted for a bit of hot glue personally)<strong>Also</strong>, ignore Jaycar's advice for setting this display up under Raspbian. <a href="https://learn.adafruit.com/adafruit-pitft-28-inch-resistive-touchscreen-display-raspberry-pi/easy-install-2">Use this guide instead</a>.</li></ul><p>The single-bay Pi OLED pieces are designed for use with the following display:</p><ul><li><a href="https://www.littlebird.com.au/adafruit-pioled-128x32-monochrome-oled-add-on-for-raspberry-pi">Adafruit's 128x32 PiOLED display</a>. Once again, will recommend <a href="https://www.jaycar.com.au/150mm-plug-to-socket-jumper-leads-40-pieces/p/WC6028">these</a> to actually connect the display to your SBC of choice.</li></ul><p><strong>Future Project Goals</strong></p><p>Here are my future goals for the project, when I have enough time:</p><ul><li>Display pieces for other small, fitting Pi displays.</li><li>Support for other popular SBCs? (Please let me know what you want to see!)</li><li>Allow for better airflow for fans.</li><li>Allow for front fan space in addition to current side.</li><li>Create a better way to clip the base/supports/top together to help limit potential breakage, and limit any wobble created by building higher than ~3/4 bays.</li></ul><p>Category: Electronics</p>
With this file you will be able to print PiRack with your 3D printer. Click on the button and save the file on your computer to work, edit or customize your design. You can also find more 3D designs for printers on PiRack.