Pinwheel Mouse Trap Version 2
prusaprinters
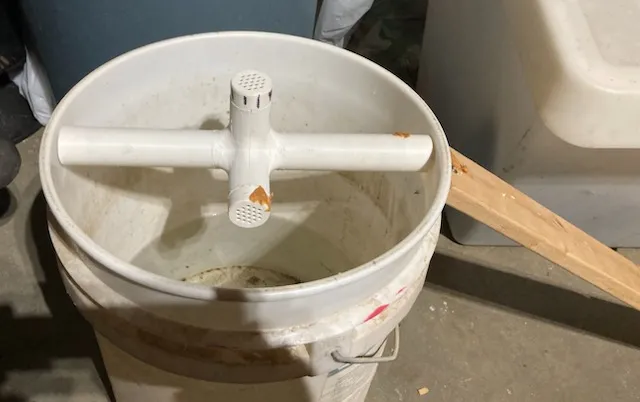
This is a variation on my earlier design that now requires no gluing, drilling of the end caps, or a length of CPVC pipe. Older one is faster to print and doesn't require a metal rod so may still be a better choice for some people.This design is for a rotating style of bucket mouse trap (it is sized for a standard five gallon bucket). To prevent mice from hanging on to a stationary spot with their rear legs and stretching out towards the bait, the entire rotor turns. The small moment arm of the ends of the spindle shouldn't induce much tendency to rotate and once the mouse reaches a spoke and it begins to turn they won't be near anything stable to grab onto.If a spoke stops pointing upwards a mouse could get to the bait without it spinning, so perforated covers are used.A useful trick I've learned is to mark one spoke (or use a different colored filament for its cap) and place it upwards so it's easy to see from a distance if the trap has been tripped.A 12" piece of 6mm or 1/4" steel rod goes through the center to not only provide alignment but to serve as the part that rotates in the bucket. As a result, the setup is quite forgiving of small errors in printing the rotor halves (bottoms not being flat, an edge lifting a little, etc.). I printed this with good results in PLA with a 0.9 mm line width (from a 0.6 mm nozzle) and a two walls with no infill and with no supports. Parts of the model have a 0.9 mm thickness, so a line width that divides evenly into that is ideal.STEP versions of all models are included to facilitate customization. To assemble:1) Print the rotor halves and 4 copies of the end caps (remember to print one cap in a different color, or mark it later).2) Drill the holes in the top and bottoms of the rotors to the size of your metal rod (it need not spin).3) Slide the two rotor halves onto the rod to align them and then screw on the four end caps to hold them together. Now remove the metal rod.4) Drill holes slightly larger than your metal rod in the top edge of the bucket. A jig is included to position them so the top of the rotor spindle aligns with the edge of the bucket.5) Slide the metal rod through one hole in the bucket, through the rotor, and through the other bucket hole. It should turn easily (make sure the ends aren't touching the bucket interior).6) If a live trap, be sure your bucket is deep enough that a mouse can't jump out (two standard five gallon buckets attached together, with the bottom cut out of the top one works, so a double-height bucket). If a kill trap, put about six inches of water in the bottom.7) Make a ramp up to the edge of the bucket. A scrap of wood works well for this, and it's not a bad idea to screw it to the bucket (being sure not to obstruct the rotor's ability to turn). To bait, remove one cap at a time and place some peanut butter in the little cup on the end of each spindle arm. Replace each cap after baiting so there are always three holding the spindle together. I like to put some additional bait on the outside of the rotor arms and on the ramp to lure mice in. The bait under the caps is to ensure that if there are many mice they can't get all of it.
With this file you will be able to print Pinwheel Mouse Trap Version 2 with your 3D printer. Click on the button and save the file on your computer to work, edit or customize your design. You can also find more 3D designs for printers on Pinwheel Mouse Trap Version 2.
