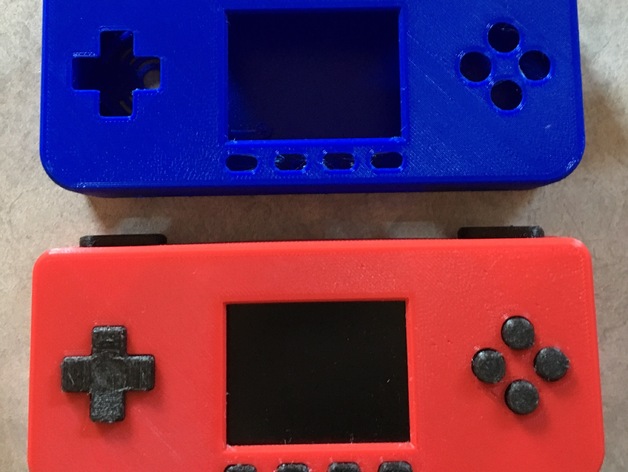
PiGRRL Zero - Modified for Speakers and Standoff Screws!
thingiverse
I've set up my three-prong potentiometer, and I know it's working because I hooked the ground to one of the outside poles and connected the other two speaker wires next to each other. Custom Retropie 4.2 IMG File Link: https://www.dropbox.com/s/xbyz6ybmli6w0cb/Retropie4.2-PiGRRLZeroPlus.img?dl=0 This is a modified version of the PiGRRL Zero case with some changes that make it more user-friendly and easier to close. Here are the tweaks I made to the original design: * Widened both cases horizontally by 5mm to accommodate the PCB and Adafruit screen/Pi Zero. I found that the clearance was tight with the SD card. * Deepened the top case by 2mm to allow for more room internally and proper closure at the top of the cases. * Reduced the height of the PCB screw pegs by 0.1mm to make tighter buttons when installing the PCB's. You can see the comparison between version 2 of this case and the original PiGRRL Zero case designed by Adafruit in the photos above. Version 1: Just the case enlargements Version 2: Modifications, including speakers, amplifier, and potentiometer(volume)!) Version 2.1: Same as version 2, but with modified placements for large battery sizes Version 3: Version 2, but with recessed standoffs for screws providing stable gameplay Version 3.1: Same as version 2.1, but with standoff screws If you're following the Adafruit tutorial to build your PiGRRL Zero, use Version 3 only. 3.1 is just a variation that works for those with larger batteries. Please note that version 3 and 3.1 with standoffs require cutting the top corner of your PCB gamepads. Don't worry; they won't have any purpose or need up in the corner of those gamepads, as all electronic components are lower. For version 2 & 3, I used these components to get it working: * Adafruit MAX98357 I2S Class-D Mono Amp (https://learn.adafruit.com/adafruit-max98357-i2s-class-d-mono-amp/overview) * Adafruit Mini Metal Speaker w/ Wires - 8 ohm 0.5W (https://www.adafruit.com/product/1890) * 16mmx2mm 10K ohm Stereo Volume Control Wheel Potentiometer B103 (https://www.amazon.com/gp/product/B00O9Y766Y/ref=oh_aui_detailpage_o08_s00?ie=UTF8&psc=1) * Adafruit provides quiet buttons now! - https://www.adafruit.com/products/3101 I've got the external audio working, but you'll need to reconfigure some buttons first to get the hookups working for I2S. I'm working with Thanos on the Adafruit forums who seems to have it going and working correctly. Check out this link to the post on the forums (https://forums.adafruit.com/viewtopic.php?f=50&t=97961) and I've also attached a PDF tutorial of how to get this all working. Let me know if you have any modifications or thoughts on this case. I've got it set up in Fusion 360, so it's a quick change and modification to the case if anyone has any suggestions. If you want me to print a case, go ahead and hit me up on my Etsy shop. I've already got this setup and tuned to print very nice versions of this case. If you have a certain color you want, just submit an order and I'll pick up some filament. If you want me to build one for you, hit me up on my Etsy shop. I have an open order that you can purchase one and I'll assemble it with the color you want. https://www.etsy.com/shop/3dprintspace Check out my multicolor button for the PiGRRL Zero and Zero Plus if you're interested in that - https://www.thingiverse.com/thing:2368254
With this file you will be able to print PiGRRL Zero - Modified for Speakers and Standoff Screws! with your 3D printer. Click on the button and save the file on your computer to work, edit or customize your design. You can also find more 3D designs for printers on PiGRRL Zero - Modified for Speakers and Standoff Screws!.
