PiDP-11 stable case extension
prusaprinters
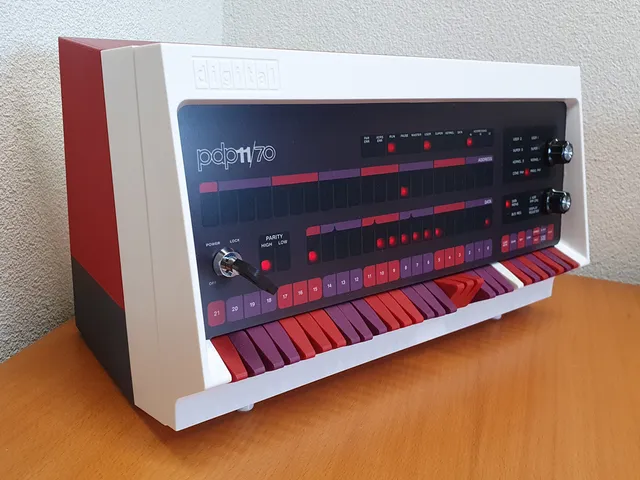
The PiDP-11 in itself is great, but I felt the stand (and its stability) could do better. Plus there is very little room for cables and connectors without an extension to the case. So I designed my own, and since I had to split it in parts anyway to fit on my printer bed, I ended up with colours matching the PDP-11/70.The original rear cover will fit this case extension perfectly, so the new rear cover included here is optional.Four M3 bolts and nuts are needed to attach the rear cover (original or new) to the case extension. * UPDATE *I have added a second version (V2) of the upper parts, with the top sloping back in line with the PiDP-11 case, instead of being horizontal. The original rear cover won't fit V2, so you will need V2 of the 3D printed rear cover. Printer settings:PLA, 0.2mm resolution, 15% infill, minimal supports required. Fitting the parts togetherAfter the printing is complete, fit the extension case parts together with appropriate glue. For the two bottom parts there is a separate connector: glue one side first, let it dry, and then connect the other bottom half. The other parts already have the connector fitted to one side. Do the bottom and upper parts first, then when these are dry glue the bottom and upper halves together. Don't let the glue creep out of the seams, and be very careful aligning them. Adding the extension to the PiDP-11The supplied bolts which would have been used to fix the back cover to the PiDP-11 frame, can be used to fit the case extension to the PiDP-11. The holes are slightly larger than actually needed, to give some room to align the case extension properly. Using the rear cover from the PiDP-11The original rear cover will fit perfectly to the case extension. Use four M3 bolts and nuts for this. The nuts can be recessed in the case extension so they will remain fixed in there. Before actually mounting the rear cover use a bolt to pull the nuts all the way into the plastic. Using the 3D printed rear coverOr...use the rear cover added here instead of the original one. I designed a new rear cover because I wanted to use other connectors and have them slightly rearranged. Cut and drill out the ones you need (it's only half a millimetre). Glue the two halved together, with the connector for strength. Then attach it to the case extension in exactly the same manner as described above. Extra feetAlthough I added extra weight in the case extension, the PiDP-11 still didn't feel stable enough when toggling the switches. So I printed two subtle feet which I attached with very sticky tape to the bottom of the original frame. Then I also added rubber pads on them, and on the case extension. Now it actually is rock solid! How I Designed ThisWith a lot of patience...Starting with another case extension featured on Thingiverse, then I re-measured everything and started from scratch. The second printed version was a perfect fit, but not happy with the finish. Shown in the photos is the third iteration.Everything done in Sketchup, with STL export. Sliced with PrusaSlicer.
With this file you will be able to print PiDP-11 stable case extension with your 3D printer. Click on the button and save the file on your computer to work, edit or customize your design. You can also find more 3D designs for printers on PiDP-11 stable case extension.