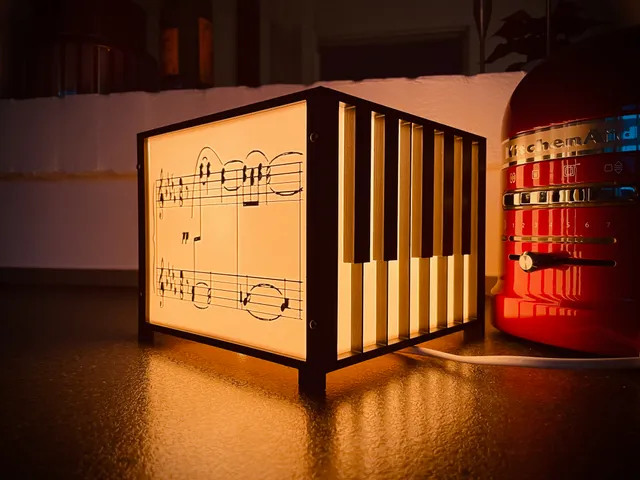
Piano Lamp - LightBox (Fixed)
prusaprinters
https://www.buymeacoffee.com/maxt---------------------- PreambleThis is a remix of the Piano Light Box by n9jcv, a model back from 2020 (originally posted on Thingiverse).Like many others, I've printed this model just to find out that it couldn't be assembled as the holes in the sides didn't match with other holes. With permission from the original author, here's my fixed remix.In addition, I've provided an alternative way of lightning. The lightbulbAs with any other lamp, the lightbulb / the color that it emits is one of the most important factors, if not the most important one. You could get the prettiest lamp out there, but use the wrong lightbulb and you could ruin the whole “hygge" atmosphere.The lightbulb must be quite small to fit inside the lamp (as it also must be removable so there should be space enough to remove the lightbulb from the socket).You can go with a LED strip or a LED lightbulb.As the lightning source, I've chosen the following lightbulb:Bulb: https://www.ikea.com/dk/da/p/lunnom-led-paere-til-skilt-e14-100-lumen-klar-60539323/Model name: LUNNOMSocket: E14Diameter: 26mmLength: 62mmLuminous flux: 100 lumenEffect: 0.9WColor temperature: 2200 Kelvin This LED bulb is equivalent to a 12W incandescent light bulbIKEA product ID: 605.393.23When turned off, it looks like this (there are 2 pieces in the package): When turned on, it emits a very nice cozy yellowish light:If you don't have an IKEA near you, find a light bulb that matches these specs as close as possible. The lamp socket/fittingNow that we have a light bulb, I had to find a lamp socket/fitting that would hold the light bulb. After some research, I've chosen the following lamp:Lamp: https://www.ikea.com/dk/da/p/isbrytare-bordlampe-frostet-glas-hvid-60502485/Model name: ISBRYTAREIKEA product ID: 605.024.85 The lamp looks like this: The package of the lamp: Inside the lamp box: The socket/fitting and the lamp are separated. The socket/fitting has a lengthy cable with a turn on/off switch: The socket consists of 2 parts: So, all you have to do is to unscrew the round fixer. It looks like this: Now that we have an inner diameter of the hole for the socket (Ø28mm), I could modify the bottom plate to accommodate the new socket: So, now I could print the bottom part, and insert the socket from the bottom:And then screw the fixer on top of the socket. It would look something like this: Printing the partsPrint: 0.2mmNozzle: 0.4mmSupport: Not neededBrim: Not neededInfill: Not needed, but I'd suggest going with 15% to ensure sturdiness The parts1 x piano_box_maxt_BOTTOM_1A2 x piano_box_maxt_clairlunepanel (print the first 2 layers (.3mm layers) in white, then pause and switch to black and continue. Or you could just paint the music notes with a black permanent marker)2 x piano_box_maxt_keysframe_1B (print/paint black)2 x piano_box_maxt_KEYSIDE_1A2 x piano_box_maxt_notes_1C (print/paint black)1 x piano_box_maxt_TOP_1B AssemblingAltogether you must print 10 parts to be able to assemble the Piano Lamp.The assembly is pretty straightforward, but will require some time and an easy hand :)You would have to find 8 x self-tapping/self-drilling screws to hold the sides. Here's how I've done it: FinaleIf you have any questions or requests, feel free to comment.Feel free to LIKE! :)I would love to see your Makes! Happy Printing!
With this file you will be able to print Piano Lamp - LightBox (Fixed) with your 3D printer. Click on the button and save the file on your computer to work, edit or customize your design. You can also find more 3D designs for printers on Piano Lamp - LightBox (Fixed).
