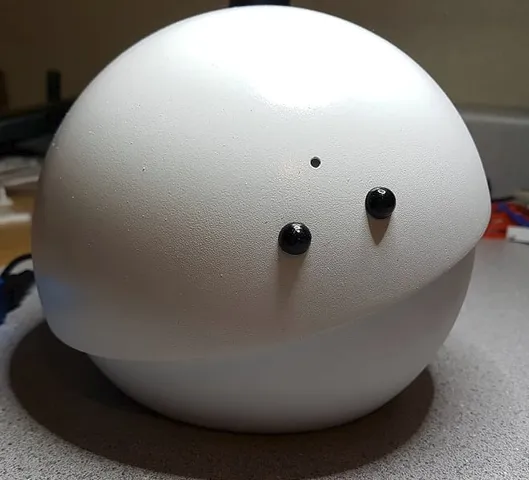
Pia the robot
prusaprinters
*UPDATED 10/07/2018 - Added an image of how I wired up Pia (raspberry pi/ circuit playground and the batteries) *UPDATED 9/16/2018 - updated arch_y_manifoldfix.stl in an attempt to resolve manifold issue. There isn't a problem printing in Cura but may be an issue using Simplify3D. I used blender to identify problem areas and there still is a manifold issue. I recreated the object in sketchup so perhaps there is an export issue when creating the STL. UPDATED missing STLs July 4, 2018 and added STLs for battery mount, PI3 and PCA board Video in action: https://www.youtube.com/watch?v=bRn4ZjMaChU After seeing Alonso Martinez's Mira robot on You-Tube, I had to have one but couldn't find it anywhere. So, I designed my own version of it and will be uploading STLs and make the software that I've written for it available either here or github. In a nutshell, it is two concentric shells with 3 servos to control x, y and z axis. It runs on a raspberry pi zero w, a pi camera and a PWM board from Adafruit. Internal parts are held in place without screws; just 3D printed blocks and 1/4", strong magnets. Currently, I'm not using battery power, but that is in the works. I went through 24 iterations of the design and printed many of the parts several times. At the time, I'm please with the outcome. What this uses: 1 - Raspberry Pi Zero W (each $5.00 from Microcenter, Tustin CA) 1 - Raspberry Pi camera ($24.95 Microcenter, Tustin CA) 3 - SG92R MicroServo (each $5.95 from Adafruit) 1 - Adafruit 16-Channel 12-bit PWM/Servo Driver - I2C interface - PCA9685 ( $14.95) 1 - Circuit PlayGround Express (each $24.95.. Mine was free when I bought my 3d printer from Adafruit) 2 - ProMAG Neodymium Magnets (.25") in pkg of 6 ($4.95 from Michael's) *Update* Although the model was originally designed for the Pi Zero W, I added support for using a PI 3 because the OpenCV software for image recognition runs a bit better on the faster computer. Software: The raspberry pi is running "stretch" lite (no gui) and OpenCV for controlling the camera. I'm writing the code that control the servos using Python. All source code, STLs and SketchUp model is now available here: https://github.com/BtreeComputingServcies/pia-the-robot. Circuit python is running on the Circuit Playground Express and will also be made available when completed. I updated some of the STLs after I first uploaded to the site. Print Settings Printer Brand: Ultimaker Printer: Ultimaker 3 Rafts: Yes Supports: Yes Infill: 20% Notes: All parts varied in resolution. Only visible external were at a higher resolution. The top and bottom shell each took 8-9 hours to print. Post-Printing Sanding Only the outer shell was significantly post processed. Both the top and bottom shell we sand and wet/sanded from 320 grit down to 1000. Only the top shell was spay painted with about 6 coats of Krylon white gloss and wet sanded with 1000 grit between coats. The black eyes were sanded and spayed with 2 coats of black glossy Krylon and sprayed with clear acrylic high gloss. How I Designed This I used sketchup I designed 24 different version of the gimble mechanism but printed fewer than 6 duplicates. Red blocks on corners are clips to hold parts together Z axis motor has interlocking disks. The disk attached to the motor has an embedded steel junction box slug. The upper disk that is glued to the inside of the robots head and press fit (very strong 0.25") magnets to connect the shell to the gimble. Changes for the PI3 and battery packs Category: Robotics
With this file you will be able to print Pia the robot with your 3D printer. Click on the button and save the file on your computer to work, edit or customize your design. You can also find more 3D designs for printers on Pia the robot.
