Pi 3 Case for 5 Inch Touch screen
prusaprinters
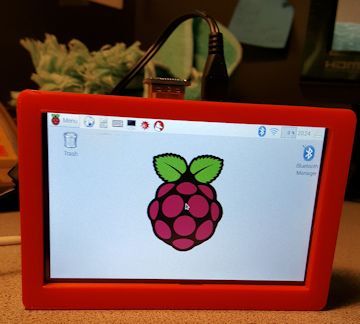
<p>I looked around for a Pi 3 case that would support a 5" screen but was unable to find one (lots of 3.5" and 7" screen models). So, I decided to make my own.</p> <p>I used the original design from "Raspberry Pi Display Case" for my basis. I recreated it from scratch with the exception of the original cutouts for the power/HDMI/audio ports and the cutout for the ethernet/usb ports. Everything else was created from scratch using Sketchup.</p> <p>I did not create an access door for the microSD card, so I designed the top to fit snugly but it does not "lock" onto the bottom case.</p> <p>Here is the screen I purchased/used: https://www.amazon.com/Kuman-Resistive-800x480-Display-Raspberry/dp/B01F3EKJIA/ref=sr_1_1?ie=UTF8&qid=1470006672&sr=8-1&keywords=kuman+5%22+touch+screen</p> <p>UPDATE: I just uploaded v2 (top and bottom are in the same file). This version has a lip on the top and bottom which allows the two pieces to fit together better than the original version.</p> <p>I have also added top and bottom v3 (with a place for the MicroSD extension, so that the MicroSD card can be accessed from outside the case (near the USB ports. I purchased an MicroSD extension from <a href="https://www.amazon.com?linkCode=ll2&tag=thingiverse09-20&linkId=e4759bff1fa9a55a0f897d801ce2d765&language=en_US&ref_=as_li_ss_tl">Amazon</a> (see below). The only drawback to using this extension is it comes with a real long ribbon cable. There should be room on the same side of the case as the extension mount to place the cable and keep it out of the way. I carefully removed the black plastic housing that came with the cable and created a slot that it will fit in snugly.</p> <p>https://www.amazon.com/gp/product/B01D9J8KQE/ref=oh_aui_detailpage_o00_s00?ie=UTF8&psc=1</p> <p>Another Update:</p> <p>I have added a version of the bottom case which has pre-built supports (for those having trouble with adding proper supports).</p> <p>Yet Another Update:</p> <p>By request, I have split the top and bottom pieces into two parts (for smaller build plates). The top is split right down the middle, whereas the bottom is off to the left side (because of the vents).</p> <h3>Print Settings</h3> <p><strong>Printer:</strong></p> <p>Hictop Prusa i3</p> <p class="detail-setting rafts"><strong>Rafts: </strong> <div><p>No</p></div> <p><strong>Supports:</strong></p> <p>Yes</p> <p class="detail-setting resolution"><strong>Resolution: </strong> <div><p>2</p></div> <p><strong>Infill:</strong></p> <p>20%</p> <p><br/> <p class="detail-setting notes"><strong>Notes: </strong></p> </p><div><p>I used Cura to slice it and left supports everywhere turned on. The only support it added was for the lower HDMI and power cutouts.</p> Print time for the bottom was about 4 hours and 1.5 hours for the top. </div></p></p> Category: 3D Printer Accessories
With this file you will be able to print Pi 3 Case for 5 Inch Touch screen with your 3D printer. Click on the button and save the file on your computer to work, edit or customize your design. You can also find more 3D designs for printers on Pi 3 Case for 5 Inch Touch screen.