Philips Hue Play Like Lights And Sensors
prusaprinters
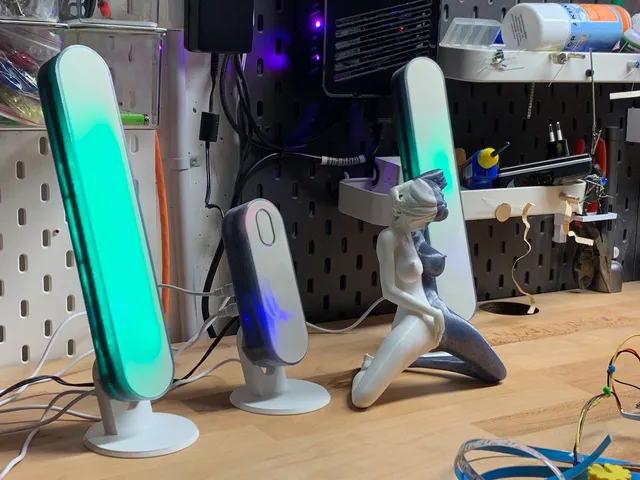
History05: Added ceiling mount for gopro adapter. Both tested now, see pictures.04: Added a GoPro back side adapter, non tested atm. I should snuggly fit with this model: https://www.printables.com/model/123074-ceiling-camera-mount-2-axis.03: Added the grow lights for indoor plants, see pictures. Also added a section describing the little differences. Earth anchor is good to go (works well).02: Lots of information added. The 80 degree angle stand gets a thumb up, works well enough. I probably get another design, a bit fancier with included magnets done as well as a split wall mount with a quick connector. So a full set is tested, earth anchor comes next. 01: First upload, lots of things in progress, master module finalized and good to go, all the rest at least tested, but not declared release candidate. Expect more to follow till April 10th. And, most important. Just go for a print if you checked everything. The flaw I am seeing right now ist that the original angle of the stand is not optimal, hence I uploaded an untested 80 degrees stand. It is printing right now.To-DosExplain electronics of MasterDesign wall mount [In progress, see history 04]Logic programming in home assistantWall mount to be designed with quick connector [In progress, see history 04]Teaser: Transparent clear grow lights with earth anchor and PWM 5V plant conform light on NodeMCU basis (ran out on microcontrollers) for the darkish bathroom (based on a hue motion detector and based on the light level). [Done]IntroductionPhilips Hue Plays came on the marked and I instantly liked the design. Having a full set on my desk I found the caveat quickly. The hardware is great, the software sucks hard. Not much functionality and I quickly came into the habit not using them at all. Softwarewise Philips had homework to do and they failed badly. Hence, I had nice hardware sitting on my desk for a long time that is worth 200 Euros and useless.So, lets design them from the scratch. TacticsIf you go through the designs you will basically find two sizes right now. The master is sort of a hub with sensors and a bit of lightning effect and distributes power (not controlled, just multiple jacks). It comes with a bottom plate, a body and two diffusor parts. You can do without it, it has no direct interaction with the slaves that we recognize as Hue Plays.Each Hue Play consists of a body (two parts) and a diffusor and a stand (currently only the 80 degree stand and earth anchor). Each of them features a power cable with a 5.5 mm jack as well as a jack in the back for daisy chaining. Inside is a DC stepdown module as well as a microcontroller and some LED strip (all pretty much exchangable to your needs, I will cover that as well). The trick is the software, either ESPHome or rather WLED (https://kno.wled.ge/). It is so trivial to install and so well documented that I don't want to loose any words avout it.The magic now is to combine the Hue Plays with the Master and homeassistant to make it way better than the original. The only caveat is (so far) no ambient lightning effects for screens. At least as far as I can tell.PrintingThe parts were designed for minimal use of supports. I only use build plate only for supports and it is enough. You might even get away without supports, but as the rims are thin you might experience warping on the bead. The Master can be printed on a Prusa Mini, the Hue Play parts barely fit on a MK3. Can't do anything about it, it is their original dimensions. Feel free to experiment with the materials. There is no limit. For the diffusor I generally use white PLA/PETG, but also transparent materials. The white looks cool when turned off. As for ASA (my beloved material)… not so good. I made one happening, but it shrinks somewhere around 0.2-0.4 mm over 25 cm which makes it a tight fit. Warping can be prevented by having rims and a heated enclosure, but the shrinking is just there. Its hard to compensate for it. Rather than designing a ASA version, you could shring the diffusor by 0.1-0.2%.DesignThe design is based on the experience of lettersigns. Hence it is not really press fit, but really close. The back, after a bit of preparation for the electronics, is glued into the body (non removable) while the diffusor is just placed into the body an can be removed for maintenance. The electronics, both Hue Play and Master, do have their places in the bottom part, but also sensor spaces were reserved. Currently, the only desing is for the part mentioned in the BOM, but I am planning for ESP-01 as a cheap alternative to the Wemos D1 form factor. A strip without silicon covering should fit into the holders on the side. As the spacing varies you might want to clip off some holders were they simply collide with LEDs. I usually remove the covering of the sticky tape afterwards and hence they stick on the walls also. I based the whole design on the assumption of using 12V, but it is tolerant within the limits of the LM2596. I haven't checked 5V so far as the step-down module needs 1V difference, so the output would be rather close to 4V then. I will try and hopefully the addressable LEDs are tolerant against 4V (the microcontroller should work). But, you can always leave out the step down module and go for USB cables as I did in the past. I just found out myself that dozens of USB accessories per room doesn't work so well as USP power supplies are the limiting factor then (port-wise).SolderingI am not that great in drawing electrical cicuits, but the wiring is simple. All 12V lines go in parallel. So, jacks, sorry, rather 5.5mm plugs (long pin, outer rim are usually GND), cables and step down all go in parallel. When connected do NOT solder the microcontroller onto it straight away, you will need to adjust the LM2596 first (or use a generic step down with fixed 5V voltage). Then, solder the Vout/GND to Vin(5V)/GND of the microcontroller. Usually also the LED strip, but you could also solder it to the output of the LM2596. As for the Data/Sig-line I usually use D4/GPIO02 on the Wemos D1 Mini. Hence, solder a not too thick cable to that GPIO.And you might want to flash your microcontroller before you put it all together. Don't forget about it. Once flashed, I usually do a whole batch, you can OTA.If using a PWM-controlled light strip (I will come up with an example soon), you will need a NPN-transistor, with left pin (metal to the back) connectd to D6/GPIO12 including a 1K resistor, GND of the strip in the middle and right pin to GND of the microcontroller/LM2596.If you are familiar with all what I said, yes, it is no magic, do what you feel best, this is just one recipe that works.As for the Master the instructions apply as well with some additions that I might come up with later.Frankenstein GrowlightsDue to a planter project I came across growlights. So, basically a light spectrum that is more beneficial to plants. The ones I linked are simple LED strips, 5V, no RGB (obviously). As I ran out on electronics I started the project and also found some years old NodeMCU V3s. These are basically ESP8266 in a different design. Apparently mine featured an USB interface, hence flashing WLED was straight forward. As GPIOs usually are limited to 20 mA I needed to PWM these pins (described above). As these are just prototypes I never got around redesigning the bottom plate. If you place the quite large board of an MCU where the step down sits and put the step down right in the middle it works out pretty well.Softwarewise homeassistant turns them on if the light intensity is below a certain threshold in the bathroom and if no motion was detected for some minutes. The moment there is motion they are being turned off. So, easy, no hassle, install and forget.SoftwareMaster: ESPHome or the likeHue Play: Preferrably WLedBackend: Homeassistant or othersA quick explanation: WLed is massive for controlling your lights. It can be flashed via Chrome and is well documented. It cannot be used for the Master if you want to deploy sensors (I know there are usermods). You could also use ESPHome with the integrated or self coded light effects. It is more work and probably you simply could look up te code in WLED and lambda it into ESPHome. As for the Master I do use such a mix and it is sufficient as I don't want the master to flash like a christmas tree as I measure general illuminace. The higher the noise around the less the sensitivity towards lower light levels. Thus, it depends on your needs.Formerly I programmed all the logic onto the microcontrollers themself. Nowadays I rather have a backend, such as homeassistant and use automations. Or a mixture thereof. It really doesn't matter. If anything breaks down smarthomes tend to be hell anyways.BOMGeneral:Thread inserts, M3x5.7, 3DJake, https://www.3djake.ch/de-CH/3djake/gewindeeinsaetze-50er-set?sai=9419&gclid=CjwKCAjwi6WSBhA-EiwA6Niokw_qLW8QUcCW6UcCZRMv5Agc50gKDwsLdwzJ1qD6ZloEgXjPXf_tvBoCSOYQAvD_BwEElectronics:Microcontroller, Wemos D1 Mini or same form factor (and compatible with either ESPHome or WLed, https://www.aliexpress.com/item/32529101036.html?spm=a2g0o.store_pc_home.productList_2001924791521.subject_0Light sensor, https://www.aliexpress.com/item/32885969140.html?spm=a2g0o.store_pc_groupList.8148356.8.11ee76fbaGP86GSHT30 Temp/Hum sensor, https://www.aliexpress.com/item/32762136940.html?spm=a2g0o.store_pc_groupList.8148356.4.11ee76fbqchDOjInterface board, https://www.aliexpress.com/item/32846977179.html?spm=a2g0o.store_pc_groupList.8148356.13.41414082RMVhzLMatching cables, https://www.aliexpress.com/item/32867490848.html?spm=a2g0o.store_pc_groupList.8148356.7.368e4082ZRAMC1LM2596 DC-DC step down, https://www.aliexpress.com/item/32980305131.html?spm=a2g0o.order_detail.0.0.1d31f19cEhchWa5.5 mm jacks, https://www.aliexpress.com/item/4000648876487.html?spm=a2g0o.order_detail.0.0.2a53f19cQRf75dDC cables, https://www.aliexpress.com/item/4001209455142.html?spm=a2g0o.order_list.0.0.21ef1802rs6EklAny Neopixel/LED strip you find appropriate for your needs. 60 LEDs per meter in my case and I need 32. So, for two, do the math yourself, one meter isn't enough for two of them. Can't help it, its the original dimensions.Frankenstein Grow LightsNodeMCU V3, https://www.aliexpress.com/item/32910153161.html?spm=a2g0o.order_detail.0.0.4c44f19c1oWufnLED strip for plants, https://www.aliexpress.com/item/1005001572001803.html?spm=a2g0o.order_list.0.0.21ef1802MaGUJ1 Example code ESPHome Masteresphome: name: esp-hue-play-master-v01 comment: Wemos D1 Mini Hue Play Master mit 12 V DC stepdown, SHT30, BH750, 17 GRB Neopixel und 4 durchgeleiteten Klinkenbuchsen substitutions: friendly_name: "Hue Play Master V01" esp8266: board: d1_mini # Enable logging logger: # Enable Home Assistant API api: ota: password: "[[***NotMyBusiness***]]" wifi: ssid: !secret wifi_ssid password: !secret wifi_password # Enable fallback hotspot (captive portal) in case wifi connection fails ap: ssid: "Esp-Hue-Play-Master-V01" password: "[[***NotMyBusiness***]]" captive_portal: i2c: sda: D2 scl: D1 scan: true switch: - platform: restart name: ${friendly_name} Restart sensor: - platform: sht3xd temperature: name: ${friendly_name} Temperature humidity: name: ${friendly_name} Humidity address: 0x45 update_interval: 15s - platform: bh1750 name: ${friendly_name} BH1750 Illuminance address: 0x23 update_interval: 15s light: - platform: neopixelbus type: GRB variant: WS2812 pin: D4 num_leds: 17 name: ${friendly_name} NeoPixel effects: - pulse: name: "Fast Pulse" transition_length: 0.5s update_interval: 0.5s - addressable_flicker: name: "Flicker Effect With Custom Values" update_interval: 16ms intensity: 5% - addressable_fireworks: name: Fireworks Effect With Custom Values update_interval: 32ms spark_probability: 10% use_random_color: false fade_out_rate: 120 - addressable_random_twinkle: name: Random Twinkle Effect With Custom Values twinkle_probability: 5% progress_interval: 32ms - addressable_scan: name: Scan Effect With Custom Values move_interval: 100ms scan_width: 1 - addressable_color_wipe: name: Color Wipe Effect With Custom Values colors: - red: 100% green: 100% blue: 100% num_leds: 1 - red: 0% green: 0% blue: 0% num_leds: 1 add_led_interval: 100ms reverse: false - addressable_rainbow: name: Rainbow Effect With Custom Values speed: 10 width: 50 - addressable_lambda: name: "My Custom Effect" update_interval: 16ms lambda: |- // it.size() - Number of LEDs // it[num] - Access the LED at index num. // Set the LED at num to the given r, g, b values // it[num] = Color(r, g, b); // Get the color at index num (Color instance) // it[num].get(); // Example: Simple color wipe for (int i = it.size() - 1; i > 0; i--) { it[i] = it[i - 1].get(); } it[0] = Color::random_color(); // Bonus: use .range() and .all() to set many LEDs without having to write a loop. it.range(0, 50) = Color::BLACK; it.all().fade_to_black(10); - addressable_lambda: name: "My Custom Effect 2" update_interval: 16ms lambda: |- // Static variables keep their value even when // stopping and starting the effect again static uint16_t progress = 0; // normal variables lost their value after each // execution - basically after each update_interval uint16_t changes = 0; // To reset static when stopping and starting the effect // again you can use the initial_run variables if (initial_run) { progress = 0; it.all() = Color::BLACK; // optionally do a return so nothing happens until the next update_interval return; }
With this file you will be able to print Philips Hue Play Like Lights And Sensors with your 3D printer. Click on the button and save the file on your computer to work, edit or customize your design. You can also find more 3D designs for printers on Philips Hue Play Like Lights And Sensors.