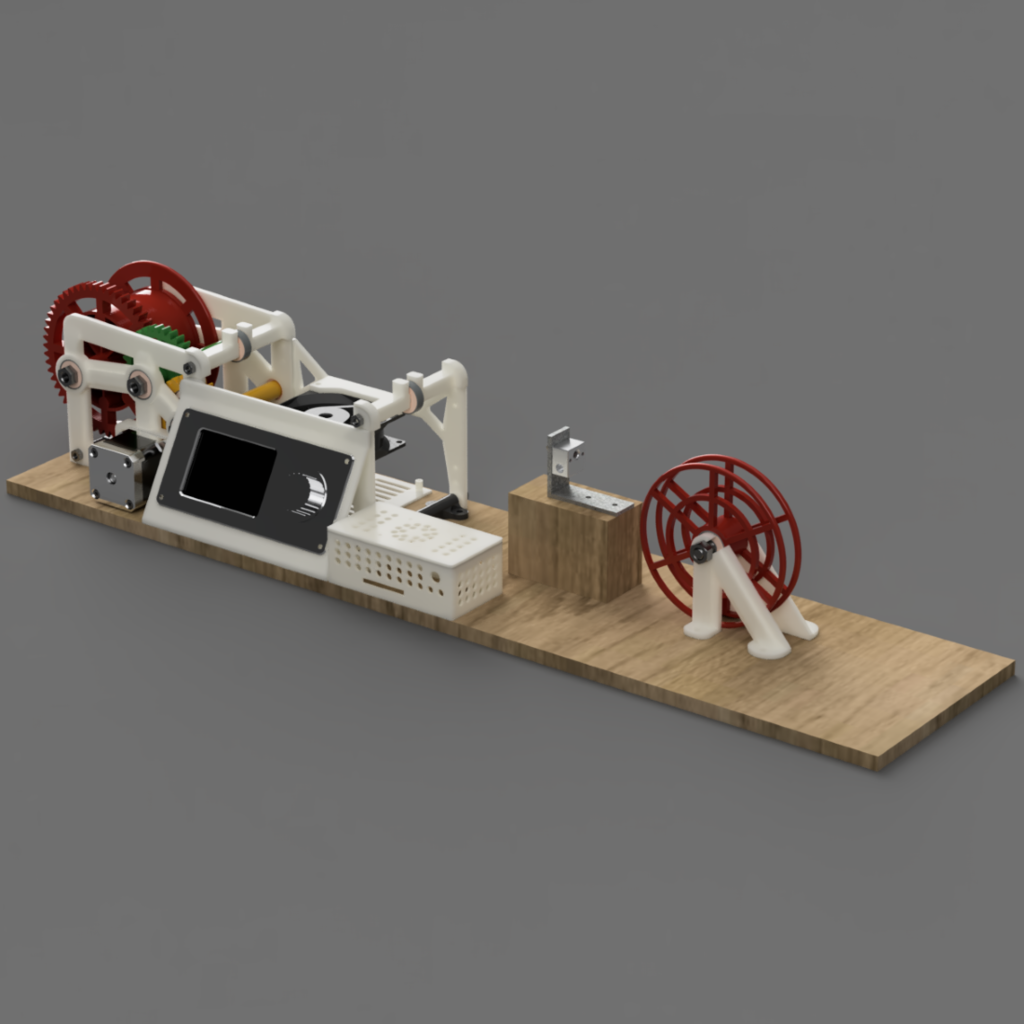
PET plastic PullStruder Winder
prusaprinters
<p>/////Updates/////</p> <p>11.02.2022 Updated hardware needed. All the hardware can be bought at a hardware store for very cheap. For the bearings, I recommend you order on Ali Express.</p> <p>They are cheeeeeep. <a href="https://s.click.aliexpress.com/e/_AfxdON">https://s.click.aliexpress.com/e/_AfxdON</a></p> <p>10.02.2022 Added an input spool. It's almost all the way to the bottom so that prevents the plastic on it from unraveling completely. It can also be taken out of the holder for ease of putting new plastic on it.</p> <p>06.02.2022 Added print instructions and plastic usage.</p> <p>Happy to find out that this whole project only uses 437g of plastic.</p> <p>Also added Ender 3 controller board mount. It is meant to go under the main cooling fan so it gets a lot of airflow over it.</p> <p>03.02.2022 Added the Ender 3 LCD mount. Thanks to @jckz82 for the original design.</p> <p>Also added bearings to the top guide spacers. Make the filament move easy and does not grind against the plastic.</p> <p>31.01.2022 Upcycled my Monoprice select mini V2. reused its LCD and control board.</p> <p>Made an LCD bracket that screws into the fan mount. It's printed without supports on its side. It droops a little bit at the top but that part is not visible when the MPSM LCD is screwed on. If you need a different type of LCD bracket and control board mounting write in the comments and il design it if you are willing to test print it.</p> <p>19.01.2022 Added Fan mount to the front of the machine. Planing on adding more extensions to make this a real filament extrusion line.</p> <p>///////////////////////</p> <p>Thanks to @Sapienz for the original design. I remixed it to use more common hardware in the 3d printing world and also lowered the part count. Made some improvements to lower filament usage and the time it takes to print everything.</p> <p>From 23 parts I lowered it to 13. Some parts have been merged to print connected.</p> <p>Does not have the original lever for starting the pulling. I think that can be done easily in Marlin. No need for it.</p> <p>Also working on a custom UI for marlin and custom code for the whole process.</p> <p>Will be here soon. My stepper driver died last night so I can't test out. Will order new ones soon.</p> <p>Hardware needed:</p> <p>1x NEMA 17 Stepper</p> <p>3x 110mm M5 Threaded rods</p> <p>2x 120mm M5 Threaded rods</p> <p>10x M5 Nuts and washers</p> <p>3x 130mm M8 Threaded rods</p> <p>1x 60mm M8 Threaded rod</p> <p>8x M8 Nuts and washers</p> <p>10x 608 Ball bearings</p> <p>18x 4mm wood screws (to screw into the base)</p> <p>2x M3 11mm bolts (for the stepper gear)</p> <p>2x M3 nuts(also for the stepper gear)</p> <p>10x M3 10mm bolts(for the ender 3 lcd mount)</p> <h3>Print Settings</h3> <p><strong>Printer Brand:</strong></p> <p>Creality</p> <p><strong>Printer:</strong></p> <p>Ender 3</p> <p><strong>Rafts:</strong></p> <p>No</p> <p><strong>Supports:</strong></p> <p>No</p> <p><strong>Infill:</strong></p> <p>20</p> <p><strong>Filament:</strong> Generic PLA</p> <p><strong>Notes:</strong></p> <p>Sideplate 1.stl - 20% infill - 43g usage</p> <p>Sideplate 2.stl - 20% infill - 37g usage</p> <p>Spool Main.stl - 20% infill - 105g usage</p> <p>Spool Side.stl - 20% infill - 19g usage</p> <p>Spool spacer.stl - 20% infill - 2g usage</p> <p>Top Spacer Winder 1 of 2.stl - 20% infill - 5g usage</p> <p>Top Spacer Winder 2 of 2.stl - 20% infill - 5g usage</p> <p>GearNo1.stl - 100% infill - 29g usage</p> <p>GearNo1 Spacer.stl - 20% infill - 1g usage</p> <p>GearNo2.stl - 100% infill - 31g usage</p> <p>GearNo2 Spacer.stl - 20% infill - 1g usage</p> <p>Stepper Gear.stl - 100% infill - 5g usage</p> <p>Mount Bottom 1.stl - 20% infill - 9g usage</p> <p>Mount Bottom 2.stl - 20% infill - 9g usage</p> <p>Mount Bottom Fan.stl - 20% infill - 9g usage</p> <p>Fan Mount 1.stl - 20% infill - 18g usage</p> <p>Fan Mount 2.stl - 20% infill - 18g usage</p> <p>Top Spacer Fan 1 of 2.stl - 20% infill - 5g usage</p> <p>Top Spacer Fan 2 of 2.stl - 20% infill - 5g usage</p> <p>MPSM LCD mount.stl - 20% infill - 36g usage</p> <p>MPSM Controller box.stl - 20% infill -29g usage</p> <p>MPSM Controler box lid.stl - 20% infill - 16g usage Ender 3 Controller Mount.stl - 20% infill - 19g usage</p> <p>Ender_3_LCD_Mount.stl - 20% infill - 29g usage</p> <p>Ender_3_LCD_Mount_Backplate.stl - 20% infill - 22g usage</p> <p>Input_Spool_Mount_1.stl - 20% infill - 9g usage</p> <p>Input_Spool_Mount_2.stl - 20% infill - 9g usage</p> <p>Input_Spool_1_of_2.stl - 20% infill - 12g usage</p> <p>Input_Spool_2_of_2.stl - 20% infill - 13g usage</p> Category: DIY
With this file you will be able to print PET plastic PullStruder Winder with your 3D printer. Click on the button and save the file on your computer to work, edit or customize your design. You can also find more 3D designs for printers on PET plastic PullStruder Winder.