Perfect-fit plate stand / bowl stand
prusaprinters
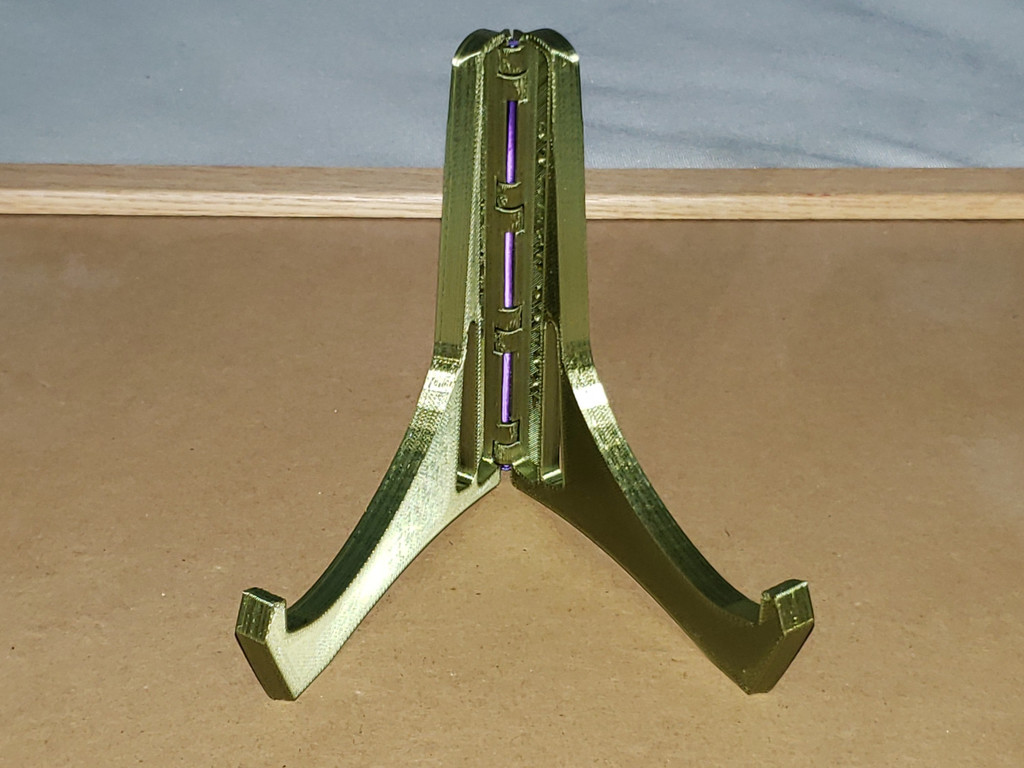
<p>In my father's shop, my son made a wooden bowl with an inlay pattern (his school's logo) as a gift for his school's 25th anniversary.</p><p>After searching Thingiverse for "plate stand" and "bowl stand" and finding nothing, I decided to create a custom stand that would fit the bowl perfectly, and include areas for engraving and embossing text.</p><p><strong>The STL file included is for a generic plate.</strong> If you want a customized stand for a bowl or different plate, you <strong>must</strong> adjust the parameters in the OpenSCAD file, which are pretty straightforward. The model for a bowl or plate requires 6 different measurements.</p><ul><li>overall height</li><li>largest diameter</li><li>diameter of top rim</li><li>diameter of base</li><li>height of rim above largest diameter</li><li>depth of recess in base</li></ul><p>The script creates a virtual bowl with a rounded shape that connects these measurements, and constructs the stand around that virtual bowl.</p><p>There are several more advanced parameters, for setting text for up to four labels (one on the inside and outside surface of each leg), tilt angle, maximum opening angle, and so on.</p><p>(13 March 2021 - updated .scad with improved foot cutout for cylindrical bowls; the original STL is still fine though.)</p><h3>Print Settings</h3><p><strong>Printer Brand: </strong>Prusa</p><p><strong>Printer: </strong>I3 MK3S</p><p><strong>Supports: </strong>No</p><p><strong>Resolution: </strong>0.30 mm adaptive</p><p><strong>Infill: </strong>15% gyroid</p><p><strong>Filament:</strong> Generic PLA Bronze</p><p><strong>Notes:</strong></p><p>If you have PrusaSlicer, I recommend 0.30 mm draft profile with automatic adaptive layer height with a quality/speed setting of 0.5 (which makes layers thinner as needed). This can save about an hour of printing time. It comes out looking good, although it doesn't really have to look good because the stand is mostly hidden by the bowl or plate.</p><h4>Post-Printing</h4><p>After printing, you need a short length of 1.75mm filament to serve as a hinge pin to tie the two legs together.</p><ul><li>Cut a piece of filament a couple centimeters longer than the length of the hinge.</li><li>On a stove burner, or a hot frying pan, push one end of the filament onto the hot surface to expand the end a bit, so it cannot slip through the hinge.</li><li>Thread the filament through the hinge.</li><li>With the filament all the way in, trim it so 3-5 mm of filament protrudes out the other end of the hinge.</li><li>Heat up a flattish metal object (dinner knife, end of a teaspoon) enough to melt the filament and press it onto the protruding end of the hinge pin to expand it, trapping it in the hinge.</li><li>Alternately, with the filament in place, you can put a drop of superglue in the hinge to bind the filament to the hinge. The hinge will still rotate with superglue on one or both ends.</li></ul><h3>How I Designed This</h3><p>Designed completely in OpenSCAD, with a pencil and paper to work out a number of trigonometry problems associated with this model.</p><p> </p><p>Category: Decor</p>
With this file you will be able to print Perfect-fit plate stand / bowl stand with your 3D printer. Click on the button and save the file on your computer to work, edit or customize your design. You can also find more 3D designs for printers on Perfect-fit plate stand / bowl stand.