Pegboard Hex Bit holder
thingiverse
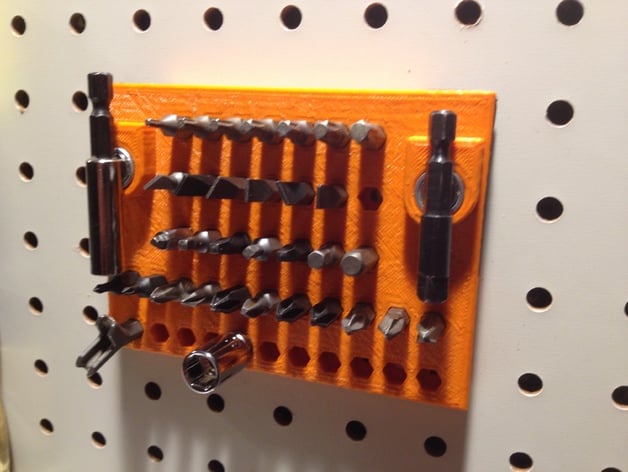
Hex Bit Holder for Standard Hex Bits This convenient storage solution allows for a total of 43 bits and comes equipped with two powerful magnets that securely hold longer drivers. To get started, simply print out the three required components: two pegboard bases and the hex bit holder itself. The hex socket caps, however, can be downloaded separately to store sockets for use in conjunction with a 1/4 drive. Note that these parts are designed specifically for pegboards featuring 1-inch spacing, commonly found at Home Depot and similar home improvement stores. For your convenience, you may visit the following online retailers to purchase necessary components: - Lee Valley Tools offers the rare earth magnet (part number 99K32.03) along with a 3/8" circular magnet - A matching 1/2" diameter steel cup (part number 99K32.52) for the same magnet can also be obtained at this store - Optional High Friction Discs are available for 3/8" magnets, sold under part number 99K34.51 If you would like to know how to assemble these parts together properly, please read on for a step-by-step guide: Settings (Recommended) To ensure optimal printing results: - Rafter on - Supports enabled - Infill at 80% - Shells set to 3 - Layer height adjusted to 0.20mm Instructions for Assembly 1) Print the two pegboard bases first, followed by thoroughly cleaning both raft and supports around 'pegs' 2) Remove raft from second part once printed, then carefully remove supports to achieve a secure fit 3) File as necessary around both holes located in pegs on back side 4) Using #43 drill bit, clean out small hole from previous step while taking extra care not to pierce the body of holder itself 5) Apply 4-40 tap and drill new tap using pre-drilled smaller holes, ensuring accuracy 6) Continue using same drill (#33) and repeat this action until completion 7) On both bases use file to smooth surface for added durability 8) After successfully assembling the magnet cup with 1/2" magnetic recess it may require additional persuasion but will soon rest close flush to top side of holder 9) Finally position base next to hex holder aligning L-hook with other matching parts 10) To secure base use machine screws (#40), carefully tightening to form good seal while avoiding over-tightening 11) One more fastener required, 1" wooden screw can secure cup in proper hole within base.
With this file you will be able to print Pegboard Hex Bit holder with your 3D printer. Click on the button and save the file on your computer to work, edit or customize your design. You can also find more 3D designs for printers on Pegboard Hex Bit holder.