Part Jars (Fast Vase Mode)
prusaprinters
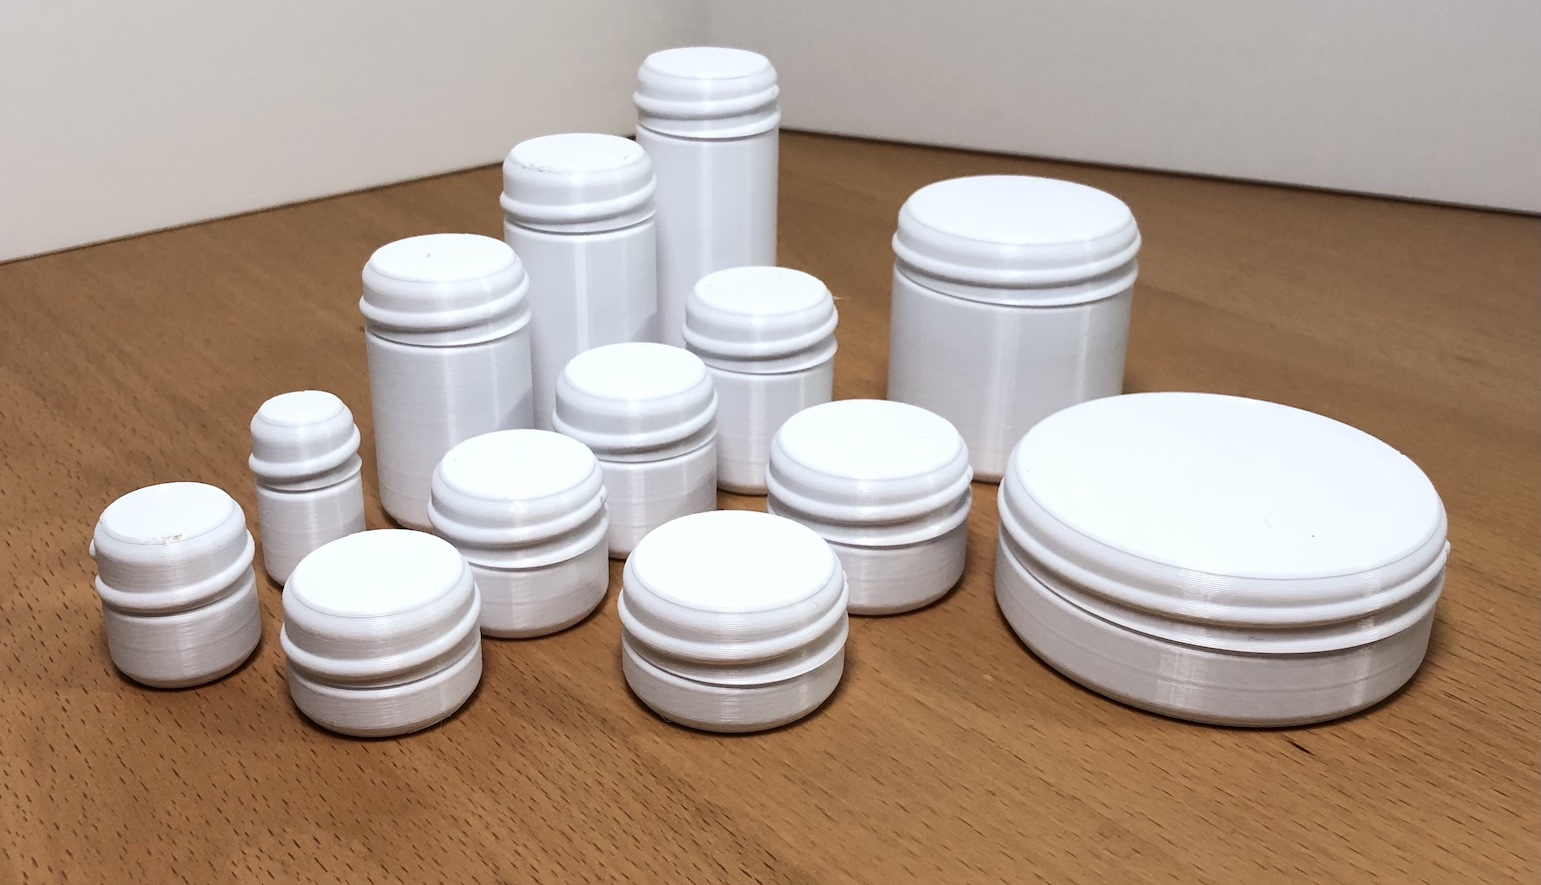
<p>I needed small part jars for organizing SMT components so I made these. They could be useful for screws or other small to medium-sized parts as well. They have a thin wall (0.5mm) but are plenty sturdy for light-duty applications.</p><p>A fast print time is achieved using Spiral Vase Mode which also minimizes filament usage. The lid screws on with a simple ¾ turn thread. The tolerances are loose to allow for printer variances. A detent on the thread holds the lid in place so it will not rattle off.</p><p>The assorted jar sizes are based on the jar's outer diameter and height. For lids, there are low (2mm), medium (5mm), and tall (10mm) height options. The attached files are for sizes I thought were useful. If you need another size then request it and I'll post additional files.</p><h5>Jar Sizes</h5><figure class="table"><table><tbody><tr><td style="background-color:#E0E0E0;text-align:center;vertical-align:bottom;width:70px;" rowspan="2"><strong>Jar</strong><br><strong>Height</strong></td><td style="background-color:#E0E0E0;" colspan="7"><strong>Jar Diameter</strong></td></tr><tr><td style="border-style:solid;text-align:center;">15mm</td><td style="text-align:center;">20mm</td><td style="text-align:center;">25mm</td><td style="text-align:center;">30mm</td><td style="text-align:center;">40mm</td><td style="text-align:center;">50mm</td><td style="text-align:center;">60mm</td></tr><tr><td style="text-align:center;width:70px;">16mm</td><td style="text-align:center;"> </td><td style="text-align:center;">✅</td><td style="text-align:center;">✅</td><td style="text-align:center;">✅</td><td style="text-align:center;"> </td><td style="text-align:center;"> </td><td style="text-align:center;"> </td></tr><tr><td style="text-align:center;width:70px;">20mm</td><td style="text-align:center;"> </td><td style="text-align:center;">✅</td><td style="text-align:center;">✅</td><td style="text-align:center;">✅</td><td style="text-align:center;">✅</td><td style="text-align:center;">✅</td><td style="text-align:center;">✅</td></tr><tr><td style="text-align:center;width:70px;">25mm</td><td style="text-align:center;">✅</td><td style="text-align:center;">✅</td><td style="text-align:center;">✅</td><td style="text-align:center;">✅</td><td style="text-align:center;">✅</td><td style="text-align:center;">✅</td><td style="text-align:center;">✅</td></tr><tr><td style="text-align:center;width:70px;">30mm</td><td style="text-align:center;">✅</td><td style="text-align:center;">✅</td><td style="text-align:center;">✅</td><td style="text-align:center;">✅</td><td style="text-align:center;">✅</td><td style="text-align:center;">✅</td><td style="text-align:center;"> </td></tr><tr><td style="text-align:center;width:70px;">40mm</td><td style="text-align:center;"> </td><td style="text-align:center;">✅</td><td style="text-align:center;">✅</td><td style="text-align:center;">✅</td><td style="text-align:center;">✅</td><td style="text-align:center;"> </td><td style="text-align:center;"> </td></tr><tr><td style="text-align:center;width:70px;">50mm</td><td style="text-align:center;"> </td><td style="text-align:center;"> </td><td style="text-align:center;">✅</td><td style="text-align:center;">✅</td><td style="text-align:center;"> </td><td style="text-align:center;"> </td><td style="text-align:center;">✅</td></tr><tr><td style="text-align:center;width:70px;">60mm</td><td style="text-align:center;"> </td><td style="text-align:center;"> </td><td style="text-align:center;">✅</td><td style="text-align:center;"> </td><td style="text-align:center;"> </td><td style="text-align:center;"> </td><td style="text-align:center;"> </td></tr></tbody></table></figure><h5>Lid Sizes</h5><figure class="table"><table><tbody><tr><td style="background-color:#E0E0E0;text-align:center;vertical-align:bottom;width:70px;" rowspan="2"><strong>Lid</strong><br><strong>Height</strong></td><td style="background-color:#E0E0E0;" colspan="7"><strong>Lid Diameter</strong></td></tr><tr><td style="border-style:solid;text-align:center;">15mm</td><td style="text-align:center;">20mm</td><td style="text-align:center;">25mm</td><td style="text-align:center;">30mm</td><td style="text-align:center;">40mm</td><td style="text-align:center;">50mm</td><td style="text-align:center;">60mm</td></tr><tr><td style="text-align:center;width:70px;">2mm</td><td style="text-align:center;">✅</td><td style="text-align:center;">✅</td><td style="text-align:center;">✅</td><td style="text-align:center;">✅</td><td style="text-align:center;">✅</td><td style="text-align:center;">✅</td><td style="text-align:center;">✅</td></tr><tr><td style="text-align:center;width:70px;">5mm</td><td style="text-align:center;"> </td><td style="text-align:center;"> </td><td style="text-align:center;">✅</td><td style="text-align:center;">✅</td><td style="text-align:center;"> </td><td style="text-align:center;"> </td><td style="text-align:center;"> </td></tr><tr><td>10mm</td><td style="text-align:center;"> </td><td style="text-align:center;"> </td><td style="text-align:center;">✅</td><td style="text-align:center;">✅</td><td style="text-align:center;"> </td><td style="text-align:center;"> </td><td style="text-align:center;"> </td></tr></tbody></table></figure><h4> </h4><h4>Trays</h4><p>Trays for these jars can be found in this project: <a href="https://www.printables.com/model/241700-part-jar-trays-fast-vase-mode">Part Jar Trays (Fast Vase Mode)</a></p><figure class="image image_resized" style="width:30.17%;"><img src="https://media.printables.com/media/prints/239144/rich_content/7ee2188b-95f2-4fc8-8822-c1e1a54ebf53/2x2_tray.jpg#%7B%22uuid%22%3A%22c6daef58-6f14-47d7-9a3e-ac29c798e2ef%22%2C%22w%22%3A926%2C%22h%22%3A719%7D"></figure><h4> </h4><h4>Print Settings:</h4><p>All of my test prints were sliced with Cura 4.12.1 but the latest version of Prusa Slicer should work as well.</p><ul><li>Material: PLA</li><li>Nozzle: 0.4mm</li><li>Layer Height: 0.2mm</li><li>Line Width: 0.5mm <== Important</li><li>Perimeters: 1</li><li>Infill: None</li><li>Supports: None</li><li>Bed Adhesion: Skirt</li><li>Spiral Vase: Enabled (Prusa Slicer setting)</li><li>Spiralize Outer Contour: Enabled (Cura setting)</li><li>Smooth Spiralized Contours: Disabled (Cura setting)</li><li>Printing Orientation: Jars bottom-side down, Lids top-side down</li></ul><p>Notes:</p><ul><li>The printer should have a 0.4mm nozzle.</li><li>In Cura, enable <strong>Spiralize Outer Contour</strong> and <strong>Smooth Spiralized Contours</strong> under the <strong>Special Modes</strong> category.</li><li>In Prusa Slicer, enable <strong>Spiral Vase</strong> in the <strong>Vertical Shells</strong> section on the <strong>Print Settings</strong> tab.</li><li>I found a bug in Cura with the <strong>Smooth Spiralized Contours</strong> setting so disable it to prevent weird line width problems.</li></ul><h4>Multi-part Printing:</h4><p>Unlike normal printing, vase mode only supports printing one model at a time since a continuous surface is required. To work around this for multiple parts, both Cura and Prusa Slicer support printing models sequentially so one print is fully completed before starting the next. There are limitations when positioning the models on the build plate so the print head or gantry does not collide with the already finished print.</p><ul><li>In Cura, to enable sequential printing change the <strong>Print Sequence</strong> setting to <strong>One at a Time</strong>.</li><li>In Prusa Slicer, turn on <strong>Complete Individual Objects</strong> in the <strong>Output Options</strong> settings for sequential printing.</li></ul><p>Project examples for both Cura and Prusa Slicer can be found in the corresponding Project Files folders. The example prints a jar and lid set. These projects can be used as a starting point to slice other model combinations.</p><p> </p><h4>Spout Lid (Experimental):</h4><p>This is a test design for a spout lid to pour out parts. I'm not sure the usefulness of it yet so I only modeled it for the 25mm diameter jar. If you have ideas to make it better let me know.</p><p>It also prints in spiral vase mode but has zero bottom layers so it is hollow throughout. Good bed adhesion is necessary for this to print right.</p><figure class="image image_resized" style="width:56.68%;"><img src="https://media.printables.com/media/prints/239144/rich_content/5a112872-b1e6-4529-af81-14bce6013446/spout_lid.jpg#%7B%22uuid%22%3A%220732a70b-829a-4846-ac0e-78a00176221e%22%2C%22w%22%3A838%2C%22h%22%3A571%7D"></figure><p> </p><h4>De-taper Lid (Experimental):</h4><p>With this lid you can quickly strip SMD parts off a tape reel directly into the jar without worrying about spilling parts all over. </p><figure class="image image_resized" style="width:54.35%;"><img src="https://media.printables.com/media/prints/239144/rich_content/545d6390-b89b-49a8-bd30-0e23fd75ab6a/detaper_lid.jpg#%7B%22uuid%22%3A%22aca85e7c-5366-481d-ba46-ad1169e60a26%22%2C%22w%22%3A1079%2C%22h%22%3A800%7D"></figure><p>To use, feed the tape through the top slot then thread the cover tape back through the lower slot (a tape puller tool is proved to help with this). A few parts may need removed first to get the cover tape started. Once the cover tape is fed through, all you have to do is pull on it until all the parts are in the jar. Takes a second or two to pull 100 parts off a reel.</p><p>I've only modeled this in the 22mm diameter jar size for now. I may make improvements later but it works good enough for me.</p><p>This is <strong>not</strong> a vase mode print so regular slicer settings are required. I used 8 perimeters to eliminate the infill. The top of the lid is placed down on the print bed. There are some overhangs that end up sloppy without supports but it is functional.</p><h4>Updates:</h4><ol><li>Added model for Jar 60mm wide x 50mm tall.</li><li>Added 22mm wide Jar series.</li><li>Added De-taper Lid.</li></ol>
With this file you will be able to print Part Jars (Fast Vase Mode) with your 3D printer. Click on the button and save the file on your computer to work, edit or customize your design. You can also find more 3D designs for printers on Part Jars (Fast Vase Mode).