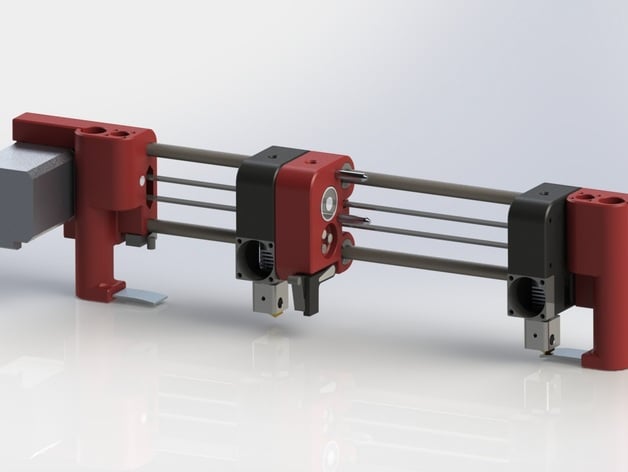
Parking dual extruder, Prusa i3 X axis mod, hexagon extruders
thingiverse
I'm designing a dual carriage system using two electromagnets that are 12V and 20N for picking up an extruder. When I need to park the extruder, I disable the electromagnet so the permanent magnet located in the X-axis, which is situated on the left and right sides of the carriage, holds it firmly in place. This prevents the extruder from oozing because an aluminum plate closes the nozzle opening. The STL and Solidworks files for this design are included. You can check out my YouTube video to see the carriages in action! https://www.youtube.com/watch?v=FiTmRHkiEUg Update: My electric scheme is based on a setup provided by 3D-Proto (thanks!), which you can find at http://www.3d-proto.de/public/img/DualParkExtSetup.png. Be sure to notice the direction of diodes D1 and D2, which are placed parallel to your electromagnets. Switching hotend fans with relays is optional. Print Settings: Printer Brand: RepRap Printer: Prusa i3 Supports: Yes Notes: Print the carriages in ABS because they are close to the hotend and the electromagnets can get quite hot. Support structures are necessary. Post-Printing: You will need the following parts: 1x Ultra micro servo (available at http://www.hobbyking.com/hobbyking/store/__31634__HK_282A_Single_Screw_Ultra_Micro_Servo_2g_0_2kg_0_08sec_EU_Warehouse_.html) 1x 5V two-channel relay (available at http://www.ebay.com/itm/5V-Two-2-Channel-Relay-Module-With-optocoupler-For-PIC-AVR-DSP-ARM-Arduino-/181026509345) 2x Diodes 1000V/1A (available at http://www.conrad.com/ce/en/product/162272/?insert=89&insertNoDeeplink&productname=Diotec-1N4007-diode-1000V1A-Case-type-DO-41-IF-1-A-Reverse-voltage-UR-1-kV) 1x Micro switch (available at http://www.conrad.com/ce/en/product/707243/?insert=89&insertNoDeeplink&productname=Microswitch-250-Vac-5-A-1-x-OnOn-Hartmann-MBB1-01-A-01-C-09-A-momentary-1-pcs) 6x LM8UUOP-8mm-Open-Linear-Ball-Bearing (available at http://www.ebay.nl/itm/10pcs-LM8UUOP-8mm-Open-Linear-Ball-Bearing-/300628744824?hash=item45fede9a78:m:m6WdBy6L7VAYf5z7aMKo36A) 2x Neodymium magnet (available at http://www.conrad.com/ce/en/product/505783/?insert=89&insertNoDeeplink&productname=NdFeB-magnet-cylindrical-design-Conrad-x-H-5-mm-x-10-mm) 2x 20mm x 15mm 12v 20N electromagnet (be aware of the temperature, mine reached 65 degrees Celsius) (available at http://www.conrad.com/ce/en/product/502290/Intertec-ITS-MS-2015-12VDC-electromagnet-12-Vdc-M3?ref=searchDetail) 2x Fan grill 25mm x 25mm (optional) (available at http://www.conrad.com/ce/en/product/505783/?insert=89&insertNoDeeplink&productname=FAN-GRILL-FOR-TB-BASE-BOARD) 2x Fans (available at http://www.ebay.nl/itm/FAN-20mm-5V-DC-Turbo-Cooling-Silencer-Damping-Blower-5mm-12mm-M3-Nut-/281609124511?hash=item41af0bbd1f:g:9jQAAOSw2pBxJ7ZM) Custom Section: You can use the Simplify 3D tool change script provided below to fine-tune your parking spots. You will need to adjust the coordinates and speeds according to your printer's specific requirements. {IF NEWTOOL=0} G1 X232.000 F6500 ; go to right parking lot {IF NEWTOOL=0} M42 P57 S255 ; electro magnet 2 off {IF NEWTOOL=0} G1 X-2.000 F6500 ; go to left parking lot {IF NEWTOOL=0} M42 P58 S0 ; electro magnet 1 on {IF NEWTOOL=1} G1 X-2.00 F6500 ; go to left parking lot {IF NEWTOOL=1} M42 P58 S255 ; electro magnet 1 off {IF NEWTOOL=1} G1 X232.000 F6500 ; go to right parking lot {IF NEWTOOL=1} M42 P57 S0 ; electro magnet 2 on
With this file you will be able to print Parking dual extruder, Prusa i3 X axis mod, hexagon extruders with your 3D printer. Click on the button and save the file on your computer to work, edit or customize your design. You can also find more 3D designs for printers on Parking dual extruder, Prusa i3 X axis mod, hexagon extruders.
