Parametric LACK Enclosure Leg Lift
prusaprinters
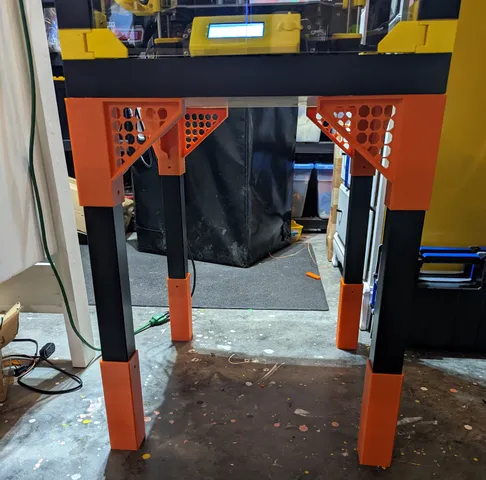
This model came out of my fatigue from bending over to check on or work on the printer. Having a working surface that is closer to waist high seemed to be more ergonomic. Lacking options that I felt fit my needs, I designed this parametric leg lift system. Using the included STL files, you can lift the base of your IKEA LACK table by 25cm. Components:A. 150mm Leg lift: This is achieved by placing the leg lift part on the bottom of the LACK legs. There are two holes for a 3mm diameter tapered head wood screw (or a 6 x ¾" is what I used) to secure the lift to the legs. B. (OPTIONAL) 90mm Leg Extensions: This part is designed to fit between the Leg Lift in (A), and the LACK leg. This is again secured using 3mm screws. C. 100mm Platform Lift and Brace: This part will attach to the top of your LACK legs, and boosts your working platform height by 100mm. To secure the part, you'll use the IKEA supplied double sided wood screw and your 6x wood screws to attach the part to the leg and the base of the table. HIGHLY recommend this part to increase your table's rigidity if increasing height. Printing Parts:I printed my legs in PETG with a 20% infill, using the default layer/width settings for the .4mm nozzle in Prusa Slicer. The parts could just as easily be printed in ASA, PLA or ABS if you chose.These parts were designed to be printed WITHOUT supports. For the leg lift or the extension, print the objects upright, with the screw holes at the top of the model. For the platform lift and brace, print these objects upside down, with the LACK leg insert portion facing upward. The default platform lift can (and was) printed on a Prusa Mini printer. Required Parts:-Total of 32 of the 3mm (6 x ¾") screws to secure parts to the legs and the table base if Brace and Leg Lift parts are used.Editing the parametric values:The included Fusion 360 F3D file allows you to open the design and set your desired lift values. The current values are set to allow the Platform Brace and Lift file to be printed on a Prusa Mini, and the Leg Lift file tops out at just under 210mm to allow you to print on a MK3. If you have a larger volume printer available, you can make adjustments as you see fit. Open the included F3D file in Fusion 360. Under the “Modify” menu, select the drop down menu and select “Change Parameters” This should display two values that you can change:A. leg_raise: To increase or decrease the amount of lift that your LACK's Leg Lift part will receive, change the number in the “Value” column. The default is 150.B. leg_top_height: This value sets the distance that the brace will raise the platform. For any questions about parametrics, and how to add/edit values, check out Prusa's blog post on the subject: https://blog.prusa3d.com/parametric-modeling-in-fusion360_37411/Requests:If you don't feel comfortable with Fusion 360, and exporting your own STL files, just drop a message in the comments, and I'll be happy to do custom sizes for your LACK table.
With this file you will be able to print Parametric LACK Enclosure Leg Lift with your 3D printer. Click on the button and save the file on your computer to work, edit or customize your design. You can also find more 3D designs for printers on Parametric LACK Enclosure Leg Lift.