Parametric Bottle Cap Generator
prusaprinters
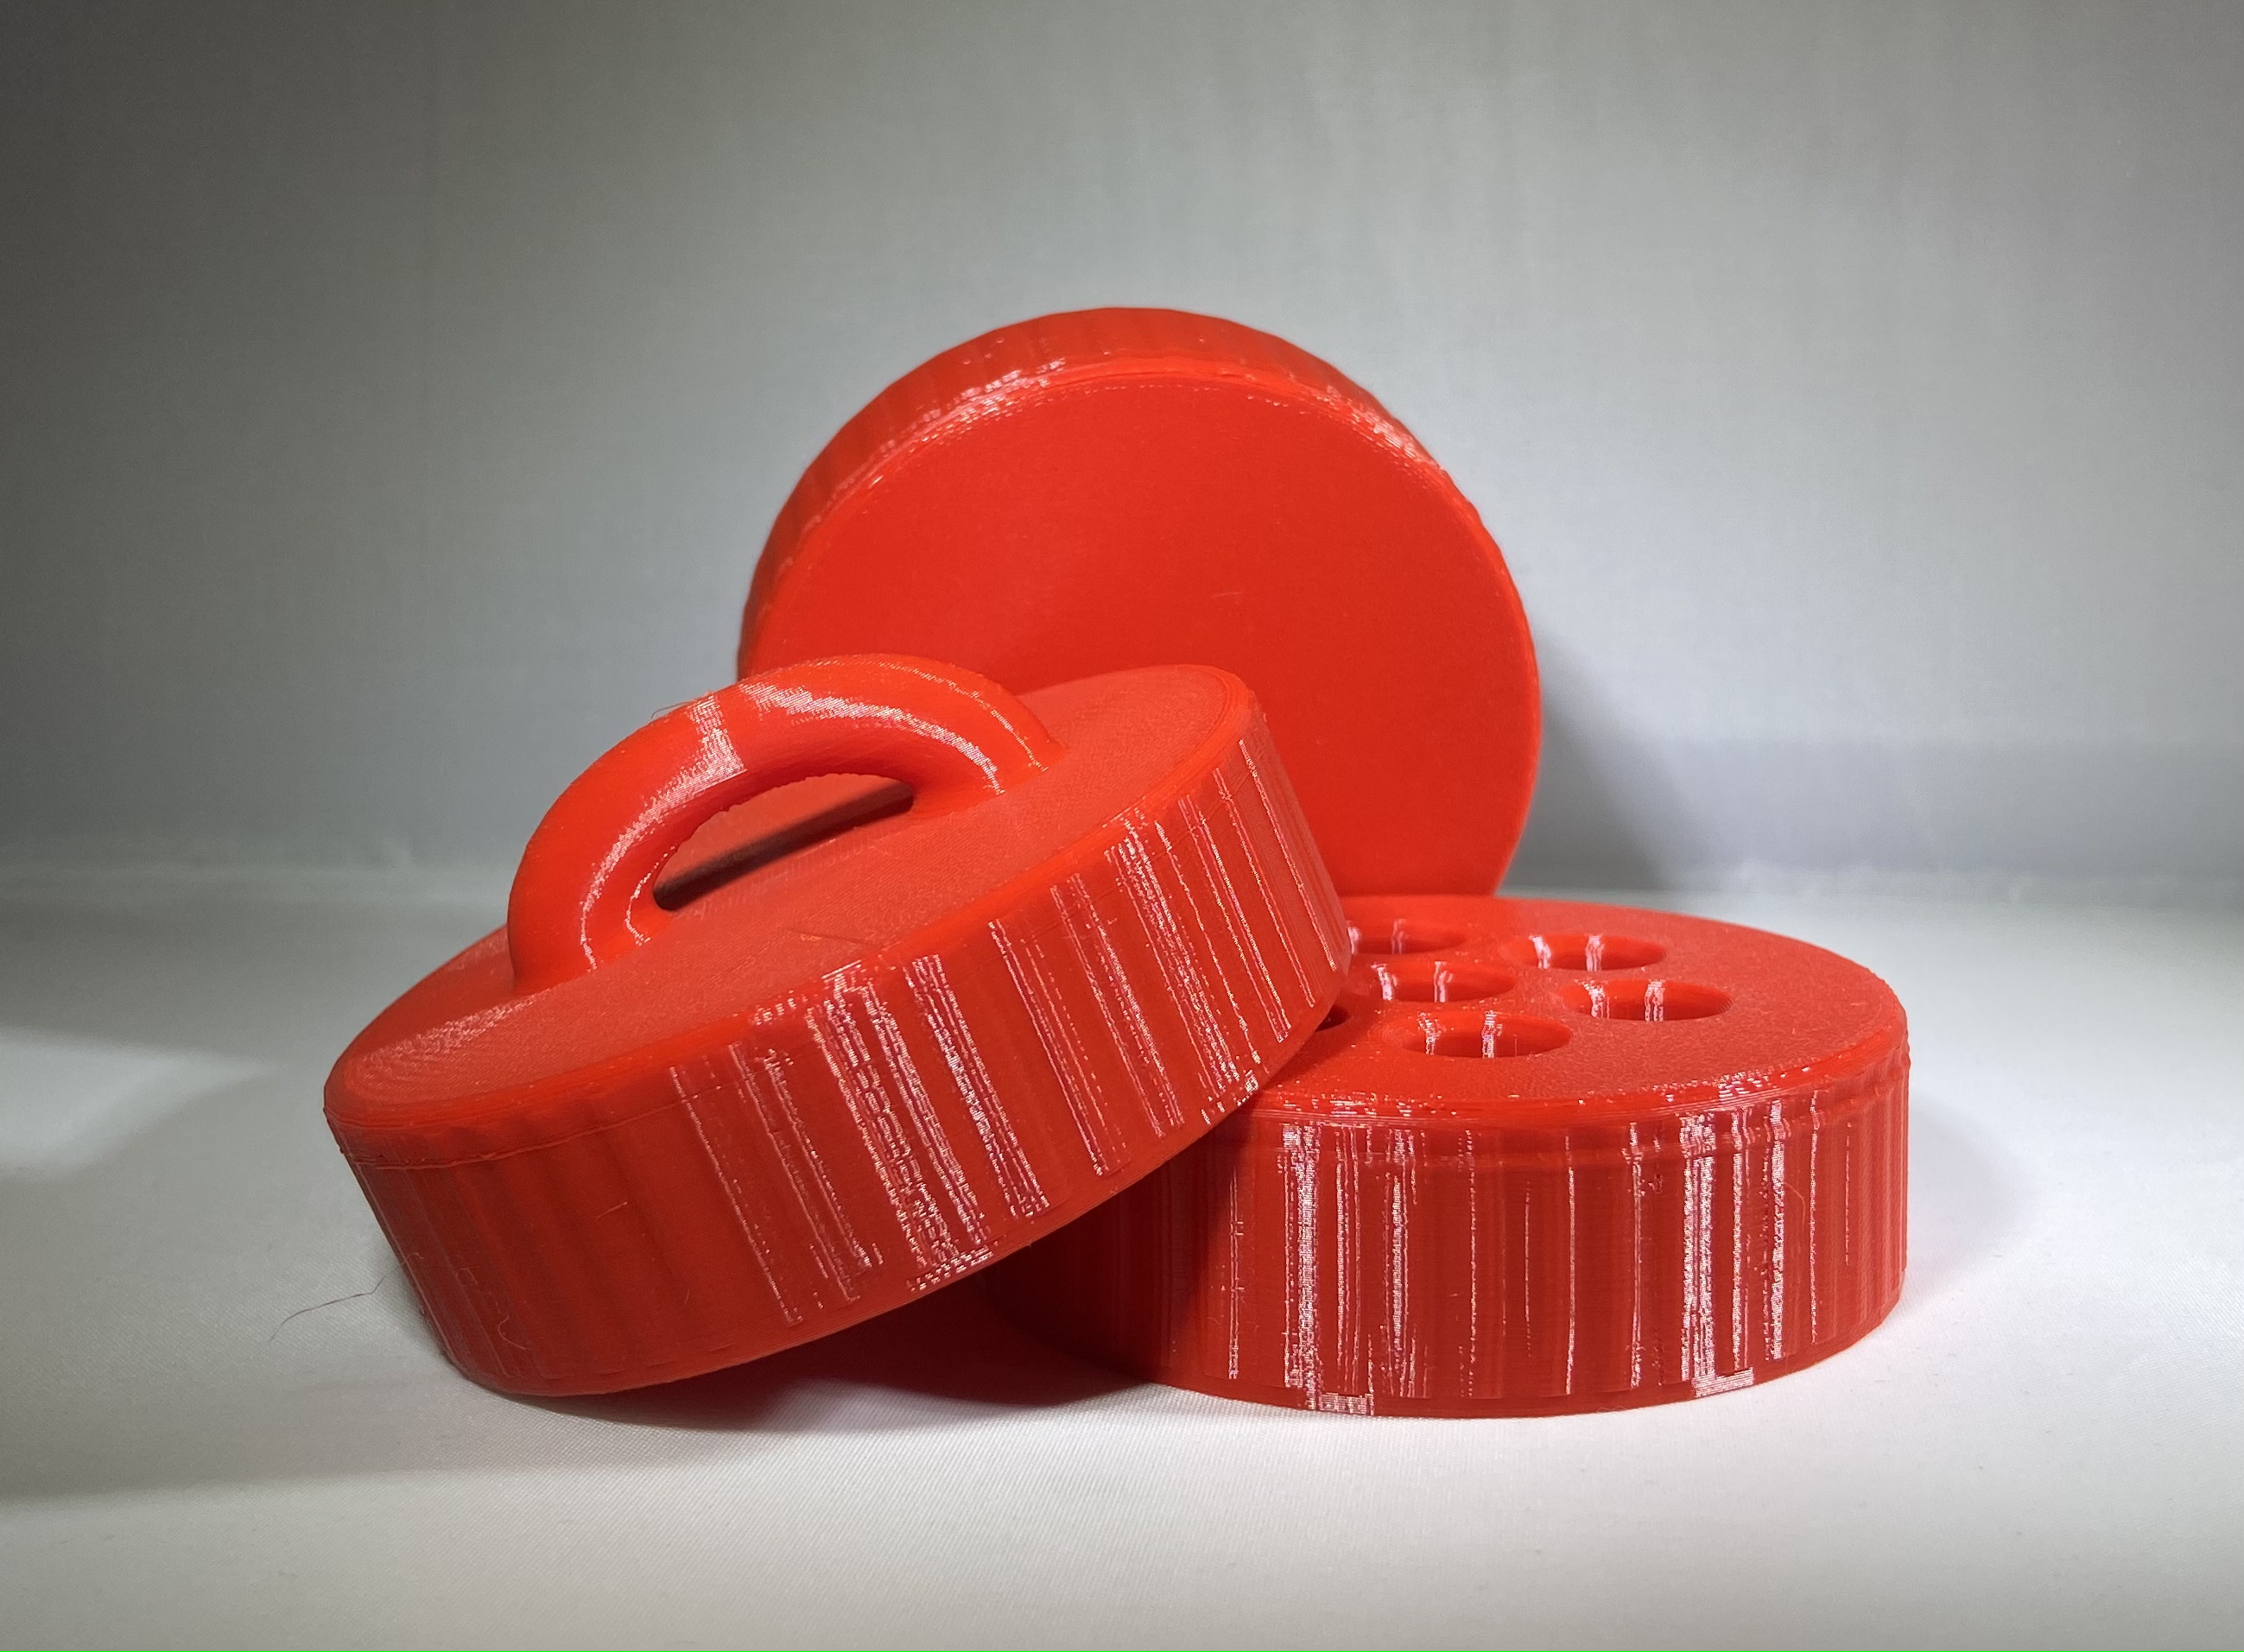
<p><strong>A Parametric Bottle Cap Generator -</strong> Lost a lid or just want a more functional cap? Generate and print your own, compatible with any existing threads!</p><p>This model was designed in Fusion 360 and uses 3 required input parameters and <a href="https://amesweb.info/Screws/metric-thread-profile-form-formula.aspx">standard Metric thread profile </a>equations to generate a cap that will perfectly fit any of your threaded containers. <strong>Input Parameters can be found from an existing threaded connector following the documentation below </strong>and their values can be written in their corresponding <i>Expression</i> boxes in the <i>Parameters</i> spreadsheet of the attached <i>Parametric Bottle Cap</i> Fusion 360 file (shown below)</p><figure class="image"><img src="https://media.prusaprinters.org/media/prints/76271/rich_content/d2a6c420-2203-4d0a-8ea9-6987a043bd60/capparameters.png#%7B%22uuid%22%3A%22160d1d25-90a9-46a2-ad57-5310f55e25f6%22%2C%22w%22%3A1000%2C%22h%22%3A549%7D"></figure><p>The three required input parameters provide the data for the thread component equations, all fed into Fusion 360's coil tool, thus creating entirely parametrically generated threads. Following these required inputs, there are a number of customization included in the generator, discussed later in the documentation.</p><p>I originally set out to make this generator due to a need for a lower profile cap for the isopropyl alcohol bottle I keep next to my printer. The thread profile of this bottle is rather abnormal, and thus I found myself finding thread component values with <a href="https://amesweb.info/Screws/metric-thread-profile-form-formula.aspx">standard Metric thread profile </a>equations, the same used by the generator. <strong>The work and testing behind this generator can be further read about on my website, </strong><a href="https://teddywarner.org/Projects/ParametricGenerator/"><strong>teddywarner.org</strong></a></p><h4>Generate Your Cap -</h4><p>For documentation purposes, I created a new cap for my Nalgene water bottle …</p><h4><strong> </strong><i><strong>Required Measurements </strong></i></h4><p><i><strong> </strong></i>There are three measurements required to generate your own cap, all of which can be taken from the existing threaded connector … </p><ul><li>Connector Diameter -</li></ul><p> Measure the diameter (in MM) of your existing connector, from the very farthest point (i.e. the point of the thread) on either side. </p><figure class="image"><img src="https://media.prusaprinters.org/media/prints/76271/rich_content/042c0a31-3669-4ea4-8632-febc207d37d3/diametermeasurment.jpg#%7B%22uuid%22%3A%222d08ff0d-d7fb-4302-b224-71340106235e%22%2C%22w%22%3A2320%2C%22h%22%3A986%7D"></figure><p>Then, update the <i>Expression</i> value in the <i>ConnectDiameter</i> row (the box highlighted yellow below) with this found value.</p><figure class="image"><img src="https://media.prusaprinters.org/media/prints/76271/rich_content/03191f19-94f6-48b9-ba92-e750ad594283/connectdiameter.png#%7B%22uuid%22%3A%22a9babb76-823a-42f3-bb02-272f6ec24a38%22%2C%22w%22%3A975%2C%22h%22%3A138%7D"></figure><ul><li>Connector Length -</li></ul><p> Measure the height (in MM) of your existing connector, from the top lip to underneath the threads. </p><figure class="image"><img src="https://media.prusaprinters.org/media/prints/76271/rich_content/478e21ba-aa9e-45ad-8cd3-321f1fdf9150/legnthmeasurement.jpg#%7B%22uuid%22%3A%22d0e6fdd7-1fa0-4ec9-af9f-7df52faa31f5%22%2C%22w%22%3A2788%2C%22h%22%3A1184%7D"></figure><p>Then, update the <i>Expression</i> value in the <i>ConnectLegnth</i> row (the box highlighted yellow below) with this found value.</p><figure class="image"><img src="https://media.prusaprinters.org/media/prints/76271/rich_content/0abc79b6-0569-4743-9875-f895803ab3c7/connectlegnth.png#%7B%22uuid%22%3A%22844b0ca4-8686-4970-9c2b-7113162bb4d9%22%2C%22w%22%3A975%2C%22h%22%3A138%7D"></figure><ul><li>Thread Pitch -</li></ul><p> Measure the thread pitch of your existing connector, the distance in MM between the points of two sequential threads. </p><figure class="image"><img src="https://media.prusaprinters.org/media/prints/76271/rich_content/c2a8502f-99bc-455e-a194-b76fc5fb3942/pitchmeasurment.jpg#%7B%22uuid%22%3A%2230c5701f-e132-40a4-9ffd-b675fc5fa2d2%22%2C%22w%22%3A2496%2C%22h%22%3A1324%7D"></figure><p>Then, update the <i>Expression</i> value in the <i>ThreadPitch</i> row (the box highlighted yellow below) with this found value.</p><figure class="image"><img src="https://media.prusaprinters.org/media/prints/76271/rich_content/dc65affd-a0ff-4fe1-b87b-4a87330b2bc4/threadpitch.png#%7B%22uuid%22%3A%228ee1a8b9-8e78-46e4-9340-f057bcfc338a%22%2C%22w%22%3A975%2C%22h%22%3A138%7D"></figure><h4><strong> </strong><i><strong>Optional Customization</strong></i></h4><p> To offer a bit more customization to each generated cap, there are a couple of different preferences allowing for different functions.</p><ul><li>Number of Grips -</li></ul><p> The number of grips lining the edge of the cap can be changed in the <i>Expression</i> value of the <i>NumofGrips </i>row. I find values between 40 through 55 work best, but if your experimenting, going below 11 will stop the generation of grip chamfered.</p><figure class="image"><img src="https://media.prusaprinters.org/media/prints/76271/rich_content/17469d1c-cbdc-4fdb-8c80-d723a8d88964/numofgrips.png#%7B%22uuid%22%3A%224d2f9e06-af2d-417b-91d8-4b909fe6b612%22%2C%22w%22%3A975%2C%22h%22%3A138%7D"></figure><ul><li>Grip Depth -</li></ul><p> The depths of these grips can be altered, determining how grippy your grips are. I've found a value around 0.3 or 0.4 offers a good texture around the edge.</p><figure class="image"><img src="https://media.prusaprinters.org/media/prints/76271/rich_content/8d84df0c-dd98-4580-968e-d8fd1f5410d4/gripdepth.png#%7B%22uuid%22%3A%225be7154a-9282-4de7-b3bc-cedf96ddc3ea%22%2C%22w%22%3A975%2C%22h%22%3A138%7D"></figure><ul><li>Lid Style -</li></ul><p> The lid style of your cap can be toggled between 4 presets in the Fusion <i>Parametric Bottle Cap</i> file by navigating to </p><pre><code class="language-plaintext">Parametric-Bottle_Cap > Bodies > Styles</code></pre><p>in the Fusion browser. The lid styles can be toggled between via the eye icon to the left of each style. The four styles are included below, with each of the toggles highlighted.</p><p> - Plain</p><figure class="image"><img src="https://media.prusaprinters.org/media/prints/76271/rich_content/f6a91f8c-0eb1-437d-832f-7a5e75f72f16/plain.png#%7B%22uuid%22%3A%22fa4ba836-9372-463a-9a36-04dbc38a5ffe%22%2C%22w%22%3A1233%2C%22h%22%3A632%7D"></figure><p> - Single Hole</p><figure class="image"><img src="https://media.prusaprinters.org/media/prints/76271/rich_content/9df6b261-07b3-46bd-b7bc-215a9a914c3c/singlehole.png#%7B%22uuid%22%3A%222b71b93b-49a0-44f1-8c5f-e2a5edaada7d%22%2C%22w%22%3A1233%2C%22h%22%3A632%7D"></figure><p> - Salt Shaker</p><figure class="image"><img src="https://media.prusaprinters.org/media/prints/76271/rich_content/59483cf6-ff9b-4064-8db4-18571d590e4a/saltshaker.png#%7B%22uuid%22%3A%229ca07fc7-6154-4d6e-9c2e-5f1c8561f02d%22%2C%22w%22%3A1233%2C%22h%22%3A632%7D"></figure><p> - Lanyard</p><figure class="image"><img src="https://media.prusaprinters.org/media/prints/76271/rich_content/f3cb552d-5f53-46db-8cc1-989f178061d0/lanyard.png#%7B%22uuid%22%3A%22c39cd72e-cfec-466e-a391-56ad98982412%22%2C%22w%22%3A1233%2C%22h%22%3A632%7D"></figure><p> </p><h4>Print Settings -</h4><p><strong>Notes: </strong></p><p>The examples were printed using the default "0.15mm Quality" from PrusaSlicer on a <a href="https://shop.prusa3d.com/en/3d-printers/181-original-prusa-i3-mk3s-3d-printer.html#">Prusa I3 MK3S+</a>. This layer height yields clean threads and is a good starting place for most caps, however, smaller caps may require a higher quality to allow for proper fitting.</p><p><strong>Rafts: </strong></p><p>No</p><p><strong>Supports:</strong></p><p>Dependent on chosen style - if printing Lanyard style, they may be necessary</p><p><strong>Resolution: </strong></p><p>0.15mm - as mentioned above, 0.15 is a good starting place - smaller caps require higher quality for proper fitting</p><p><strong>Infill:</strong></p><p>15%</p>
With this file you will be able to print Parametric Bottle Cap Generator with your 3D printer. Click on the button and save the file on your computer to work, edit or customize your design. You can also find more 3D designs for printers on Parametric Bottle Cap Generator.