Parametric Acoustic Levitator
cults3d
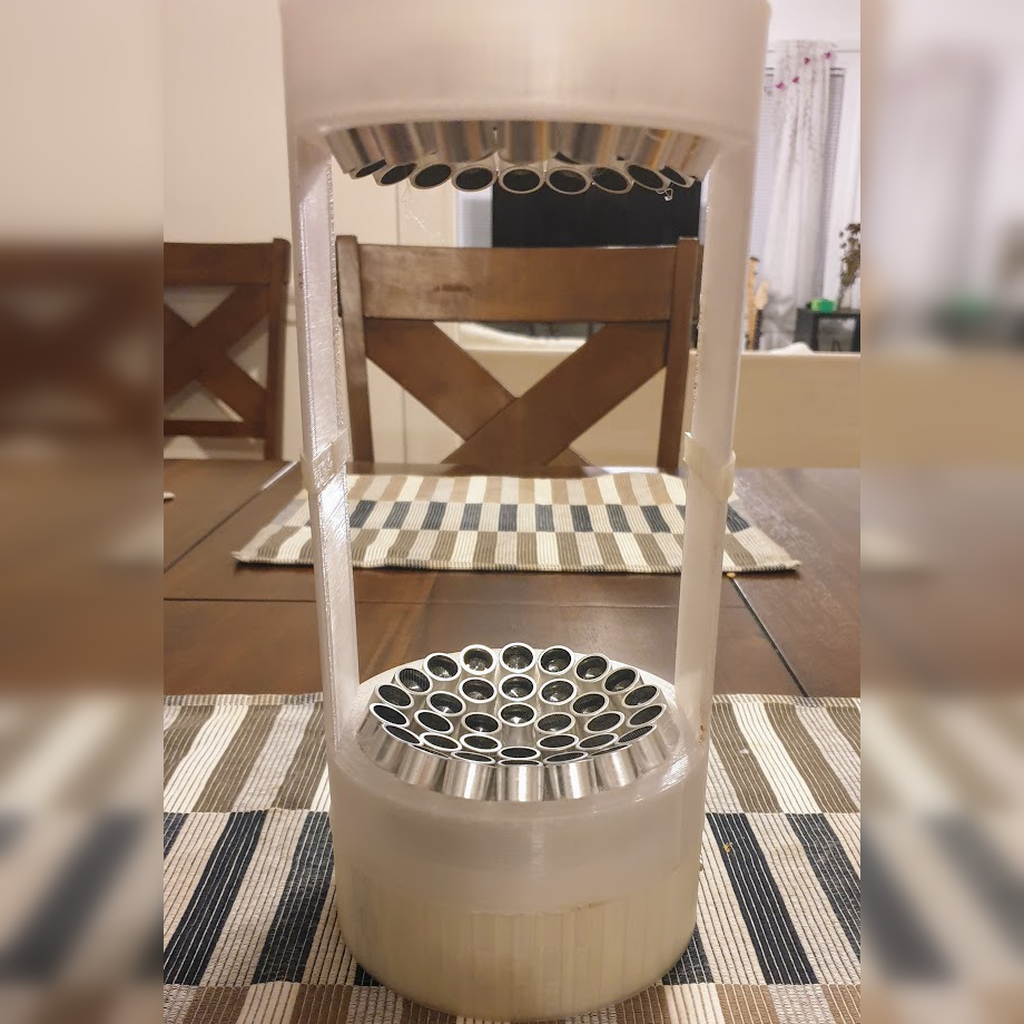
UPDATE 11/27/2019: I have finished this project! all parts including top cover and electronics base are available. Video in action here. Official home here: https://github.com/rsheldiii/ParametricLev What is this project? This is a Parametric Acoustic Levitator that takes the electronics from this instructable to power the needs of 16mm drivers, aka the BigLev, from this instructable. It works by creating 3d, standing wave patterns in the air, allowing objects with a maximum density and size to be trapped in the high pressure nodes. It does this using transducers, which is just a fancy way to say speakers that sometimes go way above frequencies the human ear can hear. The goal was to levitate small 3d printed objects, and do so in a parametric and hopefully slightly prettier package. Parametric you say? While the design is parametric, there's a lot of hand-editing required to fit the correct / maximal number of transducers; the code attempts to make useful decisions for you, but it's not always great at it. In order to keep the math simple, transducer placement is done assuming you want to organize a collection of circles in concentric rings on a sphere, which is not an airtight abstraction. This also notably does not involve any hexagonal packing like the original design, though unless you're doing something crazy, you probably won't miss it. What about smaller versions? If you're not willing to commit to a 72 transducer set up, you can edit the design files yourself and use different settings, or you can take a look at NanoLev and MicroLev. MicroLev is best served powered from the original electronics, at which point I've been able to levitate pieces of popcorn and bits of paper. NanoLev can be run from a Pro Micro or other arduino entirely, but can only levitate Styrofoam beads. the MicroLev has two sides, top and bottom, as the transducers need to be directly opposite from each other. BigLev doesn't need that, since the piece can be rotated 180 degrees to achieve the effect (and it's not nearly as important when you have 72 transducers) BigLev The sections below assume you are building a BigLev. Bill of Materials 72 16mm transducers, I used these ones. The design can be changed to fit 12mm transducers if that's what you have, but make sure that they can handle whatever voltage you'll be pumping through them first. An Arduino Nano or equivalent Wire for the transducers, using magnet wire makes it easier. I wouldn't go any higher than 22AWG, I'd even get lower if you can A large enough power supply A barrel connector, any 5.5mm will do A variable dc-dc converter A stepper motor driver Parts list For a BigLev, please print: * 2 BigLev-half.stl * 2 BigLev-press-fit-shunt.stl * 1 BigLev-top.stl * 1 BigLev-bottom.stl you can get away without the shunts by gluing the two halves together, but I've found it very helpful to be able to vary the distance of the transducers from each other. There should be a "best" distance, but some items prefer different distances than others. Assembly Proceed to the Github page for assembly instructions: https://github.com/rsheldiii/ParametricLev You can piece together how to wire this by following the two guides listed above. Note that the tractor beam guide is only used for the wiring of the electronics; follow the wiring on that guide until you get to the outputs of the stepper motor driver, then switch to the original guide (positive / negative pairs powering each side). The tractor beam is controlling 4 separate sections of speakers, while we only need to control 2. Couple notes: You do really have to test the transducers, the ground pole is wrong half the time. the jig that I used to do this per the directions in the instructables is included here. This print has extreme overhangs, so make sure you can dial in your supports. I used protopasta filament for this, which has slightly better overhang support but for a much higher price You can melt the coating off the magnet wire with a soldering iron or lighter, and then I found looping the wire around the peg before soldering was a great way to get a good fit and keep things in place The size of objects you can levitate is always limited by half the wavelength of the sound you are generating. The code in the Acoustic Levitator instructable (and the transducers) assume 44000KHZ, so that gets you ~4.5mm. Increasing voltage increases the density of objects you can levitate. In order to levitate plastic, you'll need pretty high voltages and to be very patient. Make sure not to go over 30 volts, or whatever the max voltage of your transducers is. Similarly, the transducers want to be a specific distance away from each other, so you may have to cut off / shim the side sponsons to get good levitation. I found that teabag material made a good spoon to hold things you want to levitate, though if I had some kind of wire mesh I would have done that. If there are any questions let me know!
With this file you will be able to print Parametric Acoustic Levitator with your 3D printer. Click on the button and save the file on your computer to work, edit or customize your design. You can also find more 3D designs for printers on Parametric Acoustic Levitator.